
If you are looking for a guide on How to create a business website then this post is what you are looking for! This post is made to help you showcase a small business; however, you can follow these steps and create your own website with different purposes.
Before you start any further, please gather your idea about the look, the structure, the content of your site.
How to create a business website
Find the suitable theme
The first step in creating a business website is choosing a suitable theme. There are many options for your site with 200+ beautiful themes. However, some theme might require more setup. You can use these following themes which are simpler: Goran, Edin, Gateway, Shoreditch, Sequential, etc.
In this guide, we will use the theme Goran. If you want to use other themes, you can also follow this guide.
Insert the first page
Every business site is made up of posts and pages:
- Posts are usually used for content that is frequently added (news articles)
- Pages are usually used for static content (contact info, about page).
It is recommended that you need to have from 4 to 10 pages. However, you can add as many pages as you want.
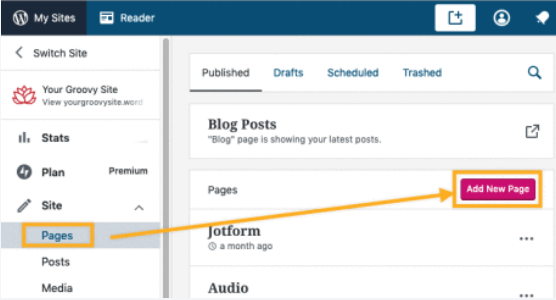
To create your first page, please go to My Site(s) → Site → Pages and choose Add New Pages.
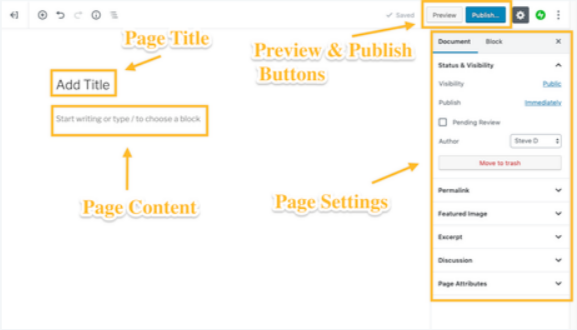
After that, you will see the WordPress Editor, in which you can create and edit your new page. In the editor, please insert your title and the content that you want to have. This image is a breakdown of what you should know within this editor.
Blocks will help you to add content to your page. Here are some most basic blocks that you need to know:
- Paragraph: used for adding plain text.
- Heading: best for adding titles.
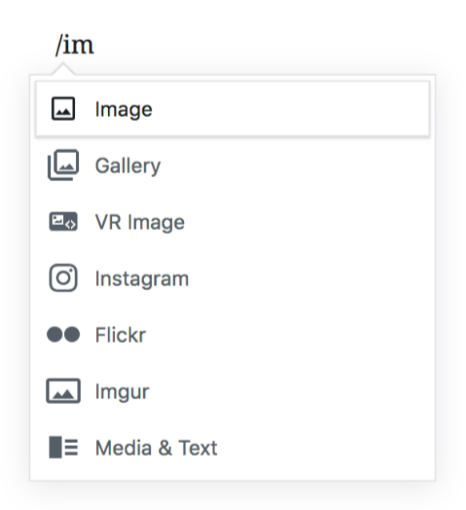
- Image: used for adding images inside a block.
- Media & Text: used for putting an image and text side by side.
- Columns: used for putting other blocks side by side in rows and columns. And many more!
In order to add a block, you need to select the ⊕ icon and search for the block you intend to add. Another way to add block is typing / and then look for the type you want.
Featured images*
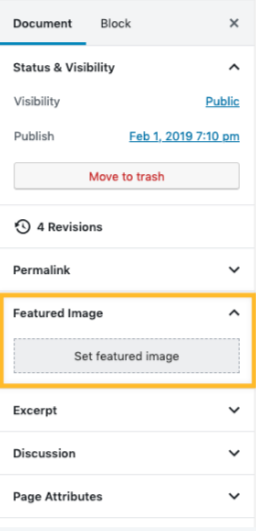
You can add an image, which can also be known as the featured image, at the top of every page in your website.
To add a Feature image at the top of each page, please go to the Featured Image section on the right side of the editor. Then, you need to click on that section and the button which allow you to upload a Featured Image will be shown to you.
Once you have finished adding blocks and images, don’t forget to click on the Publish button to officially add them on your website.
Edit your pages
In order to edit your pages, please go to My Site(s) → Site → Pages and click on the page you want to make changes and edit it.
If the theme you choose already has some content on the page, you can replace the demo text with whatever you want. You can make any changes that you would like to do. Once you have finished, please select the Update button in order to save all changes.
Generate a contact page
The contact page allows your visitors to be able to contact you directly if they are interested in your works. Please remember that you should not add your email address. However, you can use the Contact Form to receive their email and their message without showing your email.
If your theme already has a demo contact page, you can just edit the content by going to My Site(s) → Site→ Pages. If not, you can add a new page by going to My Site(s) → Site→ Pages then clicking Add New Pages and setting the title as Contact.
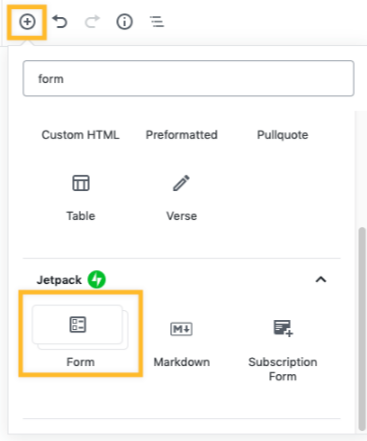
After adding the title, do not forget to add the information about how customers can contact you and when they will receive a response. Then, you need to insert the Contact Form using the Form Block. The Form Block allows you to add more fields, mark fields as required and much more.
Don’t forget to click Publish the save all the changes or publish your page.
Add other pages
Just like the previous tutorials, you can add other pages by clicking the Add button next to the Pages option. You need to repeat all those steps until you get the number of pages that you would like to have.
Set a page as your Homepage
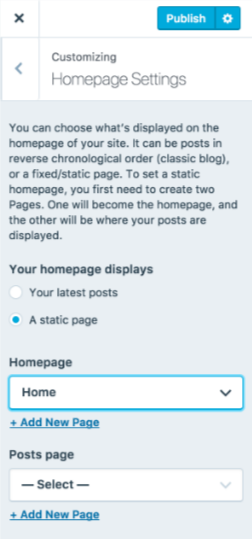
If you want your visitors to see one specific page first upon visiting your site, please read this tutorial carefully. Here are the steps you need to follow:
-
Open My Sites → Design → Customize → Homepage Settings.
-
Choose A static page.
-
You will see a dropdown menu. Please find and select the page you want to set as your homepage.
-
This step is optional. You can set one page in order to show a list of blog posts that you’ve written under Posts Page.
-
Don’t forget to select Publish so that all your changes will be saved.
Make a menu
A Menu is needed for every website, it will make it easier for your visitors to find the things they want in the shortest time. Here is how to make a menu for your website:
-
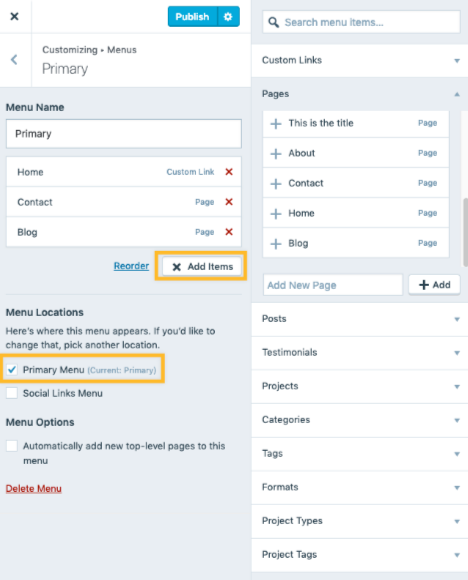
Go to My Site → Design → Customize → Menus.
-
You can either choose a menu you want to edit or make a new one. You can also edit the Primary menu which is created automatically as you create a site.
-
Select Add Items to add your pages, categories, posts, etc. in the menu.
-
Rearrange the items by clicking and dragging them in the order you want. You can also add indentation to create a dropdown menu.
-
Do not forget to get the “Primary Menu” checked under Menu Location.
To save all the changes, please don’t forget to click Publish.
Start selling your products on WordPress.com
WordPress provides you with these methods of selling your products on your website:
- Using the Paypal donation button.
- Using Simple Payments method. ( only on Premium and Business Plans).
- Using eCommerce that uses plugins, like WooCommerce (only on the Business and eCommerce plans).
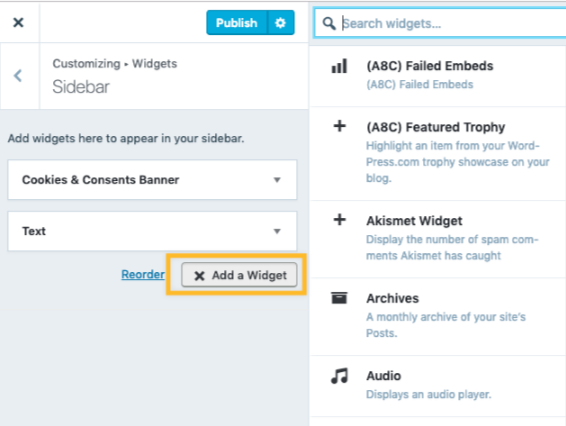
Insert widgets
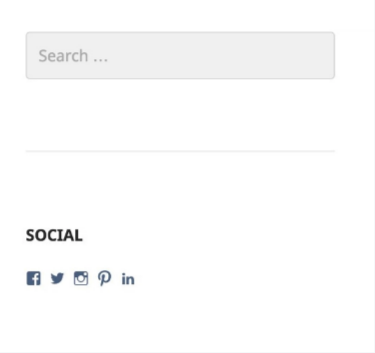
Using widgets is a great way to enhance the layout of your site. They are additional content in sidebars and footer. Each page can have different widgets. Here are some widgets that you must know when creating your site:
- Contact Info Widget – used for displaying your contact information, even an embedded Google map.
- Text Widget – used for adding any text that you want. You can use it to provide general information like an About Us blurb, and more!
- Search Widget – used for creating search bar for people to find posts, pages, and other content on your site.
- Top Posts & Pages Widget – used for showing a list of most popular posts and pages on your site.
Below are some examples of using widgets in two different areas: the footer and the sidebar on a page:
- In the footer:

- In the sidebar:
Here is how you can insert widgets to your site. Please kindly note that different themes may have different widget areas.
-
Select in this order: My Site → Design → Customize → Widgets.
-
Choose the widget area you want.
-
Select Add Widgets and the widget you want your site to have.
-
Save all your changes by choosing Publish.
Add your own brand
These following tutorials will be helpful if you want to have a better display of your brand.
Add your domain
If you are using any paid plan on WordPress.com, you can create and add a unique address, via a custom domain. In order to create a custom domain:
-
Select in this order: My Sites → Manage → Domains → Add.
-
The next thing you need to do is typing the domain you want in the search field. You can choose one of the available options in order to register your brand new domain. In the case that you already have a domain at another provider, you need to map the domain or transfer it to WordPress.com.
-
The only thing you need to do now is to follow the remaining steps. However, mapping and transferring the domains that you already have need more steps.
Custom Logo
Most of the themes allow you to add the logo to the header of your site. You only need to go to My Sites → Design → Customize → Site Identity. You can see the option allow you to hide your Site Title and Tagline. Moreover, WordPress also allows you to add the logo in the WordPress.com footer credit.
Custom colors
This option is only available in the Premium Plan or higher. In order to change to your own colors, please go to My Sites → Design → Customize → Colors & Backgrounds and the colors that are suitable with your theme will be displayed for you to choose.
If you want to change only one color, then select the color circle needed to be changed and then preselected color or click the “pick your own color” link. The color picker tool will be shown to you, it will help you to choose a color based on a specific hex value.
Share you website on social media
Sharing your website to social media sites is very important if you want to gain more customers. To provide the service you need, WordPress.com allows you to add buttons at the end of posts and pages, which can be toggled on and off. Here is an example of how the sharing buttons look like:
Sharing buttons

Adding and managing the sharing buttons for your posts and pages can be done by visiting My Site → Tools → Marketing → Sharing Buttons
The Sharing button tab has the Options section in which you can turn Sharing Buttons on or off for Pages by unchecking the ‘Pages’ or ‘Posts’ option under ‘Show sharing buttons on’. Remember to click Save Changes if you don’t want to do that again.
Connections
In order to manage social media connections and share your posts to each platform, you only need to go to My Site → Tools → Marketing → Connections.
Conclusion
If you follow all those tutorial above carefully, you will successfully create your ơn business website. We hope that this guide answers all your questions about this topic.

