
Enabling WordPress notifications in your browser helps you to quickly update new posts or blogs or any update information. All of these notifications will display on your desktop even when your WordPress tab is closed.
For example many other social networks such as Facebook Desktop or Instagram Desktop, you can obviously see the alerts from a pop-up located on the upper right corner of the screen to notify you whenever there are any new notifications. There is no need for you to be active right at the time that notification is happened.
Most of WordPress websites process content quite frequently. As WordPress provides with unlimited information such as blogs, community forums, social networking websites and so much more, you had better not miss any news from it. In this article, we will clarify the step-by-step way to enable desktop alerts for your WordPress browser so that you can easily access any updates.
Nevertheless, browser notifications is supported by only one device at the present. If you expect to use on your phone, you may try on mobile applications.
Step 1: Install the latest version of Chrome or Firefox
Remember that only by using Google Chrome or Firefox you can enable WordPress.com notifications. You absolutely can activate WordPress notifications on both browsers. However, we highly recommend you should use the one regularly used due to the fact that it could not be useful to see the same data so many times.
Step 2: Log into WordPress.com
Log into WordPress.com in your web browser. Once you own a WordPress account you can make any necessary changes you need.
Step 3: Enable the Browser Notifications
First, you go to Notification Settings. Next, you will see the Browser Notifications panel then press the Enable button.

Step 4: Allow to receive notifications
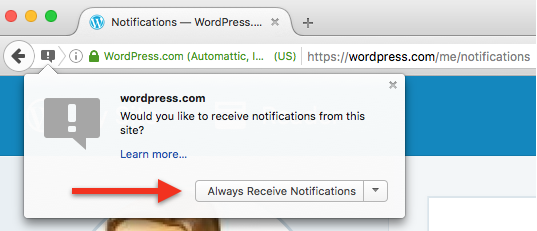
Normally, there will be a pop-up window to confirm whether you want to receive notifications or not. If you activate WordPress notifications on Chrome, select Allow. On the other hand, if you use Firefox browser, choose Always receive notifications.
- For Chrome browser:

- For Firefox browser:
Step 5: Choose activity preferences
After finishing all the steps above, you will be required to choose activity preferences that you want to be notified by WordPress in the Notification Settings, which includes:
- New comment notification
- Comment replied notification
- New likes on your posts and comments
- New users follow your WordPress account
- Achievements
- Mentions
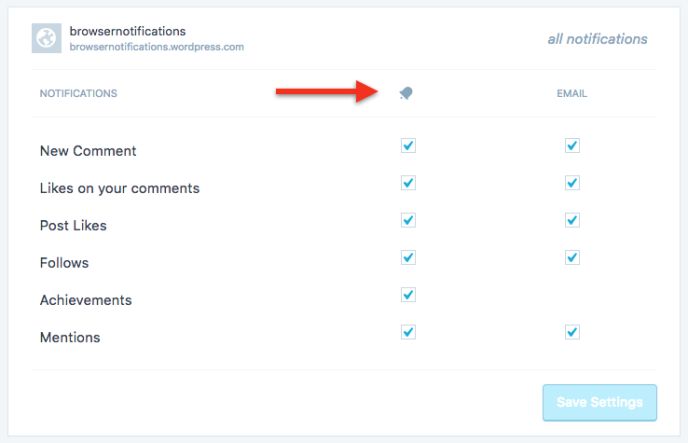
Unless you do not want to receive notifications of an activity for instance new followers, you are able to deselect and WordPress will not announce you if there is anyone subscribing you on your account.
If there is any problem with that the notifications are not running properly:
- Restart the browser - this solution is normally the simplest way to do first, especially when your PC has been running for a long period of time.
- Carefully check to make sure that the browser is work. Sometimes the browser returns false which lead to that you can not access any website. The WordPress tab does not need to be open, however your website browser itself must be working.
- Ensure that you had already enable the browser notifications. Disable then re-do all the steps if there is a report of incomplete actions needed.
Conclusion:
All the steps above is about allowing WordPress.com to send notifications on your Desktop. We hope that this instruction is helpful for you to easily approach to if there is any announcement from WordPress.com.

