Custom DNS records are known as special and important settings which can change how a domain works. In fact, Custom DNS records ads in connecting your own domain with several third-party services which are not hosted on WordPress, including email providers.
In this article, we will show you more about Custom DNS records and explain how Custom DNS works on WordPress in details.
How Custom DNS work
Reasons why editing Custom DNS records
You might wish to edit your DNS domain if you are in the following status:
-
You already registered a custom domain on WordPress but you would like to point it to another different service.
-
You want to transfer your current domain to WordPress from other providers.
-
You already registered a domain through other providers and would like to point it to WordPress site.
-
You have to verify your site ownership.
-
You need to configure the custom emails with another third-party provider.
View your DNS records
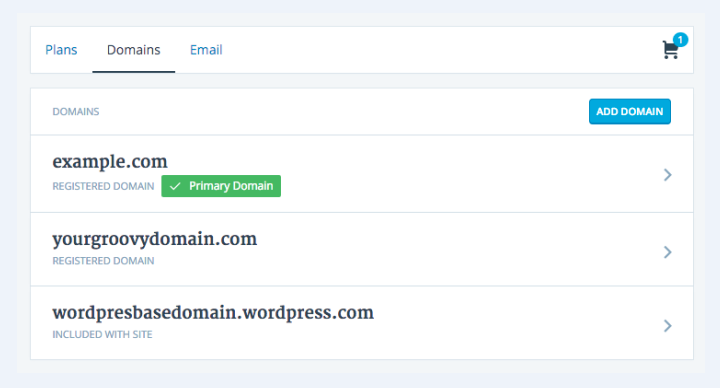
Take note that your DNS records are situated in the Domains page. Each custom domain added to the blog can have its section.
As you choose a domain from your list, the screen will inform the domain information and a series of settings that you are able to edit.

-
Choose Name Servers and DNS.
-
Next, head to DNS Records.
In case you have your domain and insert Domain Mapping, you are able to view DNS Records at once, instead of viewing Name Servers and DNS.
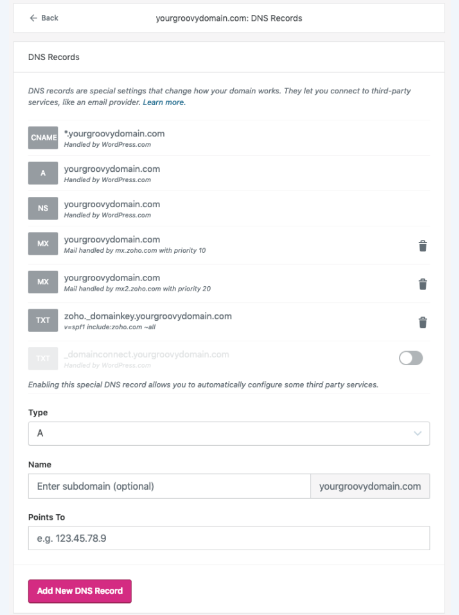
Choosing DNS Record can provide you with the current existing DNS records for this domain.
In order to get rid of DNS records by pressing on this trash icon or even inserting a new record.

How to add and edit Custom DNS Records
Add DNS Records
-
You can view records set located at the top of the DNS page by default.
-
In case you need to insert different DNS records, you will add them to the current records.
-
Custom DNS records consist of many pieces of information. In fact, the real information demanded will count on the record type you want to add.
If you want to insert a new one, you can follow these steps below:
-
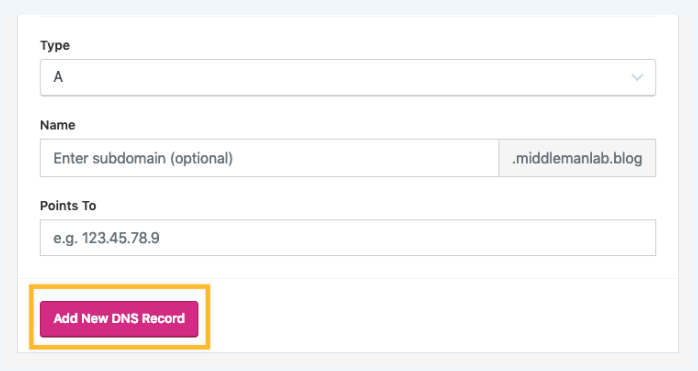
Step 1: Go to the DNS record type from your drop-down list.
-
Step 2: Fill in your remaining information from the services you insert the record for.
-
Step 3: Head to Add New DNS Record.

Edit DNS Records
In order to edit your current DNS record, you have to cancel the previous one by pressing on the trash icon.

Change name servers to Point to WordPress
-
All of the domains that are registered through WordPress account are able to WordPress’s name servers.
-
In case you can make changes to the servers’ name or in case you can transfer in your current domain from other providers, you might have to modify the servers’ name so that your domain will point correctly to the WordPress site.
-
Go to Domains Page, you can easily opt for your domain you really wish to edit and update, press on Name Servers and DNS.
-
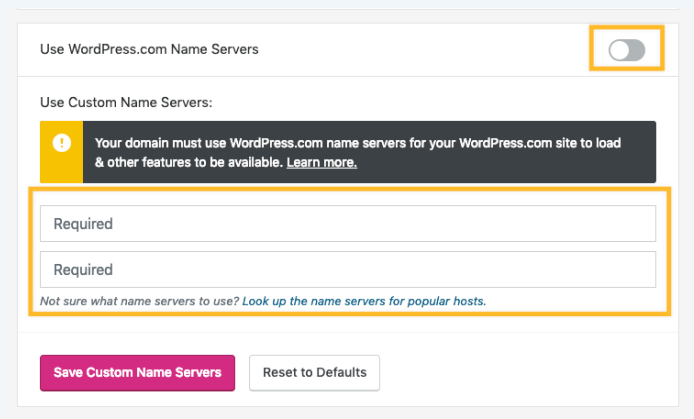
Next step, you will enable Use WordPress.com Name Servers selection.

Change name servers to Point away from WordPress
-
If you really want to apply your registered domain with WordPress, followed by a new host. Next, head to My Site -> Domains, choose the domain you really wish to edit.
-
Opt for Name Servers and DNS.
-
Get the option Use WordPress.com Name Servers disabled.
-
Type the servers’ name you wish to use. Those name can be included from your provider or a new host.
-
Choose Save Custom Name Servers.

Enable the _domainconnect discovery record
-
If the domain is using WordPress’s name servers, you can see there is an option to help enable a DNS record that are mentioned as
_domainconnectrecord in your DNS manager. -
If the record is activated and lets you connect with another service without asking you to edit DNS records manually.
TXT Record Character Limit
-
You should bear in mind that the DNS editor allows up to about 225 characters for the TXT records.
-
If you receive any errors which the TXT records are too long or invalid, you can check whether there is a selection to apply a 1024 – bit record from your service you are striving to connect.
Conclusion
With our above article on how Custom DNS words, we hope that you will understand more about the Custom DNS and its operation on WordPress.


