
You can set up an email using your domain as the "after @" part, like [email protected] for example. WordPress.com supports a number of email providers that you can choose the one which best suits your purposes and financial conditions. For more details, check out this writing to know how to add an email through other providers on WordPress.
To add an email through other providers on WordPress
Email providers supported by WordPress.com
By using email forwarding, you can use your domain as your email address and all the emails you receive will be forward to your selected email. Meanwhile, if you reply to emails, it will be sent from your personal email, not the one with your domain name.
As mentioned before, you can buy an email hosting from another provider and connect with your domain. There are some common providers like G Suite, Zoho Mail, GoDaddy and Microsoft Office 365 that you can use. In case you use the service from others, do not panic because WordPress.com still supports it.
After setting up an email hosting account, to send or receive emails, you still need to complete another step, which is adding the DNS records for the domain. It is varied from one to another due to the provider you select. If you already registered email hosting with another provider and you want to change to WordPress.com now, it is highly recommended that you should get assistance from your service provider to know the custom DNS records for your email then head to the next part.
Setting up Email from other providers
In case your email provider is none of the above, you need to get the DNS records from your provider. If you are not sure how to obtain it, you can look for help from your provider support team by sending them an email. The content of the email needs to include the following idea:

The DNS records may contain multiple MX records together with an A record an/or a CNAME record, then you can follow these steps to add them to your domain.
Step 1: Choose a domain
Go to WordPress.com and sign-in to your account. After that, click on My sites then scroll down to the Configure section and click on Domains. The list of all of your domains will appear that you need to open the one you want to add an email. If you have more than one sites, select My sites and Switch sites respectively to choose the site including the domain you want.
Step 2: Click on DNS records
The settings page for the domain will be displayed that you have to press on the Name Servers and DNS which stays below the Email option. The system will move to another page, hence, click on the DNS records and move on to the next step.
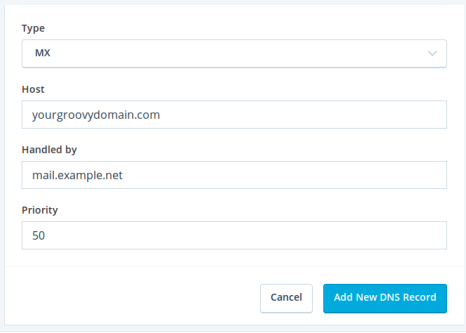
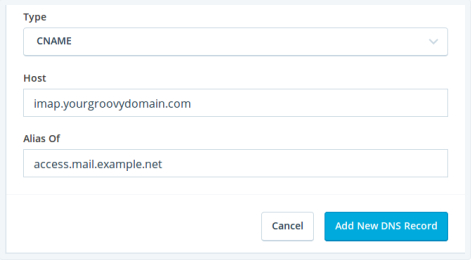
Step 3: Enter in the fields
The Type field is a drop-down menu that you need to click on it and choose the type of record you gonna add. After that, fill in the below fields the information provided by your providers, consisting of Host, Handled by and Priority. In the Host and Handled by boxes, you must add in an URL while in the Priority, enter a number. If you have completed all the information, click on the Add New DNS record button to save it. This is an example of how the record may look like:
For each record added, you need to repeat this step then it is possible that you may do it for at least three or four times. When you are done, wait for the system to work and your email may be ready to work for a few hours later.
Conclusion
To sum up, this topic has given you the guideline of how to add an email through other providers on WordPress. This is a simple process that you can easily complete it within five minutes. Illustrated images are also included in this post to help you have a clearer view of what you have to do in actual. Hope that you can appreciate my effort and gain some benefits from this writing.

