When you first sign up for an account on WordPress.com, you will be provided with a free address with .wordpress.com in the URL. If you want, you can register a new domain without the appearance of .wordpress.com. For more details, check out this topic to know how to register a new domain on WordPress.
Before going into steps, there are some notes that you should know:
- If you want to register for a domain, you must use one of the WordPress plans which you have to pay a monthly fee to enjoy it.
- You will have a free domain name for one year of registration when using a plan
- There is no limitation for the number of domains you can register, however, for each new one, you have to pay extra fee separately.
- There are a number of extensions supported by WordPress.com that you can use to register a domain, like
.academy,.agency,.actor, etc. - If you have already owned a domain, you can register them with a different registrar and map it to your WordPress.com site.
- The
wwwpart will be automatically hidden from all URLs available on WordPress.com
To register a new domain on WordPress
Step 1: Head to Domains
Log-in to your account on WordPress then select My sites. After that, click on the Domains under the Configure section. Be noted that if you have multiple sites, you must choose the site you want to sign up the domain by going to My sites and Switch site respectively.
Step 2: Choose Add Domain
You will see all of your domains appear on the screen display then press on the pink Add domain button which is next to the Change primary button like in the picture below:

Step 3: Fill in the domain name you like
You need to enter the domain title you like in the search bar to check whether it is used by other users or not. In case you have no idea for the name, you can add the keywords only and the system will provide you some suggestions related to these words. Besides, you can select More extension to find the domains matching your keywords as well.
The search result with details will be displayed right below the search bar that you can read through them and choose the one you want to use. The one which is the best match to your keywords will appear first then if you see the domain you want to add, click on the Select button under it.

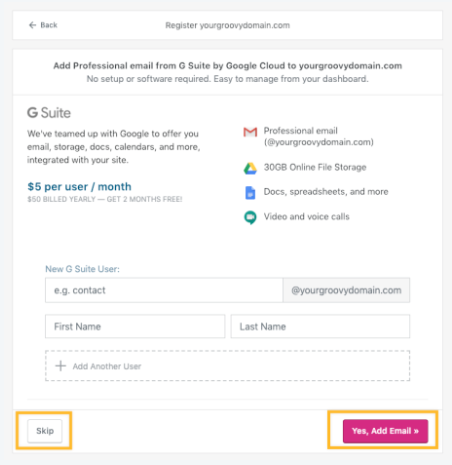
Step 4: Select Add email
The settings for email will be shown that you need to fill in the fields and press on Yes, add email. You can choose Skip if you don't want to add it immediately either and set up it later if you want as well. Moreover, you can decide to public your contact information by choosing Register publicly or Register privately with Privacy Protection if you want to keep it private otherwise.

Step 5: Enter in the Domain Registration Information
Add the needed information in the Domain Registration Information section. You should check it carefully before go to the next step because the details need to be accurate. You also have to verify your email address to confirm that it belongs to your ownership.
Step 6: Complete the checkout
To finish the registration, complete the checkout to pay for the domain. If you have already added credit information, you can see a notification of how your domain is bought using your credits.
Conclusion
In short, this writing has provided you with the process of how to register a new domain on WordPress. Notes and images are also included in this topic to help you understand what to do and easily follow the instructions. Hope that you find it helpful and enjoy the reading time.


