
If you already have a domain and you want to use it with your site on WordPress.com, it is achievable by using the domain mapping. Particularly, if you buy a domain from other providers, like GoDaddy or 1&1, you can point it to load WordPress.com site and still pay the current registrar to maintain it every year. For more details, follow this article to know how to add a domain mapping on WordPress.
To add a domain mapping on WordPress
Step 1: Go to Domains
Get access to your account on WordPress.com and head to My sites. After that, click on the Domains staying under the Configure section.
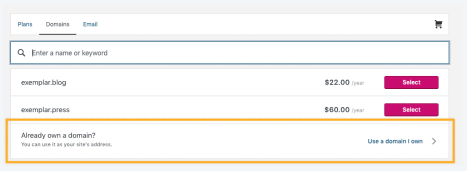
Step 2: Choose Use a domain I own
You will see all of your domains on the screen display then click on the Add domain button to continue. The system will give you some suggestions for your domain that you have to press on the option below them, which is Use a domain I own. The following picture is an example of what your screen display may look like, hence, select the option which is in yellow highlighted.

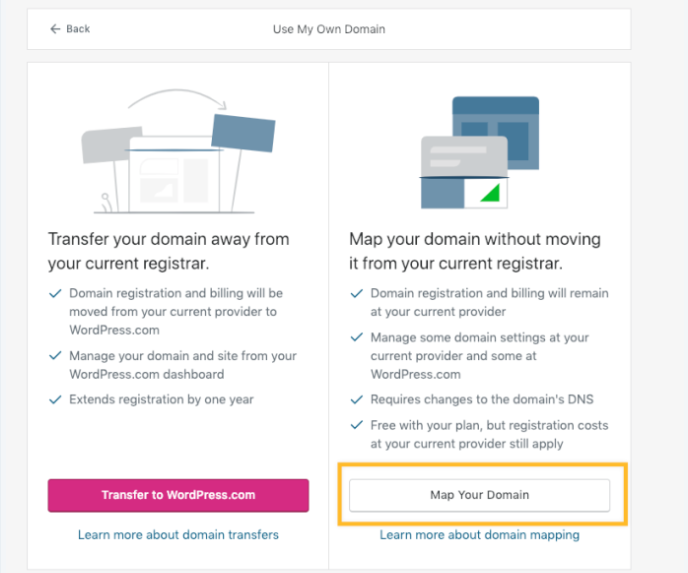
Step 3: Click on Map your domain
In the next page, you will have two options to choose then press on the one named Map your domain. You can read the short description about it or click on Learn more about domain mapping if you want to know more information.
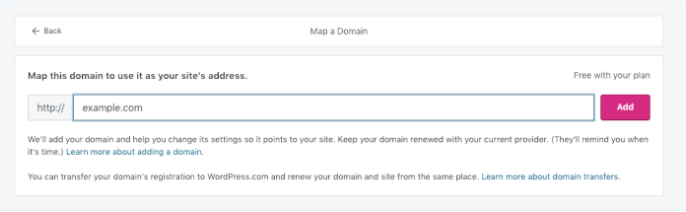
Step 4: Fill in the domain then check out
There is a field named Map this domain to use it as your site's address that you need to enter the domain you want to map in this box and select Add after that. Next, the check-out page will appear that you have to fill in needed information and complete it.
Step 5: Check for the work of domain
If you have done all the things above, you still need to check for whether your domain is pointed or not by changing the name servers with your current domain registrar if you haven’t already.
Adjusting domain's name servers
The name servers indicate the site that the domain should point to. Thus, you need to replace the company where you buy the domain with WordPress and you can do this by using one of three ways below.
Option 1: Manually update name servers
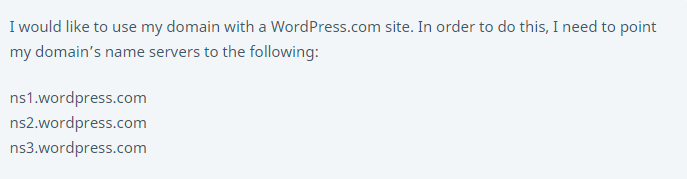
You can do it on your own by sign-in your domain registrar account and change any existing name server into one of these three domain name server (DNS) addresses:
- ns1.wordpress.com
- ns2.wordpress.com
- ns3.wordpress.com
Be noted that you must delete the old name before adding a new one (WordPress.com name servers).
Option 2: Contact Domain registrar
If you are afraid of messing up your site, you can contact your Domain registrar to find some help or supports. You can send them an email to call for help and the content you can use as follows:
Option 3: For users of GoDaddy or 1&1 Registrar
If you purchase a domain from GoDaddy or 1&1, you can use the Connect your domain option to configure the DNS changes. Firstly, select My sites then Domains and click on the one you want to adjust. The detailed information of the domain will appear then click on the Connect your domain option. In the next page of settings, you will see the Configure Your Domain Settings button that you need to press on it. Next, go to your domain registrar (or DNS provider) site and sign in your account then confirm that you want to point your domain to WordPress.com.
After editing name servers
If you have completed the adjustment, there are some notes that you should aware of:
- It may not work immediately then you can wait up to 72 hours for the domain name servers to fully update. Besides, you may need to clean up the cache of your browser as well.
- You can start setting up your primary domain if your site loads when you visit your domain.
- In case you use extra services like email or subdomains, you may have to reconfigure the DNS settings
- If you change your mind and want to point your domain to other sites, you can get access to your registrar account and remove the DNS records
Conclusion
In short, this writing has introduced to you how to add a domain mapping on WordPress. Notes and illustrated images are added to this topic that may help you understand the steps more clearly. Hope that you have good reading time and gain some benefits from it.

