
G Suite is an app which provides you with popular features of Google like Gmail, Google Drive, Google Hangouts, etc. but with a better experience than the normal version. You can integrate your existing G Suite account to your site on WordPress.com, however, you still need to pay Google to enjoy its services. In other words, you cannot transfer the management right of your G Suite account from Google to WordPress.com. In case you want to know how to add an email with an Existing G Suite Account on WordPress, do not skip this writing.
To add an email with an Existing G Suite Account on WordPress


Set up G Suite automatically
Step 1: Copy TXT Verification record
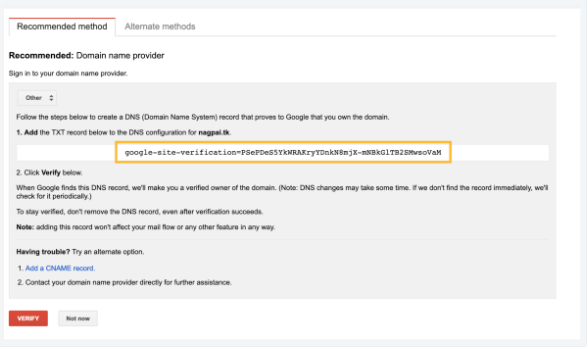
Open your Google Admin console and click on Start setup or Verify domain. The Verify your domain page will appear then find the Log in to your domain host’s website section. In case, there is nothing like this on your screen display, press on Choose a different method and Add a domain host record (TXT or CNAME) respectively. Tick on the boxes corresponding to two options: I have successfully logged in. and I have opened the control panel for my domain.. Then you will see your Verification record stays under the Value/Answer/Destination field, thus, copy it and move on to the next step.
Step 2: Pick a domain
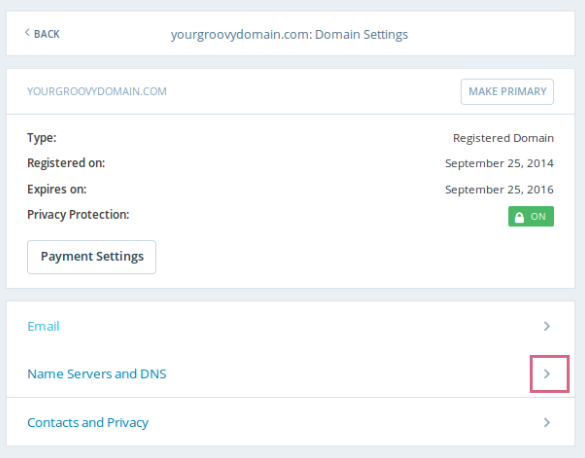
Log-in to your account on WordPress.com and click on My sites. Next, choose Domains under the Configure section. You will see the list of all of your domains then open the one you want to add a G Suite.
Step 3: Choose Name Servers and DNS
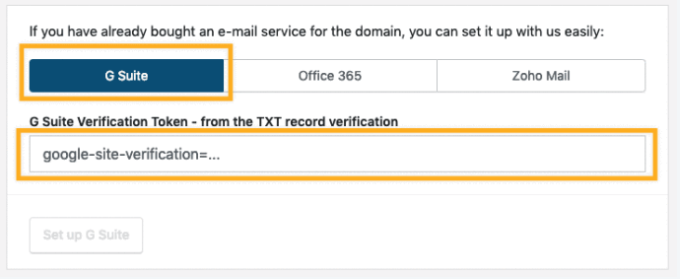
Click on Name Servers and DNS and G Suite button respectively. Below it, you will see a field to enter the TXT record verification that you have to paste the record you've copied in the first step in the box.
Step 4: Press Set up G Suite
After filling in the box, the Set up G Suite button will be lighted up that you need to click on it to complete the process.
Set up G Suite manually
Step 1: Verify your domain with Google
If you have already verified your domain with G Suite, you can move on to the next step to save time. Otherwise, set up your account with G Suite until you reach the stage when the system requires you to verify your domain, select Confirm that you own the domain. A pop-up box will appear that you need to press on Continue. Next, click on the drop-down menu Select your domain registrar and choose Other which stays at the end of the list. Copy the verification record and do not close your Google Dashboard tab.
Open a new tab and sign in to your WordPress.com account, then click on My sites. If you have more than one site, click on Switch site and choose the one containing the domain you want to add G Suite. After that, go to Configure section and press on Domains. Select the domain you want from the list and you will see the settings page for it appear. Click on the option below the Email which is Name Servers and DNS.
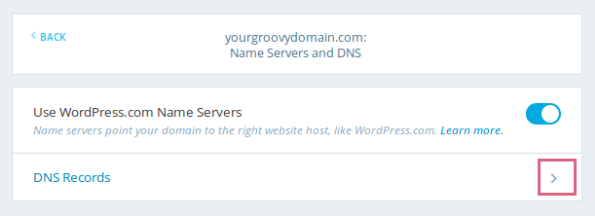
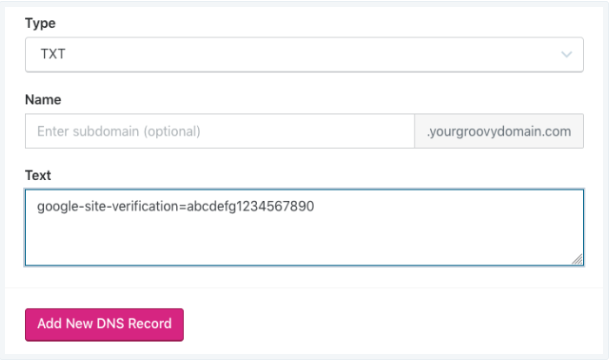
In the next page, select DNS records then you will see more settings. In the Type section, click on the drop-down menu and choose TXT while skipping the Name field. Paste the verification record you've copied from Google and press on the Add New DNS record button.
It might take a while for the system to work then you can come back to your Google Dashboard in some minutes. Select Verify at the bottom of the page then you will see the Congratulation page that you must click on Continue to move on to the next step.
Step 2: Insert MX and TXT records
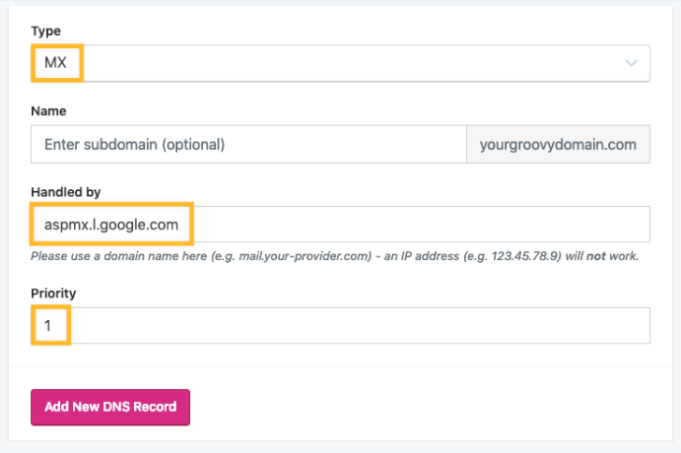
From My sites, head to Domains and select the domain you want to set up G Suite. In the settings page, press on Name Servers and DNS and choose DNS record respectively. Click on the drop-down menu and select Type as MX and leave it blank for the Name box. Next, you need to fill in these following fields:
Handled by: the box that you need to enter the record value, such asALT1.ASPMX.L.GOOGLE.COMPriority: where you have to add the priority number
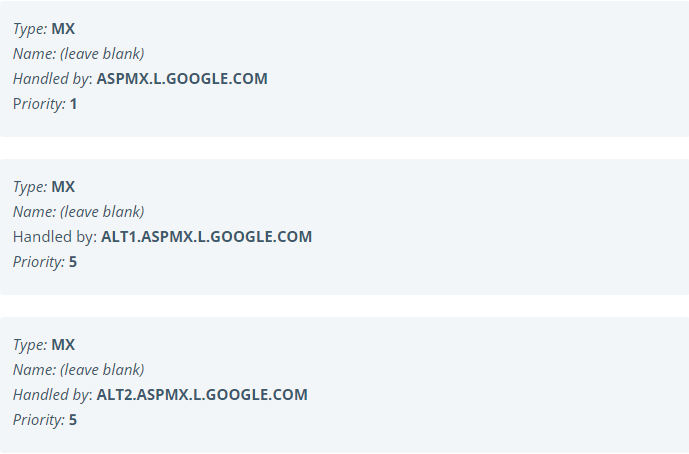
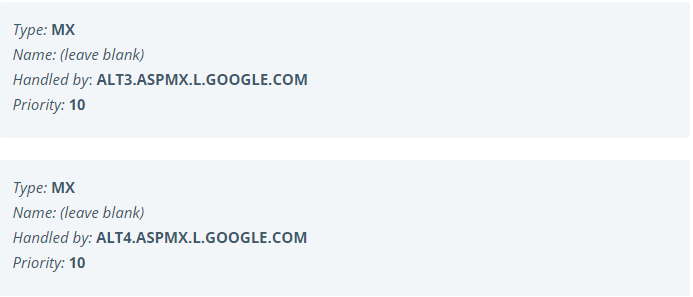
After that, click on the Add new DNS record and you must repeat it 5 times to add all the below MX records:
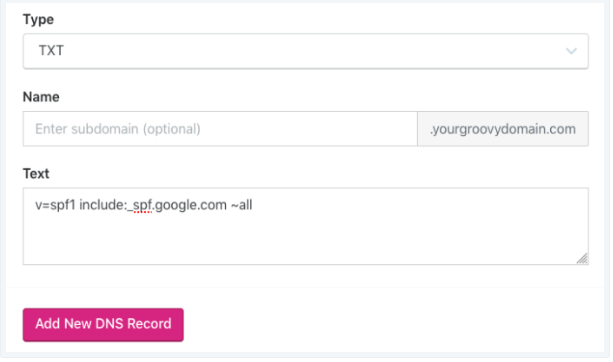
The final step is to add TXT record that you should start with choosing Type as TXT. Then leave the Name blank and enter in the Text box the following code: v=spf1 include:_spf.google.com ~all. Click on the Add New DNS record to finish and wait for some hours for your email to start working.
Conclusion
In short, this writing has shown you the instructions of how to add an email with an Existing G Suite Account on WordPress. There are two ways that you can apply, however, the first one is recommended to use because it is easier and faster to finish. Illustrated images are also included in this topic to help you imagine how it looks like in actual. Thus, with such an effort, hope that you find this writing understandable and useful.

