It is a commonly known fact that a website's overall success is remarkably influenced by how it appears in search engines, especially giants such as Google, which results in how many clicks it receives every month. WordPress.com equips users with built-in statistics that provide you with a lot of useful insight about your site's traffic. It takes great care of all the complex but necessary SEO tasks such as indexing your site so that you could focus on building top notch content for your blog.
However, there is an extra step you could take if you would like to gather even more information on your site overall traffic performance, which is verifying your site with Webmaster tools like Google for example. Tools like Google Search Console helps you acquire more information about your website’s current rankings on Google Search, as well as helping you stand out among thousands of similar websites on the net by enhancing your website’s appearance on Search Engine Results Pages (SERPs).
If you are a stats junky, read below for a quick and easy-to-follow instruction on How to verify your domain with Google on Wordpress. A few minutes of setting up will do you wonder for goods. So follow through!
- Note:
For most websites, it is necessary that you added a hidden meta tag to your site before you could verify it for webmaster tools in general and Google in particular. Wordpress provides some very useful specific tools that helps you add this meta tag to your site.
If there are multiple different domain names pointing to the same site, it is recommended that you only verify the primary domain.
Step 1: Log in to Google Search Console
First of all, after you logged in to https://search.google.com/search-console with your Google account.
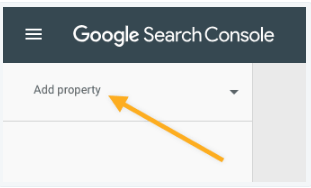
Step 2: Click Add Property
Next, in Google Search Console, access the Add Property section.
Step 3: Select URL prefix
A pop-up window will appear which asks you to Select property type. Select the URL prefix option on the right, as the new Domain option would not work.
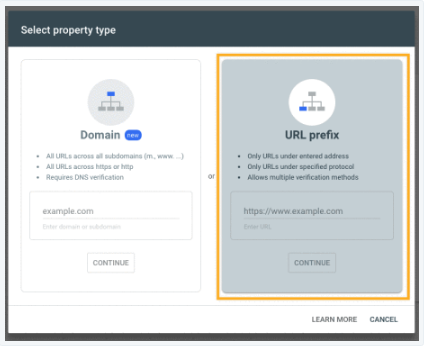
Copy and paste your WordPress.com website address in the textbox (including https://), then click the Continue button.
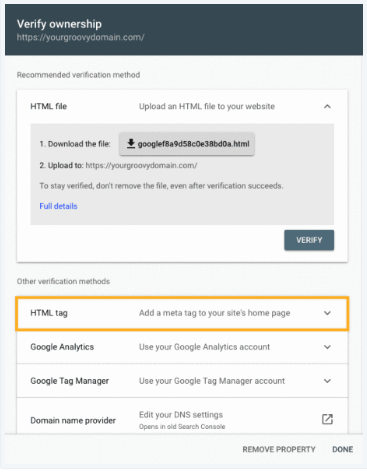
Step 4: Click on the HTML Tag
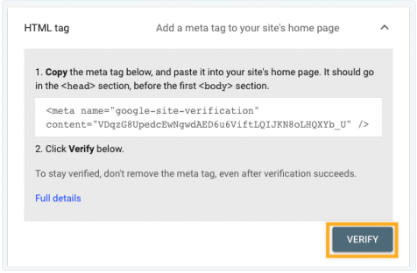
Next, click Add a Property. In the Verify ownership pop-up, scroll down to the Other verification methods section and select the HTML Tag.
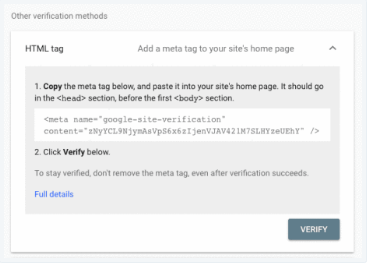
Step 5: Copy the HTML code
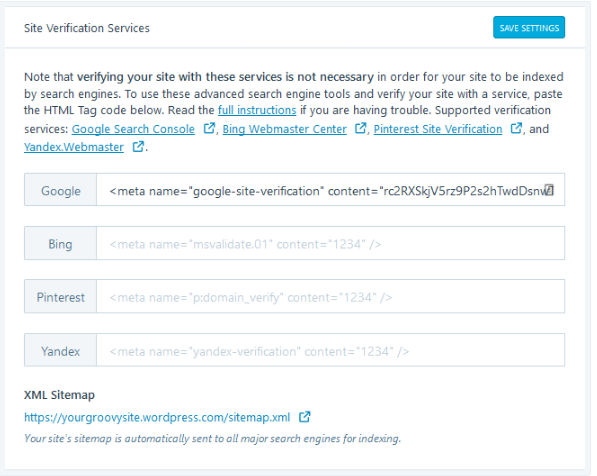
Follow the instruction and copy the entire meta tag shown. Its format looks something like this: <meta name="google-site-verification" content="rc2RXSkjV5rz9P2s2hTwdDsnwTu4tD-gmruKUrqBGjs" />.
In a new tab or new window, open your Wordpress.com site's Settings page. (Remember to leave the verification page you are viewing open)
Step 6: Paste the HTML code into the Google field
Click the Traffic tab, in Site Verifcation Services, paste the HTML code you just copied into the Google field. Once you are done, click the blue Save Settings button.
Step 7: Go back to the Google Search Console verification page and click Verify
Finally, go back to the Google Search Console verification page and click the Verify button.
Conclusion
Above is a detailed, step-by-step instruction on How to verify your Domain with Google on WordPress. Hope it helps you make the most out of your Wordpress.com resource.


