Overview
Insert audio to your pages can help your readers have another way to approach the information you want to share. Audio file can be added on WordPress.com in many ways.
In order to show you how to do it, this informative post on How to upload audio to your site can be a useful help. Here are the ways we offer:
Upload audio to your site
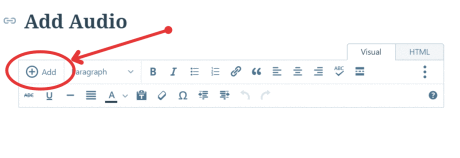
You are allow to upload the audio files to your site when you get the Personal, Premium or Business plan. These above plans permit you to upload .mp3,.m4a, .ogg, or .wav files to your site. Firstly, you need to create a new post, a new page or edit an existing one, then click Add button and select Media.

Secondly, Media Library will appear. Select the desired audio file, or choose Add New to select a file from your device. Edit button can be used to view and change the file details:

Finally, Edit option allows you to create titles, captions, and description. When the settings satisfy you, choose Insert.

There will be a shortcode shown in the post editor. It would show as a playable audio embed on your site.
Embed audio from a link
You can add a link from your site to an audio file outside. There are two cases. The first is uploading the audio file such as .mp3, .m4a, .ogg, or .wav to a server then use shortcode to link to it. The second case is more simple if you already found an audio file because you just need to copy its URL.
In case you has the URL and just paste it to the audio file, the Editor will recognize it then convert it to shortcode. However, if the editor does not recognize the file as audio, you can use your own shortcode.

For example, a shortcode as belows:
[audio src="http://en-support.files.wordpress.com/2014/10/istock_audio.wav"][/audio]
- To loop your track or playlist, add loop=yes to the shortcode:
[audio http://en-support.files.wordpress.com/2014/10/istock_audio.wav loop=yes]
- To auto start the audio when visiting page, add autoplay=1:
[audio src=http://en-support.files.wordpress.com/2014/10/istock_audio.wav autoplay=1]
- To add both autoplay and loop, adding both the codes:
[audio src=http://en-support.files.wordpress.com/2014/10/istock_audio.wav autoplay=1 loop=yes]
Note that in case your current browser does not support HTML5 audio, or Flash Player is not installed, a direct download link will be shown instead of the player.
Audio Widget
You can insert an audio player as an Audio Widget in the sidebar or footer of your site, you can use both an audio file you’ve updated and an audio from a link.
Create a download link
This action requires your readers to save and play the sound file on their own devices. If you upload or link a file in somewhere else, please be concerned about the copyright holder.
SoundCloud or Audiomack player
You can embed audio file with the Soundcloud Audio Player.

You also can use Audiomack Audio Player.

Add Audio playlists
It’s a much better if you can add your playlist to the sidebar.
Go to My Sites → Design → Customize → Widgets in your site’s Dashboard, add the Music Player widget into a widget area. Then, click Choose songs to upload your audio files.

Dark Styling & Customizing the Audio Player
You can change between the dark color and the light color by inserting style=”dark” to your shortcode ( which is generated with the playlist editor above). For instance:
[playlist ids="123,121,119,117,115,113,111,109" style="dark"]
Related Post:


