
Making a business website in Wordpress is like another channel for your business to reach the market. If you own a firm but have yet to have a website, you should consider starting now.
Apart from other channels such as social networks, a business website can engender more clients throughout all aspects of the customer acquisition cycle. There are several beneficial reasons affecting your decision of creating a business website:
- The cost for opening a website is low depending on your plan for your site.
- You totally are able to design your page as desire in the most logical and convenient way since WordPress supports you with available themes and format.
- Your potential customers can easily discover you through SEO as they are looking for what sort of businesses can be a solution for their problems on the internet.
- By accessing the website, customers find it easy to locate the information especially your contact information to reach out to you either through email or the phone.
So, what are you waiting for not kick off a site of your firm right now? This following article is to help you with creating your own business website.
One more tip before you start, it will be better if you already imagine yourself what your website is going to look like, its structure, theme, color, etc. What content and information that you want to deliver to your customers, how they can find you. This will help you decide what pages to add, and give you an idea of the appearance of your site.
Choosing a Theme
The very first step is choosing a theme for your site. There are a number of options you can get as WordPress has hundreds of different themes. Some recommendations for you:
- Goran: wordpress.com/themes/goran
- Edin: wordpress.com/themes/edin
- Gateway: wordpress.com/themes/gateway
- Shoreditch: wordpress.com/themes/shoreditch
- Sequential: wordpress.com/themes/sequential
The following steps are set up by Goran theme. However it is similar to others so keep going.
Adding Your First Page
One site is technically made up of Blog Posts and Pages.
- Posts are for content that is added often, like journal entries, or news articles.
- Pages are for static content, like contact info, or an about page.
There is no limit for how many pages you have, so you are free to create pages on your site.
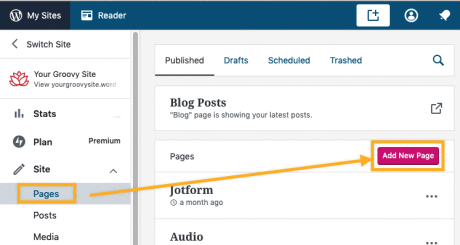
To get started, going to My Site(s), select Site from the sidebar menu then choose Pages. In the Pages tab, click the Add New Page button.
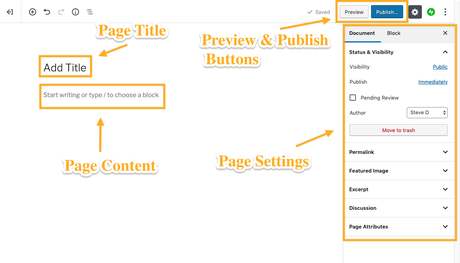
This will move you to the WordPress Editor, where you’ll create and edit the new page. Imagine what you want to introduce to your viewers about you new page, describe who you are or what your business does in the “About Page”.
In the editor, go ahead and insert your own title and content for a page on your site. Here’s a breakdown of some of the essential sections within the editor:
Blocks are where you add content, modules that contain various content, such as paragraphs, images, galleries, audio and more. Some basic blocks you might want to add could be listed:
- Paragraph: This is a basic block that adds plain text to your page or post.
- Heading: These blocks are good for adding titles within your post or page for breaking up your - content.
- Image: Lets you add images inside a block.
- Media & Text: This block lets you put an image and text side by side.
- Columns: This block lets you put other blocks side by side in rows and columns.
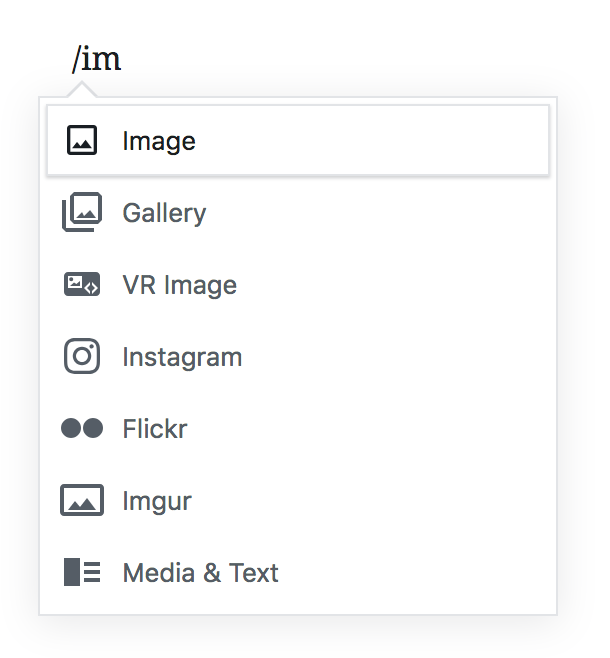
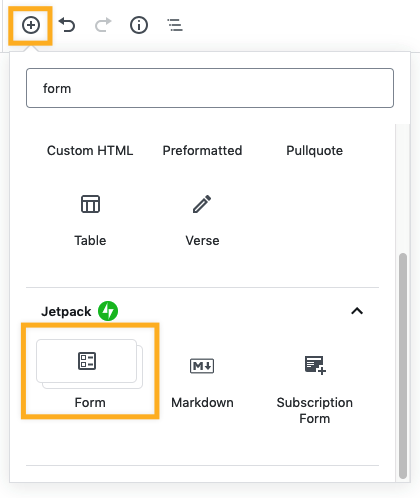
To add a block, click on the inserter icon ⊕ and search for the block you want. You can also add blocks by typing / and then searching for the block you want, like this:
Figured Images
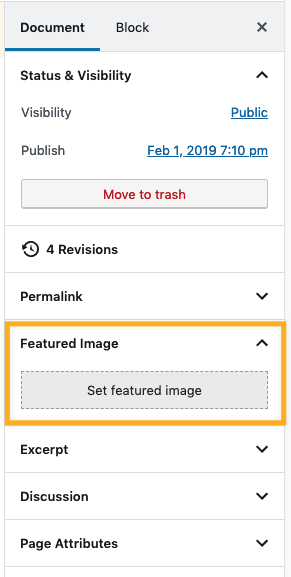
At the upper side of each page, you can add Featured Image. Each theme has different uses of Featured Images. For example this Goran theme uses Featured Images as the image at the top of each page. And it may show differently if you choose another theme. To set a Featured Image, on the right side of the editor, click on the Featured Image section, and you’ll see a button allowing you to upload a Featured Image.
After you’re done adding blocks or images, hit the Publish button to add that page to your site. You’ve successfully built the first page on your website.
Editing Pages
For users who already have some pages added, or if the theme demo created some for you, you can go to My Site(s), select Site from the sidebar menu then choose Pages. You can see all the pages that you’ve got. Click on the About page to edit it.
If the activated theme has demo content, you can replace the example text with your own text and make any changes you’d like to. After done, hit the Update button to save your changes.
Creating a Contact Page
Some themes will add a Contact page automatically and some will not. If you see a Contact page already, go to Pages tab and edit your contact address directly instead of creating a new one.
With the Contact page, if the customers feel interested in your products or necessary to ask for more information, they can contact you directly. On the Contact page for your site, we recommend you don’t include your individual email address. Having your email address publicly visible can attract spammers. Instead, you can use business email address or better is a Contact Form on your site. When visitors fill out the Contact Form, you’ll receive an email with their message, but they won’t see your email address.
On the other hand, if the theme does not make the Contact page available for you, add one as you did with the first page. Go to Page tab then on the right side, click Add New Page. Set the title of the page to Contact.
After adding the title, add some text explaining how visitors can contact you, and when they can expect a response. Next, add a Contact Form by using the Form Block.
You can edit the Form Block to include more fields, mark some as required, and so on. Give your contact page a featured image if necessary. Then when you’re ready, create your Contact page by publishing it using the Publish button.
Creating Your Other Pages
If you have other pages that you’d like to add to your site, just as we did before, using the Add button next to the Pages option to add a new page .
Repeat this step for every page you’d like to create on your website. You can choose to add as many or as few pages as you expect.
For example, you may want to create a page called “Home” that contains static information to visitors on your site.
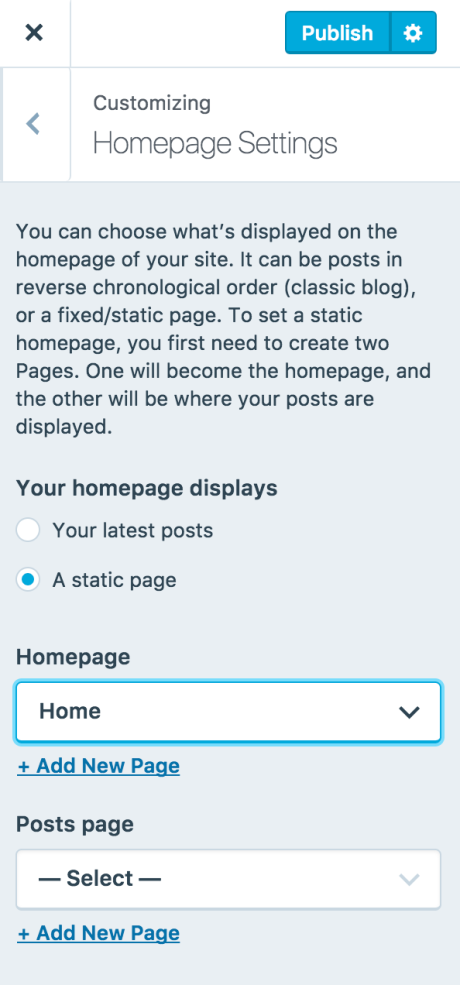
Setting a Home Page
By default, many WordPress.com theme’s show a list of your latest blog posts on the home page. However, you can choose your homepage which is the first thing that visitors can see when opening your site.
To Set a Homepage:
- Go to your My Sites → Design → Customize → Homepage Settings.
- Select A static page
- In the dropdown menus, select the page you want to use as your Homepage.
- Optionally, you can also set another one of your pages to display a list of any blog posts you’ve written under Posts Page.
- Click Publish to save your changes.
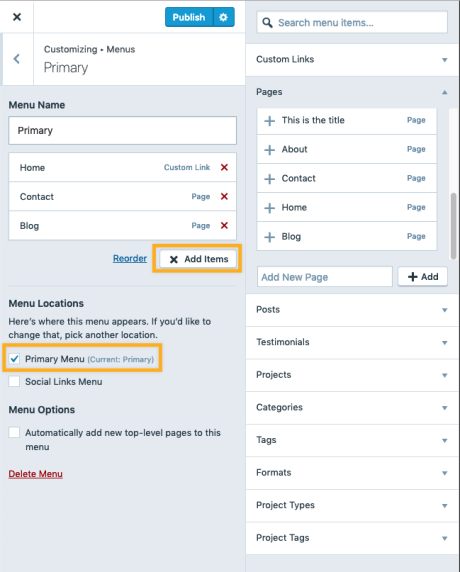
Creating a Menu
The Menu bar can provide a way for visitors to navigate your site and its pages.
To Create a Menu:
- Click on My Site → Design → Customize → Menus.
- Choose a menu you want to edit, or create a new one. When you create a site, a Primary Menu will be created automatically.
- Click on Add Items. In the menu that slides out, you’ll see a list of pages, categories, posts, etc. that you can add to your menu. Click on them to add them to the menu.
- You can click and drag menu items around to re-arrange them, or drag them and indent them underneath one another to create dropdowns.
- Make sure that “Primary Menu” is checked under Menu Location.
- Click the Publish button to save the changes to your menu.
Selling Products on WordPress.com
There are a few ways to sell products on your site:
- Paypal donation button
- Simple Payments (available on Premium and Business Plans)
- eCommerce using plugins, like WooCommerce (available only on the Business and eCommerce plans)
Adding Widgets
Another way to upgrade your site’s layout is by using widgets. Widgets are additional content you can add to your site’s sidebars and footer, and can be tailored for each of your pages.
Widgets can do a number of things:
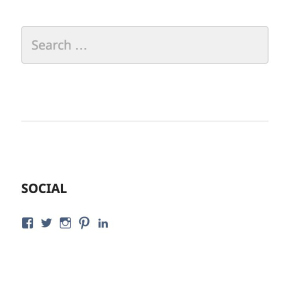
- Contact Info Widget – Display your contact information, including an embedded Google map.
- Text Widget – A simple widget that lets you add any text that you want. Great for providing general information, an About Us blurb, and more!
- Search Widget – Creates a search bar that people can use to find posts, pages, and other content on your site.
- Top Posts & Pages Widget – Show a list of your most popular posts and pages on your site.
And lots more!
In these examples, we are using widgets in two different areas: the footer and the sidebar (on individual pages). Depending on your purposes, choose the best widget for your site.
The footer of your site is the section at the bottom of each page:
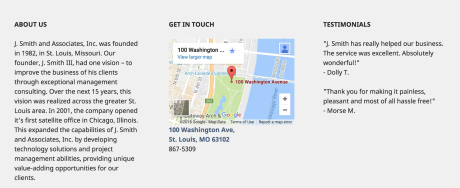
The sidebar appears on either the left or right hand side of your site:
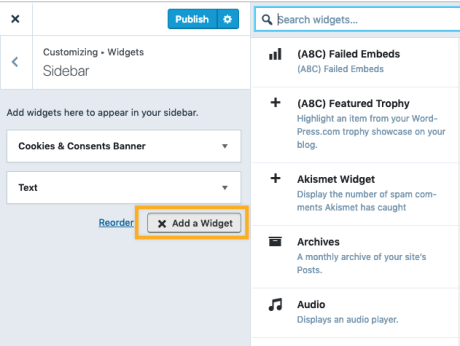
To add widgets to your site:
- Go to My Site → Design → Customize → Widgets.
- Select a widget area, such as Footer or Sidebar.
- Click on Add Widget, then select the widget you want to add to your site.
- Click Publish to save your changes. Note: Certain themes may only show widgets on specific page types, and some may not have certain widget areas at all.
You can follow the instructions on how to add a widget as well shown in the live example here
Adding your Brand
Creating Brand Image may get the visitors to be aware of your business better.
Adding a Domain
Give your website a unique address, via a custom domain. A credit to add a custom domain – either one you already own or a free year of a new domain registration – is included with any paid plan on WordPress.com.
To add a custom domain:
- Go to My Sites → Manage → Domains → Add.
- Type the domain name you wish to use into the search field. You can register a brand new domain by choosing one of the available options. If you already own a domain at another provider, map the domain or transfer it to WordPress.
- Follow the remaining steps to complete the setup process. Mapping and transferring domains you already own require additional steps.
Custom Logo
Many themes allow you to add a custom logo to the header of your website. This can be added via My Sites → Design → Customize → Site Identity. In the Site Identity section, you have the option of hiding your Site Title and Tagline. You can also choose how you to display the WordPress.com footer credit.
Custom colors
Your brand may have custom colors you would like to use on your website. With a Premium Plan or higher, you have access to a theme’s custom colors. This can be found in My Sites → Design → Customize → Colors & Backgrounds. The number of colors available to customize will vary depending on the theme you choose.
Inorder to customize a color, click on the color circle you expect to change. Then, choose a preselected color or click the “pick your own color” link to open the color picker tool. The color picker tool allows you to use a color based on a specific hex value. This list of common colors and hex values may be a good place to find your favorite color.
Additionally, there are preselected color pallets in the Colors & Backgrounds section that will apply a pre-made palette of colors to your website.
Sharing to Social Media
As you already created your website, you will be looking forward to how your site will be connected to other sites and social media. There will be Sharing buttons at the end of posts and pages, that can be toggled on and off.
Normally, Sharing buttons are used for posts. However, you can manage Sharing buttons for your posts and pages by going to My Site → Tools → Marketing → Sharing Buttons.
On the Sharing Buttons tab, you’ll see an Options section. You can turn Sharing Buttons on or off for Pages, by unticking the ‘Pages’ or ‘Posts’ option under ‘Show sharing buttons on’. Then, click the Save Changes button.
Connections
What is more, if you’re using a blog on your site, you can manage social media connections so new blog posts are automatically published to each platform. You can manage these connections under My Site → Tools → Marketing → Connections.
Conclusion
The preceding step-by-step instruction is to help you to create a business website in Wordpress platform. We hope that you will find it helpful to follow this detailed guidance. Please let us know if there is any problem so far.

