
Sometimes, you may want to collect feedback and comments from your viewers, it is convenient to create a contact form to get all these kinds of information, from the name, email address to the website, etc. You can quickly create contact forms for your posts or pages on WordPress with just a few steps. For more details, follow this topic to know how to insert a contact form in your posts or pages on WordPress.
To insert a contact form in your posts or pages on WordPress
Step 1: Select Pages or Posts
Get access to your account on WordPress.com and head to My sites. After that, press on the Pages or Posts and open the one you want to add the contact form. If you do not want to insert a contact form for an existing post or page, you can create a new one.
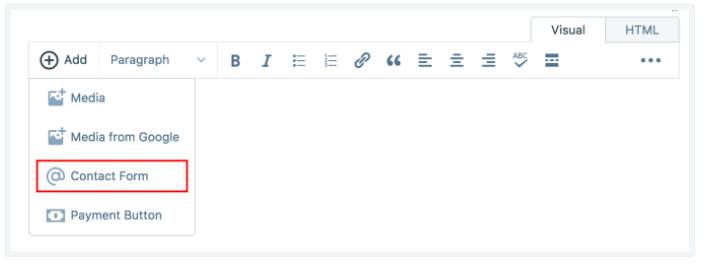
Step 2: Choose Add
On the editor of the post/page, click on the Add button with the plus icon in the toolbar. A list of options will show up on your screen then select the Contact form and move on to the next step.
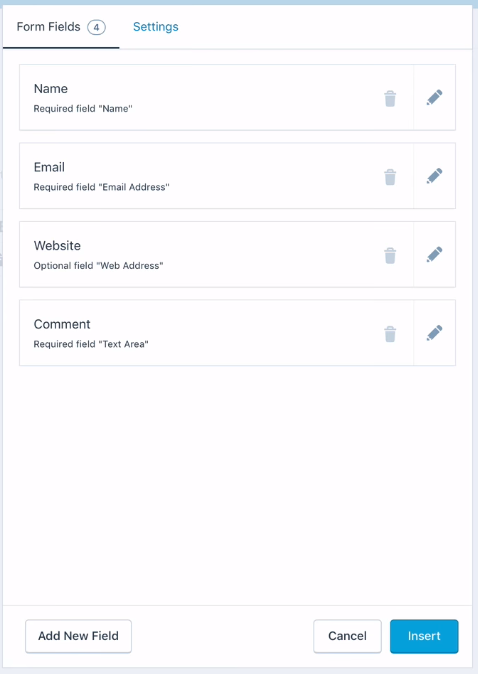
Step 3: Edit the form fields
A dialog box will be displayed on your screen and you can see that there are four predefined fields under the Form Fields section, consisting of Name, Email, Website and Comment. If you want to exclude any of these fields, you can click on the trash icon to remove it. You can also insert a new field if you need by clicking on the Add new field button then specifying its label and field type. WordPress provides you with eight field types as following:
- Checkbox: Allows you to create a list of options and other users can tick on the box to show their choice.
- Dropdown: Lets you generate a dropdown menu.
- Email address: Requires visitors to enter text in an email address format.
- Name: This is a text field that users can fill in their name.
- Radio button: Similar to the
Checkbox, you can use this to produce options list. - Text: Provides a single line allowing you to enter text.
- Text Area: Works like
Textbut this field allows you multiple lines to add in the content. - Web Address: Users are required to fill in a URL format in this field.
In case you are not satisfied with the predefined fields, you can press on the pencil icon next to it to edit them, you can change its title and choose another field type. If you select a field as Required, the visitors should follow exactly the requirement of that file type. Meanwhile, they can enter another format if you don't enable the Required box. For example, when you create a field called Website, if you set up it as Optional field "Web Address", other users can put a URL link or just the title of the web in that box. However, if you specify it as Required field "Web Address", it is compulsory for others to enter a URL format.
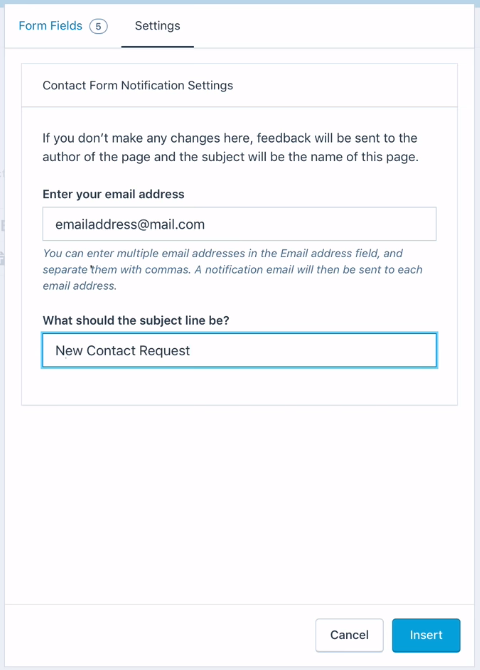
Step 4: Enable the Notification
Next to the Form Fields is the Settings that you have to press on it to open the settings for notification. By default, the feedback will be sent to the author of the post or page with the subject as the post/page title. If you want to change it, enter the email address of recipients in the Enter your email address field. You can add more than an address and use commas to separate them. If you want to edit the subject of the notification, fill in the What should the subject line be? the title you want or left it blank otherwise.
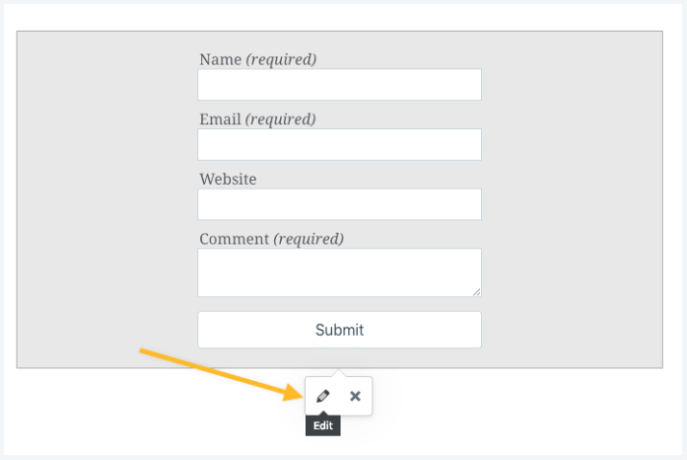
Step 5: Click on Insert
After finishing all the above steps, press on the Insert button to complete the action. You can visit your post/page to see how the contact form displays and if you want to adjust anything, you can click on the contact form and choose the pencil icon. The settings tab for contact form will appear that you can add your adjustment and click Update to save it.
Conclusion
In summary, this writing has shown you the process of how to insert a contact form in your posts or pages on WordPress. It is a simple process with only five steps in total that it will not take much of your time to practice. Moreover, images are included in this topic to help you easily imagine what to do in actual. Thus, hope that you find this writing helpful or at least you have good reading time.

