Slideshows offer a great opportunity to deliver structured information to your viewership. If you are taking the idea of sharing your presentations on your own website, then you are about to find a way to embed a slideshow in WordPress.
A slideshow or a presentation is defined as a series of projected images or photographic slides viewed sequentially on a screen. It helps you to communicate your information about an idea or a project to others logically and structurally. By adding a slideshow directly to your website, you can easily recap presentations that you’ve delivered, put forward new product ideas, advise how-to guides, or show your product’s features to clients. What is more, as a viewer looking at your presentation, how an easy way to digest when the old kind of old blog post is now being covered in slides.
It is very thankful that there are several methods to attach a presentation on a WordPress website. However in this article, we would like to recommend the Speaker Deck Slideshows.
Speaker Deck is the best way to share slideshows online due to it is a free of charge service and very simple to use. However, note it down that Speaker Deck only support if your slide is uploaded in PDFs. The amazing feature of Speaker Deck is that it will automatically re-size your PDF to fit each slide in the display that your blog visitors are using regardless of mobile devices or PC.
So, let’s get started.
Step 1: Go to the slideshow page on Speaker Deck
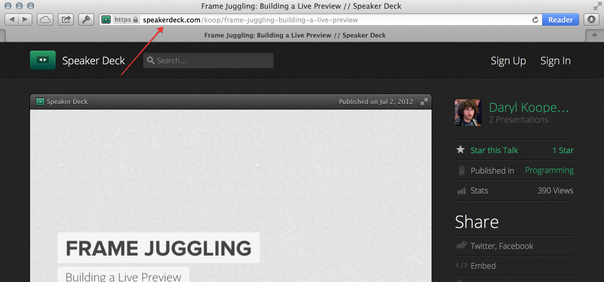
Go to the slideshow page on Speaker Deck. In order to use this service, it is necessary for you to own a free account. Once you have an account then you are able to upload your slides. On taking the example, we’ll use the slideshow Frame Juggling: Building a Live Preview.
Step 2: Copy the URL
Copy the URL in your address/location bar, like below:

Step 3: Paste it on a line by itself in your Visual editor
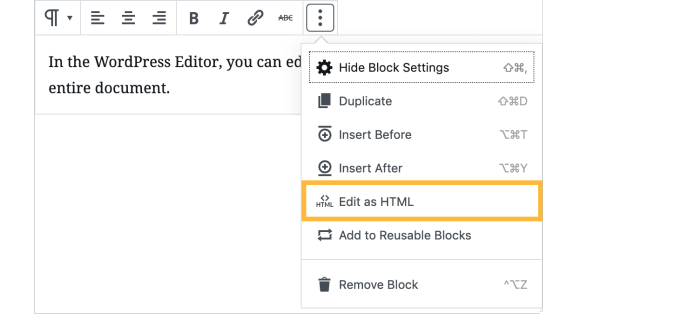
Paste it on a line by itself in your Visual Editor located in Edit as HTML block in the WordPress Editor.

Make sure that it is not hyperlinked which can be seen if the hyperlink button in the toolbar highlights and a link box with the option to edit appear when you click on the URL.
Step 4: Publish the post
Publish the post. When you preview or publish your post, the URL will be replaced by the actual slideshow, like what is shown in the live example here
Conclusion
The step-by-step instruction above is to support WordPress users to upload Slideshow on his website in order to allow subscribers to access his presentation easier while following the blog. We hope that you will find it helpful and pleasant with this detail guidance.


