
The Instagram Widget is a very effective tool that allows you to promote for your Instagram account straight from your blog by displaying your latest Instagram pictures on your website's sidebar.
For example, an Instagram Widget could look like this on display:

The number of images and columns, as well as tittle fonts are fully customizable. Read on for more details.
If you are looking for a way to boost your brand's social media presence effortlessly, it's time to try out the Instagram Widget cuz why not?
In this instructional writing below, you would be guided through a quick and easy-to-follow instruction on How to display the Instagram widget on your sidebar on WordPress. Hope these little effort would help you generate big result.
To display the Instagram widget on your sidebar
Step 1: My Sites > Customizer > WidgetsVisit Customizer > Widgets.
First, from My Sites, visit Customizer, then Widgets.
Step 2: Click Add a widget
Next, click the Add a widget button.
Step 3: Select the Instagram widget and click Save & Publish
Find "Top Posts" from the search bar, and select the Top Posts & Pages widget.
Click the Save & Publish button.
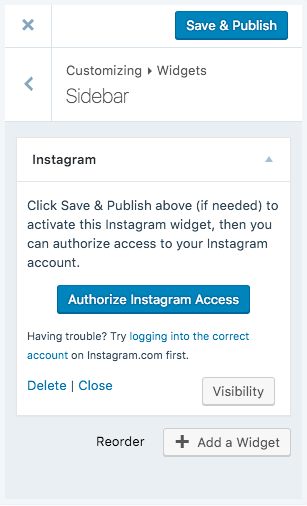
Step 4: Grant access to your Instagram account
Open another tab, and sign into your Instagram account. After that, return to your Wordpress tab. In the Instagram widget, select Authorize Instagram Access. This will grant WordPress.com access to your currently logged-in Instagram account.
Step 5: Customize the widget settings
Once you're done adding the widget to your site, there are several widget settings you are required to customize. The widget settings might look something like this:
Here is a clearer explanation on what you are required to fill in those blank fields:
Authorized Account:
This is the authorized Instagram account that you just connected Wordpress.com to. If you want to connect your blog to a different account, click Remove first.
Title: Fill in the title for your widget
This is the text that will be displayed as your widget title. It's up to you to name your widget or leave it blank.
Images
Enter the number of most recent Instagram photos to be shown.
Layout
Decide how many columns you want to display your images in. The more columns there are, the smaller the image sizes will be.
When you are done, click the Save & Publish button to record any changes.
Conclusions
Above is a detailed, step-by-step instruction on How to display the Instagram widget on WordPress. Hope these little effort would bring you great result.

