You put a lot of effort in developing and maintaing your Wordpress.com website, of course you would want to keep it safe.
The most basic layer of security is your password. Hopefully you have already set up a unique and hard-to-crack log in password for your account. However, with hacker's brute force attack, sometimes your password could be stolen and your website infected easily.
To prevent this from happening, one of the simplest yet most effective ways to protect your website against black hat hackers is to enable Two Step Authentication, or Two Factor Authentication. This is an extra layer of security, that ensures maximum protection for your WordPress.com site. Once the feature is set up, WordPress will send you a new code to your device, which you have to input before you could log in, every time you log in to the website with your password. This way even if you have your password stolen, your account will still be safe as the hacker will be required to enter a one-time security code sent to your phone to gain access.
If you are looking for ways to make your Wordpress.com account much more secure and protected without much effort, this article is for you. Read on for a quick and easy-to-follow instruction on How to set up two-step authentication with Google authenticator on WordPress. A few minutes of setting up will do you wonder for goods. So follow through!
To set up two-step authentication with Google authenticator on WordPress
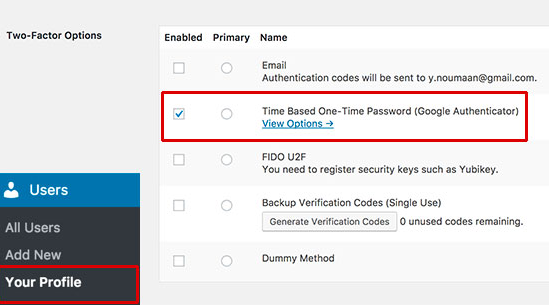
Step 1: Users > Your Profile > Two-Factor options
First of all, after you logged in to your Wordpress.com account, go to Users > Your Profile, and scroll down to the Two-Factor options section.
Step 2: Enable Time Based One-Time Password
Enable the Time Based One-Time Password (Google Authenticator) checkbox, then click the blue view options link to start the Google Authenticator setup.

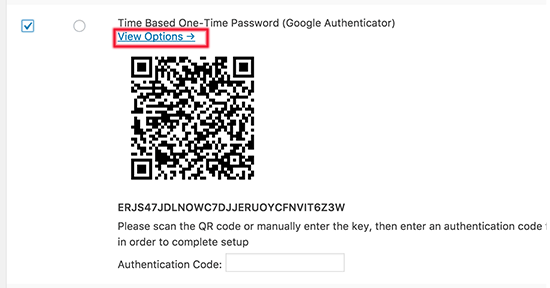
Step 3: Install the Google Authenticator app on your smartphone
After clicking the view options link, a QR code will show up. You will now need to scan it with the Google Authenticator app on your smartphone.

Grab your phone and install the Google Authenticator app. Once the app is installed, open it and tap the Add button.

Step 4: Scan the QR code displayed on the plugin's settings page with your smartphone's camera
Next, scan the QR code displayed on the plugin's settings page with your smartphone's camera.
Step 5: Enter the six-digit code in the plugin’s settings page
The Google Authenticator app will automatically detect and add your Wordpress.com website, then show you a six-digit code. Enter this code in the plugin’s settings page, and you're finished.
Step 6: Click Update Profile
Finally, click the Update Profile button to record your changes.
To see your result in action, log out of your WordPress site and log in again.
Conclusion
Above is a detailed, step-by-step instruction on How to set up two-step authentication with Google authenticator on WordPress. Hope it helps you make the most out of your Wordpress.com resource.


