
If you are WordPress beginners, you should not ignore this post since you will be instructed on how to use visual editor on WordPress.
In fact, the feature of visual editor offers you a semi-What You See is What You Get content editor which lets you create, format or edit the content easily in the same view as you are using a word processor.
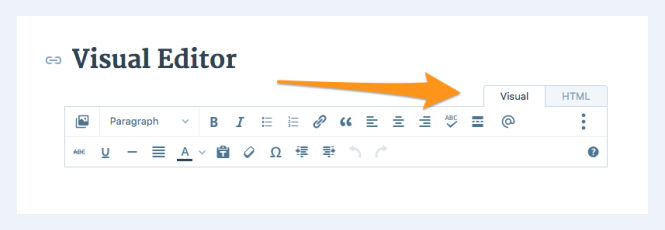
The visual editor is known as the default edition mode of WordPress, however, in case it does not seem to be enabled, you can choose Visual tab located at the top right corner of your editor area as it is depicted below.
To use visual editor on WordPress
Row 1 and Row 2
Take note that there exist two rows of edition icons added in the visual editor. You can simply find out what each icon means or do so by hovering over icons with the mouse. A small letter appearing describes what icons are and their purpose.
Row 1
With row 1, when you first open it, the visual editor can show a row of icons like this:

- Add media
- Style with different formatting styles which are defined by your own themes.
- Bold
- Italic
- Unordered lists (mean bullet points)
- Ordered list
- Insert/edit/remove link
- Blockquote (a way of showing quoted text and this will be defined by different themes)
- Align Left
- Align Center
- Align Right
- Spell check / Proofread
- Insert More tag
- Toolbar Toggle
Row 2

In order to show the second row of those icons, you can head to toolbar toggle icon.
- Strikethrough
- Underline
- Horizontal line
- Justify
- Select text color (means change text colors)
- Paste as Text
- Clear of formatting
- Insert special character
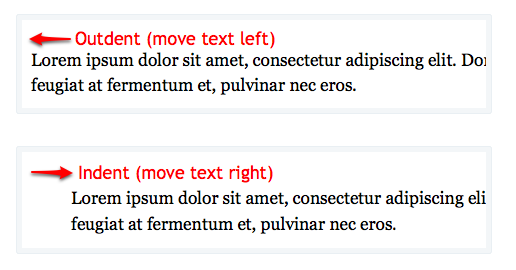
- Outdent (means move the text further left)
- Indent (means move the text further right)
- Undo (means undo the last action)
- Redo (means redo the last action)
- Help – showing information on using the editor or keyboard shortcuts.
Alignment
Both images and text will be aligned when using proper icons.
- Left
- Right
- Center
- Justify
You should note that the justify alignment is only used to text and aligns both text’s sides.
Style and text color
Style
As you can see, there will be a style dropdown list which allows you to modify the format of any text selected. This contains a variety of headings as well as pre-defined styles which are built in your theme.
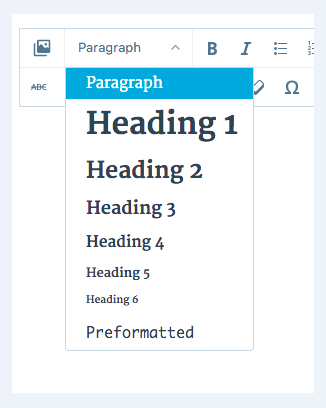
One more thing is the change of further style will ask for the Custom CSS Upgrade.
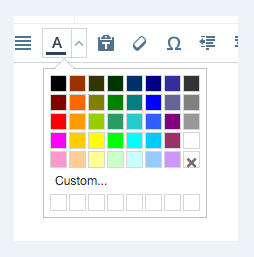
Text Color
If you want to change the color of the text, you need to highlight text you wish to modify.
Next, you can click the down arrow located next to the color of text button and it will show you a color selector. As this color selector opens, the arrow points up. Choose it to close the color selector without opting for a color.
A selected color will use this color to apply on selected texts and make it default color for your color button.
Pasting text and clear formatting {#pasting-text-clear-formatting}
Pasting text
If you get your text copied and pasted from anywhere else, you can find out that sometimes, it will not exactly appear as you expected.
Hence, in case you are using Paste as text button, a special cleaning process will appear to get rid of special formatting as well as HTML tags which might modify the formatting of text.
You can see that how Toolbar looks like in Plain Text Off mode. There will be no box surrounding it.

You can see that how Toolbar looks like in Plain Text On mode. There will be a box surrounding it and the button is also colorized black.

Clear formatting
The Clear formatting button will help you remove all formatting like bold, colors, italic and so on from your highlighted text.
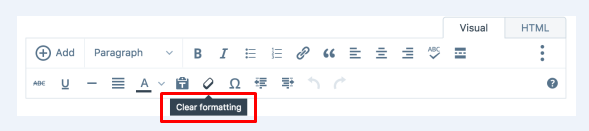
First, you need to highlight text and click on that button.
Custom characters and outdent/indent {#custom-characters-outdent-indent}
Custom characters
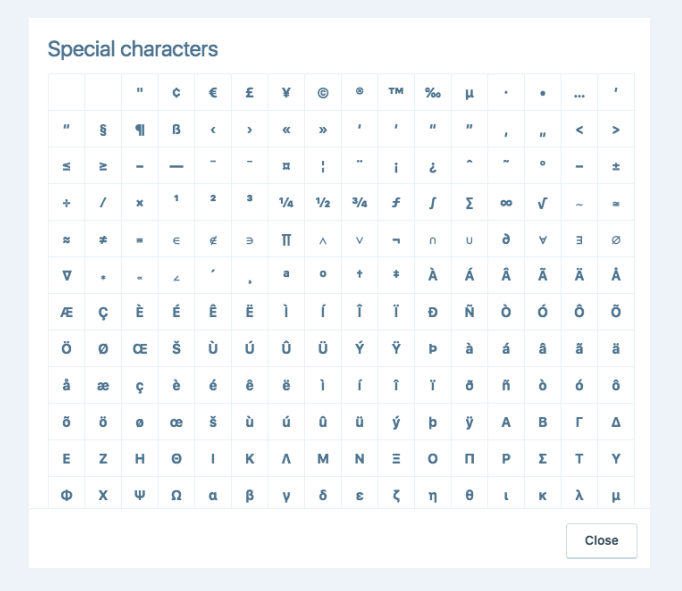
Do you know that you can add special characters like normal letters that are available from the keyboard? Place the cursor to the position you want to add this character and click the insert custom character button and a popup window appears.
Outdent/Indent.
This indent button can move the text in by one level, meanwhile the outdent button can take away one level.
Spacing and keyboard shortcuts {#spacing-keyboard-shortcuts}
Spacing
Hitting Enter(Return) aids in ending your paragraph you write and begin the new one. If you would like to start a new thing without forming a new paragraph, you can click on Shift key while you hit Enter.
Keyboard Shortcuts
This visual editor contains some keyboard shortcuts or some hotkey or built in.

If you want to see all available shortcuts, choose the toolbar toggle to display the second row of icons. After that, you can click on Keyboard Shortcuts icon located at the end of your second row.
Next, a pop-up window can display a menu of keyboard shortcuts that are available in your editor.
With default shortcuts, Control + key on Windows and Command + key on Mac.
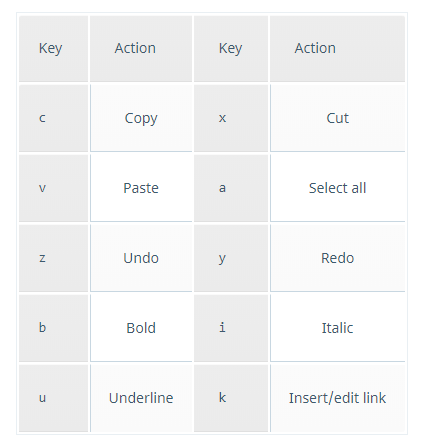
With extra shortcuts, Control + Alt + Key on Windows and Control + Option + Key on Mac.
Conclusion
We hope that with our above post on how to use visual editor on WordPress, you can easily apply what has been written down and successfully complete your task. If you find this post useful, help us share this on your social channels or give us your comment.

