If you want to customize the look of your WordPress website, it is time for you to use CSS editor. CSS editor will help you change and customize your sites’ appearance on WordPress and it also lets you override some default styles of your own theme.
Hence, in this article, we are glad to share with you on how to add Custom CSS on WordPress.
To add Custom CSS
Default placeholder comment
Before going further, you need to make WordPress.com Premium or WordPress.com Business become active on your own site so that one of them can add the Custom CSS to the site.
After that, to aid in accessing CSS editor, the first thing you need to do is to launch the customizer of your site, then clicking the CSS tab to get CSS accessed.
In cace you never add CSS to your site before or your theme has been changed, you will view a placeholder comment that is shown as a sample below:

In general, the placeholder comment is left in a place or removed and replaced with the Custom CSS, however, it will not affect your added code.
Preview and save
As you can edit your CSS rules in your site’s customizer CSS panel, you will be able to apply changes automatically to your preview window, however, don’t forget to go to Save & Publish since they will not be saved till you click on that button.
Revise CSS
In this part, you should take note that there exist 25 latest revisions of CSS editor that are saved and accessed by using CSS Revisions link located on the top right of your CSS panel.
Basically, CSS is known as theme-specific, therefore, all of the CSS will be moved as you change your themes. If you want to restore or review the past CSS, don’t hesitate to head to the CSS Revisions link.
CSS help
If you need CSS help, WordPress team also gives you limited CSS support through emails or live chat. You are free to reach out them and they will let you know if they can help your CSS questions or not or they can aid you to go into the right direction.
There is advice for any WordPress beginners. If you have just started, it might be difficult to learn new things. However, Custom CSS is considered a valuable as well as reusable skill. And there will be lots of resources on the Internet to help you find out more about both CSS and HTML.
Insert Custom CSS into your site through WordPress Customizer
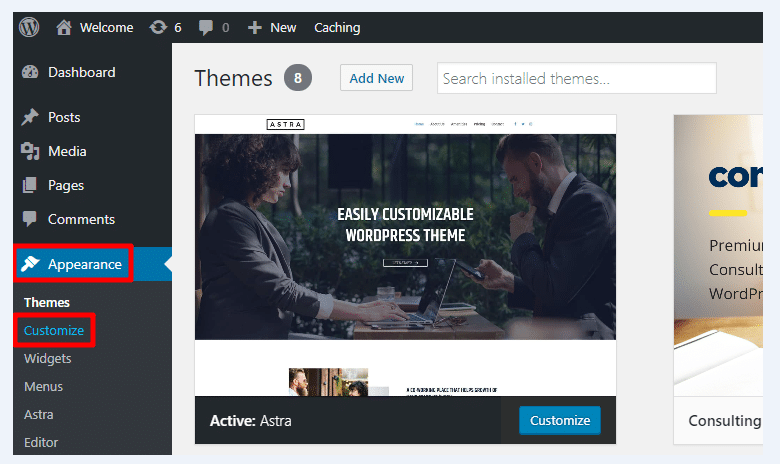
- Step 1: Launch your WordPress customizer by heading to Appearance -> Customize located in the WordPress dashboard.
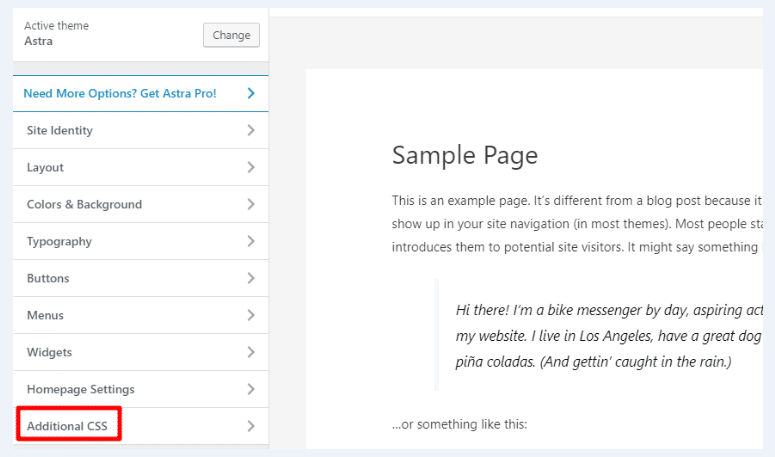
- Step 2: Choose Additional CSS in your WordPress Customizer sidebar at the bottom of the page.
- Step 3: Add your own Custom CSS to the box. The editor might alert some errors if you are messing up the syntax.
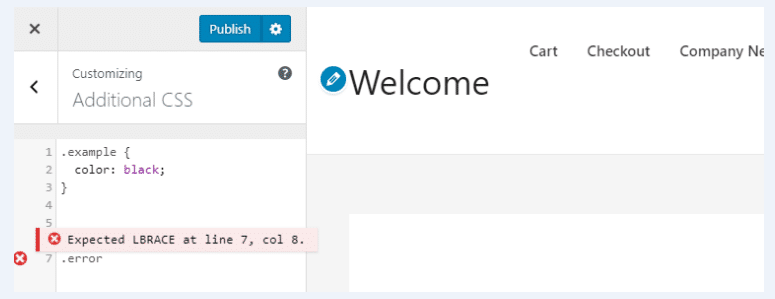
- Step 4: After finishing inserting your Custom CSS, you should remember to click on Publish to make your changes become activated.
Insert Custom CSS into your site through CSS Plugin
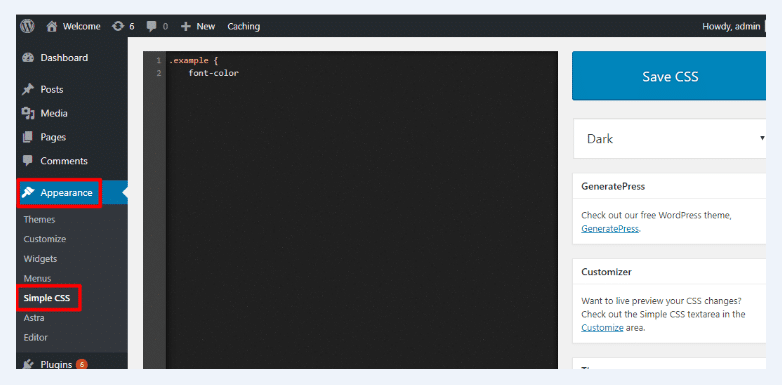
Another way to help you add your Custom CSS to your site is by applying CSS Plugin, but first, you need to install and enable the plugin.
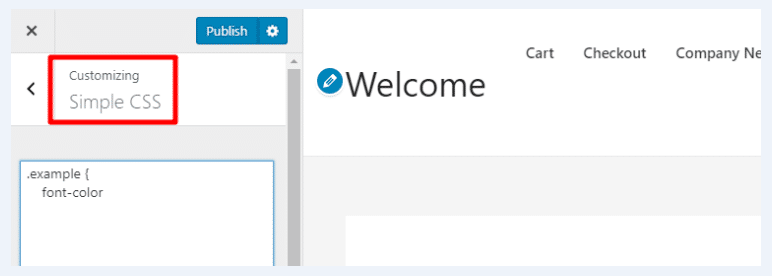
After that, you can head to Appearance -> Customize and select Simple CSS option or go to Appearance -> Customize to help you apply the full editor. Then, you can add your own custom CSS to your personal page or post through a new simple CSS meta box located under your WordPress editor.
Conclusion
We hope that with the above tutorial on how to add Custom CSS to your site on WordPress, you can easily insert your own Custom CSS through WordPress Customizer and the CSS plugin. These two methods are popular to help WordPress users insert Custom CSS. If you have any questions, do leave us a comment or contact us for more useful information.


