
Leverage Browser Caching: How to enhance the website performance in Shopify

“Slow and steady wins the race,” as we’ve all heard. However, when it comes to search engine optimization, quick page speed and site performance are critical aspects of e-commerce success.
That is the fact - more consumers are visiting websites or purchasing items from their smartphones, and they want websites to load as soon as they click on a link. Slow-loading web pages can result in a high bounce rate, low user engagement, less traffic, and, as a result, a negative impact on your revenues.
Let’s assume your website takes more than 2 seconds to load pages, which means fewer people will stay on your site. As a result, the page load time must be kept as short as possible because no one wants to wait 10 seconds.
When performing performance tests for your website, the “leverage browser caching” warning will appear in Google Page Speed Insights. Page speed is an essential component in ranking high on Google and delivering a good customer experience.
There are several alternatives for boosting page performance nowadays, but one of the best ways to improve your website’s speed is to correctly leverage browser caching.
What is the cache browser?
Browser caching happens when a web browser temporarily keeps a copy of a resource locally on its device in order to load the resource more rapidly in the future. The “cache” refers to the area on the local disk where resources are saved.
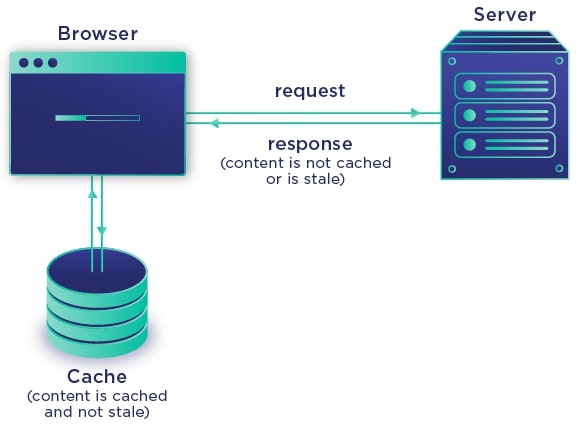
Let’s take a look at how websites typically function to better understand the fundamentals of caching. When a user enters the URL of your website into their browser, an HTTP request to your site’s web server will be sent, requesting the website resources at the URL’s given location. These resources contain text and picture content, style sheets, and scripts that make things happen on the page.
If everything goes correctly, your web server returns the requested resources to the browser, along with some additional instructions on how to handle those files. The browser parses these files and shows them to your visitor as a web page.
However, none of this is vital to the typical internet user; all they want is your web page to appear on their screen as soon as possible. Browser caching is a specific way to reduce load time (or, in other words, enhance performance).
When browser caching is enabled, your server directs users’ browsers to save some of your website’s resources in their cache for a certain period of time. When the visitor returns to the same page, the browser will download the resource from its cache rather than requesting a copy from your webserver again. The process of requesting, receiving, and cached processing data is avoided, resulting in quicker overall load times.
Similarly, if a visitor navigates to another page on your website that utilizes some of the same resources as the previous page — for instance, a repeating logo or a header region — their browser can retrieve those resources from the cache as well.
It’s crucial to remember that cached material is virtually always ephemeral. It is up to the server to specify which resources can be cached and for how long. Depending on how frequently you intend to update this material, this might be as little as a minute or as long as one to two years.
Caching works best with static content. Images are a frequent example of static material that does not change after being posted to a web server. Static files will seem the same to the user regardless of whether they are downloaded from a server or retrieved from the browser cache.
What is Leverage Browser caching?
Currently, we all regularly operate data through applications or websites. Because website caches are used to store requested objects, the same items will not be fetched more than once in the Web server.
Caching technology helps programs to run quicker and more efficiently. Because saved material such as photos or blogs in local storage allows websites or browsers to load rapidly, you may increase your Shopify business’s number of customers and income. Therefore, leverage browser caching is often regarded by online shop owners as a perfect solution.
Definition
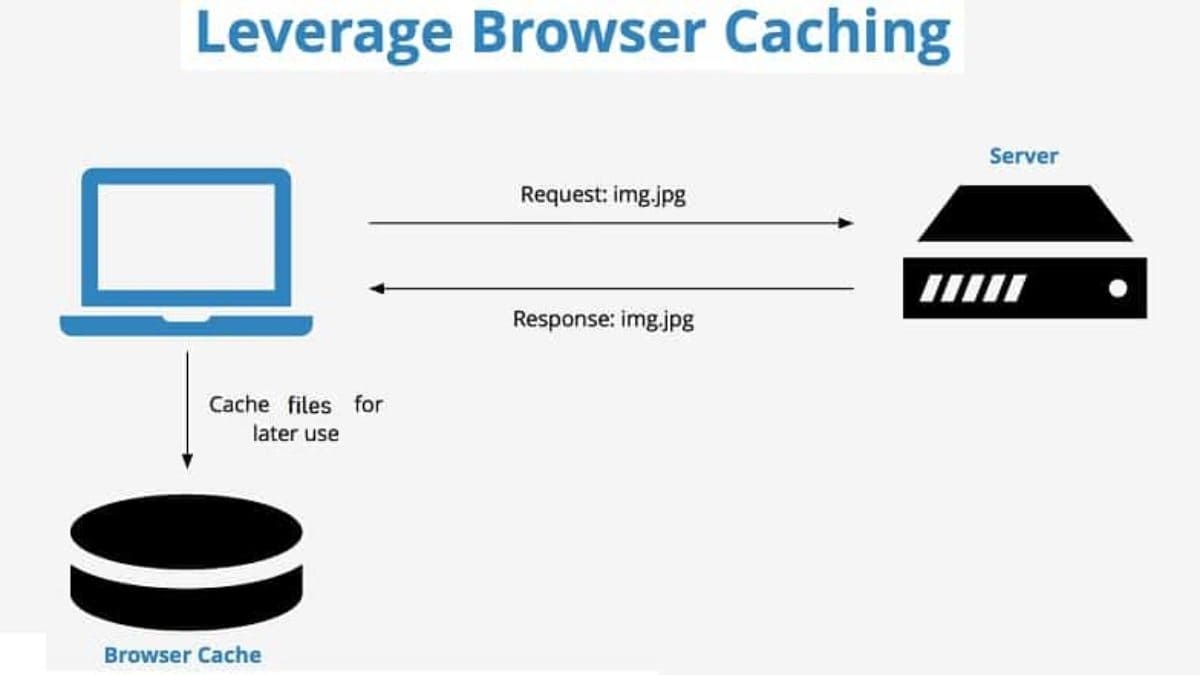
You may specify periods for these files to be saved on the user’s device by “leveraging” browser caching. Sites can load faster when this method is used since part of the files are already saved on the user’s computer and do not need to be refreshed.
Because of leverage browser caching, when you visit any site for the first time, it takes far longer to load than when you visit that same site again. You may decide how long web browsers should preserve cached images, CSS, and Javascript files. As a result, the user’s browser will download less data when browsing through your sites, increasing your page loading speed.
Warning
When measuring website performance with popular speed testing tools, the utilize browser caching warning appears. If the expiry times is set too low or do not place the browser caching restrictions, the leverage browser caching warning will be triggered.

Every cached resource includes an expiration date. This notifies browsers when the material on your site has become out of date, allowing them to replace their cached copy with an updated one.
If the “Leverage Browser Caching” warning appears in your performance test results, it most likely implies one of two things:
- The relevant headers are present, but the expiry duration is very short and so has no effect on speed.
- The Expires headers are missing from your site’s or a third-server party’s
This warning is connected to the cache in your browser. When you visit a website, your browser downloads and caches a variety of items. These components may include:
- Images
- JavaScript
- CSS
- HTML
The use of local cache storage ensures a quicker browsing experience. When you return to that website, your browser will not have to download it from the beginning. Certain components, on the other hand, will be easily available.
This warning has also been seen by webmasters while conducting the “Think with Google” website performance test. Many website owners who do not handle their websites utilize the tool, read the alert, and get concerned that something is wrong with their website. As a result, they send the alert to their webmaster to be fixed.
How to leverage browser caching in Shopify?

If you own a website, you should know that server caching refers to the method through which your website creates cached web pages. This is server-side caching; browser caching occurs when visitors view your website via a web browser.
This is the inverse of the previous statement. When you use browser caching, you are instructing your server on how long the resources should be cached in your visitors’ browsers.
To use browser caching, you must typically create HTTP headers to establish correct expiry times for different file types on your website. This will vary depending on whether your web server is Nginx or Apache, and whether you wish to input the code manually or use a WordPress plugin.
We’ll go through some of the most popular methods to set your browser caching in the sections below.
By using plugins
Plugins are ideal for site owners who are hesitant to make modifications to their server files directly. A browser caching plugin will do the grunt work for you, and many can also assist in improving your website in other ways. In this part, we’ll look at three such plugins and show you how to enable browser caching in each.
Many hosting companies, mainly managed WordPress servers, forbid the usage of cache plugins and may even block certain plugins — not because they are dangerous, but because they are incompatible with the current server setup. Browser caching is most likely already enabled in these instances. However, before installing a caching plugin on your website, check with your web host to ensure that it is permitted. If you have any questions regarding caching your WordPress site, contact your hosting provider.
Let us now extract these plugins.
WP Rocket

The WP Rocket plugin is the most hands-off approach for WordPress site owners after having your host handle browser caching for you. WP Rocket is a comprehensive speed optimization module that automatically manages many performance elements, including caching. WP Rocket is a premium plugin costing $49 for a year’s worth of updates and support for a single website.
WP Rocket caches your material for desktop and mobile devices instantly after activation, however, you may change your cache settings in Settings > WP Rocket. You may toggle caching on and off here, as well as modify the cache lifespan. Cached materials are set to expire after 10 hours by default, but you may wish to decrease this if your site updates often, or extend it if your site is mostly static.
WP Rocket improves your website in addition to caching by applying GZIP compression to files housed on your domain, preloading specific assets, and lazily loading pictures.
Hummingbird by WPMU DEV
Hummingbird is a plugin in the WPMU DEV plugin family that focuses on improving your site’s speed using various techniques like GZIP compression, a content delivery network (CDN), uptime monitoring and a set of caching capabilities. Membership for one website is $5 per month, or you may buy all WPMU DEV plugins for $15.83 per month.
Hummingbird allows you to activate several types of caching on your page, including page caching and browser caching. Log in to your WordPress account and go to Hummingbird Pro > Caching to activate page caching. Then, under the Page Caching module, press the Activate button. You may use this module to control which components are cached depending on how frequently they change on your site — caching is less beneficial for elements that change frequently — as well as which devices and users can access cached information.
Scroll down to the Configure section, pick your server type, then specify your expiration times for all files or specific files to allow browser caching.
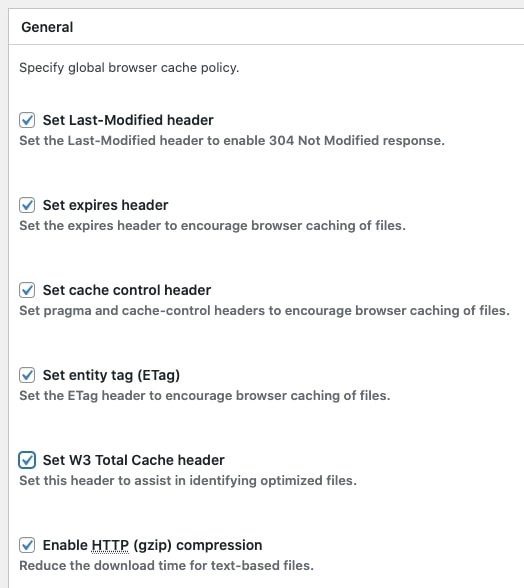
W3 Total Cache
W3 Total Cache is a prominent speed optimization plugin that caches your web pages, minifies your code, lazy-loads images, and connects with CDNs such as Cloudflare. It has over one million downloads to date. It is available in a free version as well as a premium plugin for $8.25 a month — caching is included in the free version.
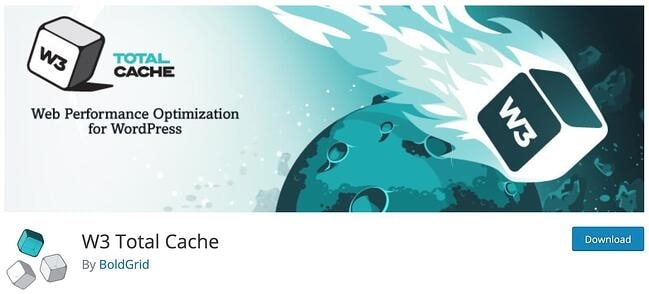
To enable caching, go to Performance > General Settings, scroll down to Browser Cache, and click the box next to Enable if it’s not already enabled. Then, click the Save all settings button.
Then, choose Performance > Browser Cache. Check the first five boxes under General. These enable the headers (HTTP instructions provided from your server to browsers) necessary for browser caching.
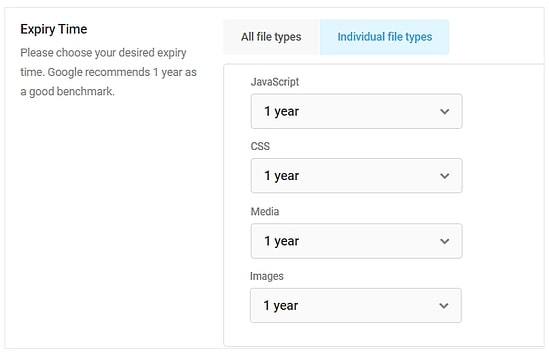
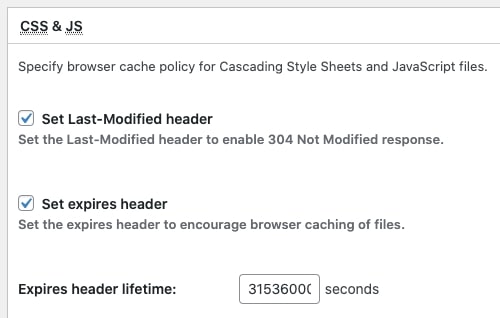
Finally, you’ll need to provide the expiration dates for each of your file types. The expires header instructs browsers how long they should keep a copy of your site’s files.
Separate expires headers can be specified for CSS and JavaScript files, HTML and XML files, and media assets. Scroll to the CSS & JS area under Performance > Browser Cache, select the box next to the Set expires header, and enter your Expires header lifespan value in seconds. This number is set to 31536000 seconds, or 365 days, by default. Adjust this number to suit your CSS and JavaScript files — for example, a two-week expiry period would be 1209600 seconds.
Rep the previous steps for the HTML & XML and Media & Other Files sections, then click Save all adjustments.
By editing files directly
You can activate browser caching if you have access to your server files and are comfortable making direct changes to them.
First and foremost, proceed with caution when making changes like this. Any misplaced or incorrectly written code might render your site inoperable or cause a problem with your server’s setup. If you haven’t already, we recommend contacting server support for permission and any further information, especially if you’re new to altering server files. Also, if you make a significant change, always make a backup of your site.
To take advantage of browser caching, your changes will direct the server to cache particular files for a set amount of time. You will include two headers in your HTTP responses: Cache-Control, which determines how long and where files can be cached, and Expires, telling the browser how long the cached file is valid.
Depending on your server platform, the method for adding these headers may differ. In this part, I’ll show you how to activate browser caching on the most popular Apache and Nginx settings.
Leverage Browser Caching on Apache Server
If your website is hosted on an Apache server, you will make site-wide modifications in the .htaccess file located in your primary WordPress directory (typically public_html). Because .htaccess files include instructions and permissions for their respective folders, the .htaccess file in your root directory applies to your whole site.
Access your server files through your hosting panel or an FTP client to edit .htaccess. Navigate to your WordPress installation’s root folder. If you don’t see .htaccess, you might need to expose hidden files. If, after disclosing hidden files, you still don’t see .htaccess, it indicates it doesn’t exist in your root folder. Simply build a new .htaccess file in this folder in this scenario.
After you’ve located or created your main .htaccess file, open it in the file editor in your hosting panel, or download it and open it in a code/text editor. This is where you will make the necessary adjustments.
Set Cache-Control Header in Apache
First, let’s configure our Cache-Control header. Add the code to the bottom of the file:
<filesMatch ".(ico|pdf|flv|jpg|jpeg|png|gif|svg|js|css|swf)$">
    Header set Cache-Control "max-age=31536000, public"
</filesMatch>
This enables caching for all files with the extensions mentioned in the first line, sets the maximum expiry date to 31536000 seconds (365 days), and specifies that files can be cached on a public server, such as a CDN. To advise the browser to only keep cached files on the client’s machine, change public to private in the code above.
Set Expires Header in Apache
Next, provide your Expires header to notify the browser when to replace cached files with new ones. Copy and paste the below code beneath your Cache-Control rules:
<IfModule mod_expires.c>
ExpiresActive On
ExpiresByType text/html "access 1200 seconds"
ExpiresByType text/css "access 1 month"
ExpiresByType text/javascript "access 1 month”
ExpiresByType text/x-javascript "access 1 month"
ExpiresByType image/jpeg "access 1 year"
ExpiresByType image/jpg "access 1 year"
ExpiresByType image/png "access 1 year"
ExpiresByType image/svg "access 1 year”
ExpiresByType image/gif "access 1 year"
ExpiresByType application/pdf "access 1 month"
ExpiresByType application/javascript "access 1 month"
ExpiresByType application/x-javascript "access 1 month”
ExpiresByType application/xhtml+xml "access 1 month""
ExpiresByType application/x-shockwave-flash "access 1 month"
ExpiresByType image/x-icon "access 1 year"
ExpiresDefault "access 1 month"
</IfModule>
Each ExpiresByType specifies an expiry term for a certain file type. These figures are not fixed in stone; you may need to adjust the timings to meet your specific requirements. Image files, in general, seldom change and may be cached for extended periods of time.
The final line is a catch-all for any file type that isn’t mentioned above. It is set to one month by default in this case.
After you’ve finished editing, save the file (and re-upload it through FTP if necessary), and then run a speed test in an incognito browser to check how your pages perform.
Leverage Browser Caching on Nginx Server
Open your configuration file (conf) in your server panel editor (or a code editor) and make the following modifications to tell your Nginx server to add Cache-Control and Expires headers.
Set Cache-Control Header in Nginx
Copy and paste the below statement into your configuration file’s server block:
location ~* \.(ico|pdf|flv|jpg|jpeg|png|gif|svg|js|css|swf)$ {
    expires 365d;
    add_header Cache-Control "public, no-transform";
}
The maximum expiration period for the specified file types is set to 365 days. You can change the time frame and/or the file types included. It also allows these files to be cached openly (for example, on CDN servers) rather than only privately in the browser’s local storage. Change the status from public to private in the above code to make your assets secretly cached.
Set Expires Header in Nginx
Copy and paste the statement below into the same server block to add Expires headers:
location ~* \.(jpeg|jpg|png|svg|gif)$ {
    expires 365d;
}
This will cause your picture assets to expire after a year. For files with shorter/longer expiration periods, re-paste this code in the same section, replacing the file extension names and inserting an alternative time period, as shown:
location ~* \.(html|css|js)$ {
    expires 30d;
}
Save your conf file and restart Nginx after making these modifications. To check how your sites perform, rerun a speed test in an incognito browser.
Tips to enhance the website performance in Shopify
If you have a Shopify eCommerce website, the following suggestions can help you dramatically enhance your site’s loading speed.
Performance Analysis
I’m going to go through a few tools for analyzing your site; clearly, implementing the advice will frequently enhance your site.
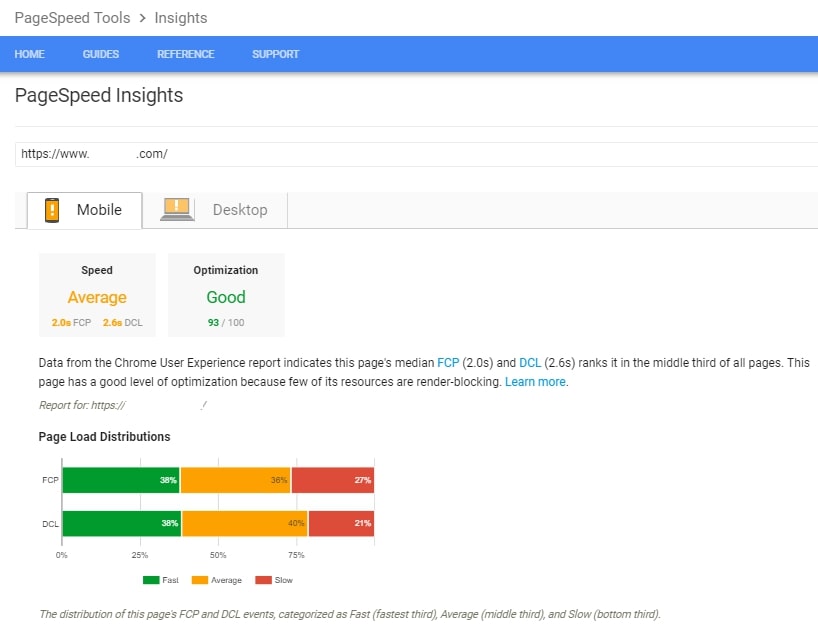
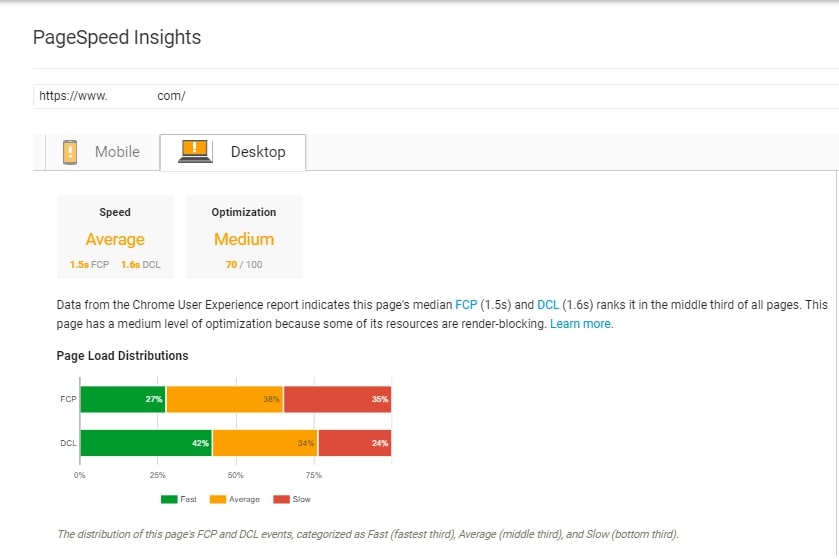
PageSpeed Insights
Google’s PageSpeed Insights tool produces a PageSpeed score and PageSpeed recommendations for your pages in order to make your website quicker. The tool displays the important aspects for both mobile and desktop, such as:
- Optimize images
- Minify CSS
- Minify JavaScript
- Leverage browser caching and Reduce server response time
- Avoid landing page redirects
- Gzip compression
Google also suggests that you test your site using the Test My Site Tool, allowing you to assess mobile-friendliness and mobile page performance. To try it out, go to Test My Site.
Enter your website’s URL, and Google will scan it and assess it in a few minutes. You may also obtain your free report by clicking on the “GET MY FREE” button and entering your email address for further information.
Gtmetrix
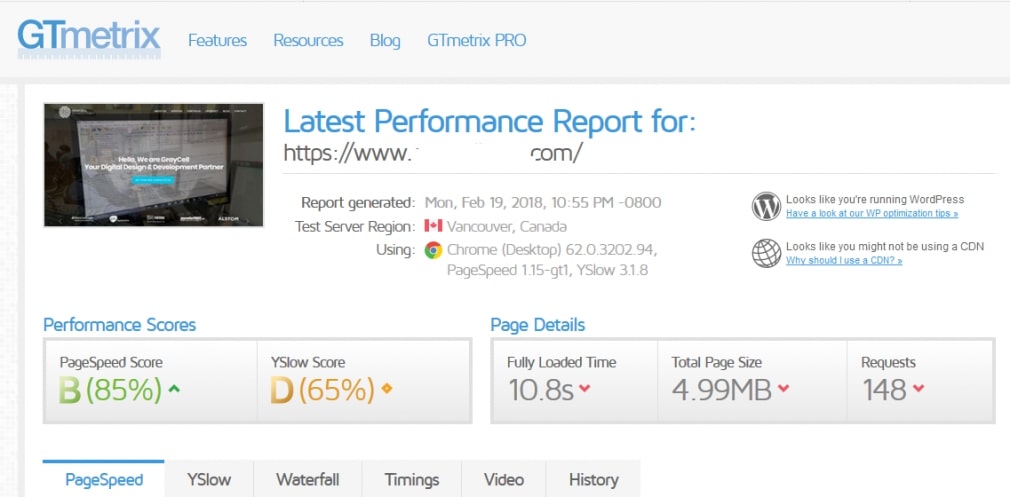
GTmetrix is another free tool that assesses your page speed performance, scores web pages from A to F, and provides advice on how to improve. We can view the precise length of time each request took to fulfill with Gtmetrix by clicking on the “waterfall” tab.
Pingdom
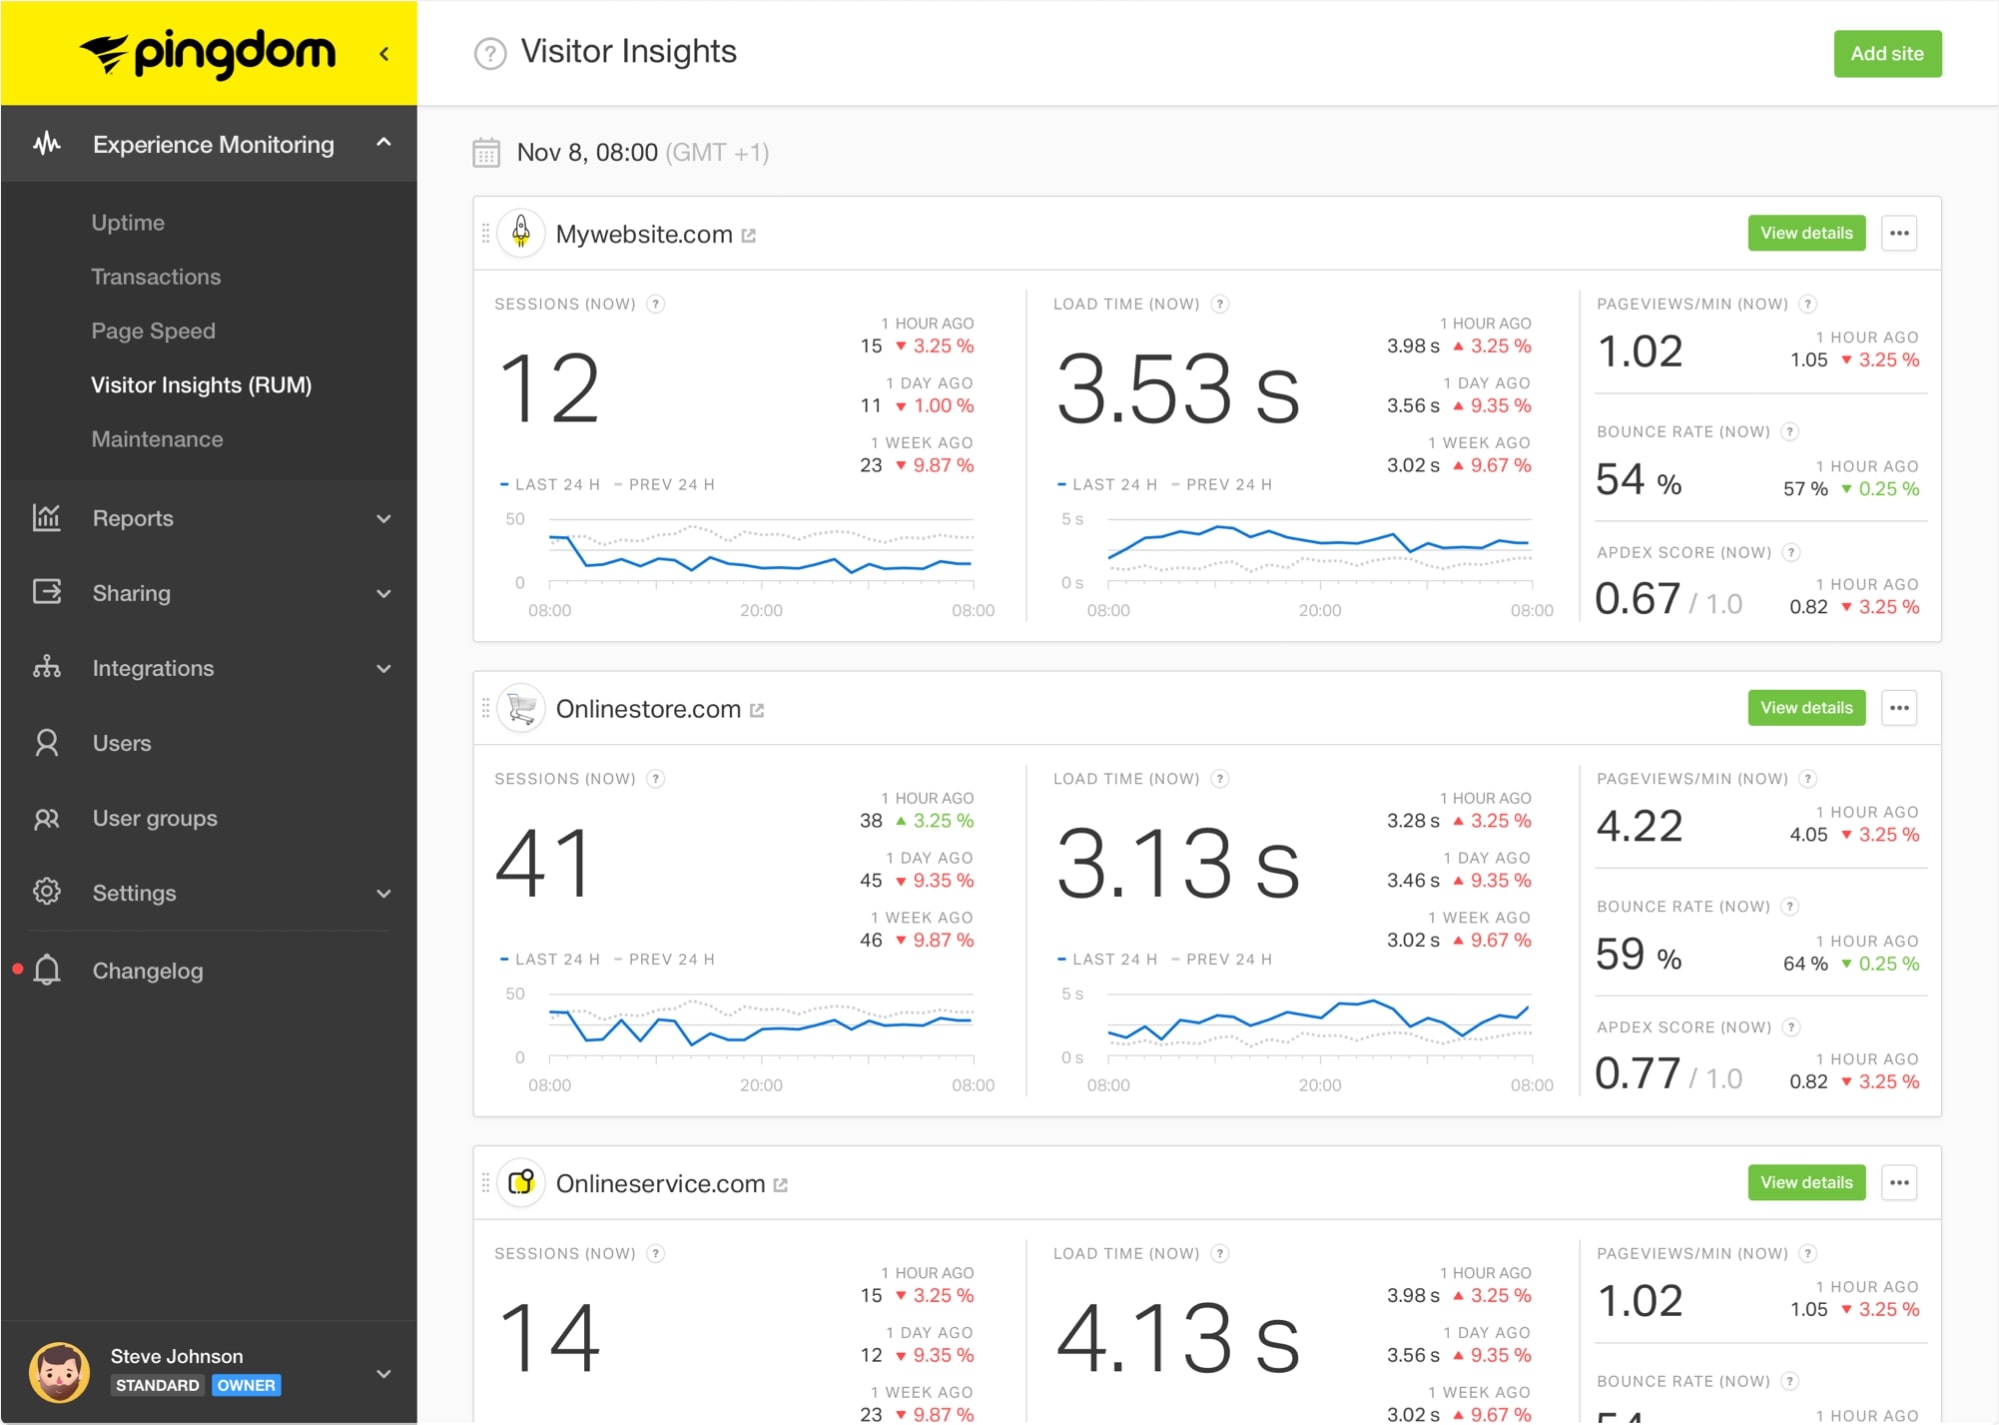
Pingdom will test your website’s load speed for free and provide advice on how to make it quicker.
AMP
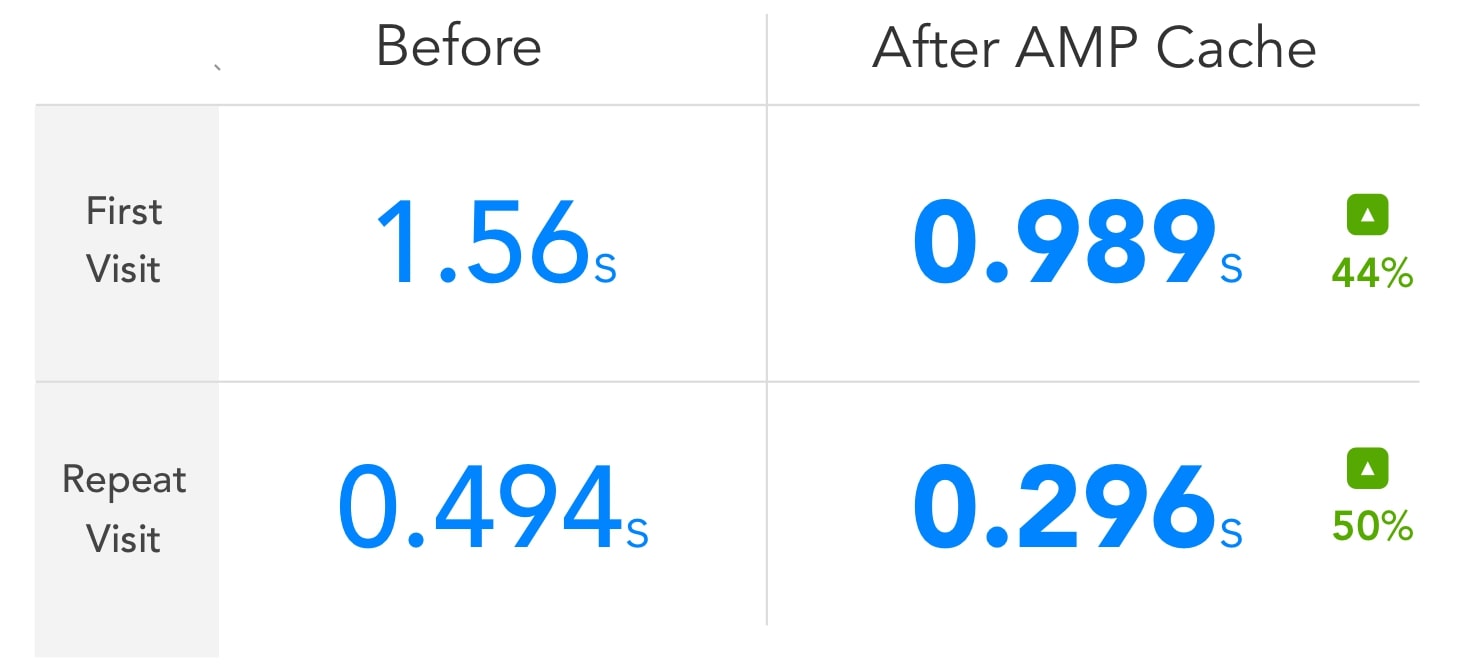
Accelerated Mobile Pages (AMP) is an open standard framework that allows any publisher to develop fast-loading mobile web pages.
Because more than half of all purchases are made on mobile devices, it is critical that your website be mobile-friendly and load quickly. As a result, with AMP (Mobile Accelerated Pages) technology, people on mobile devices may access your website rapidly.
With Shopify’s FireAMP or RocketAmp Apps, you can build AMP pages for your site quickly and simply. Both of these Apps have over four-star ratings on the Shopify App Store and enhance your mobile page loading time. Otherwise, you might explore developing similar AMP sites using the Shopify API.
Image Compression
You may add the following picture formats to Shopify:
- JPEG or JPG
- Progressive JPEG
- PNG
- GIF
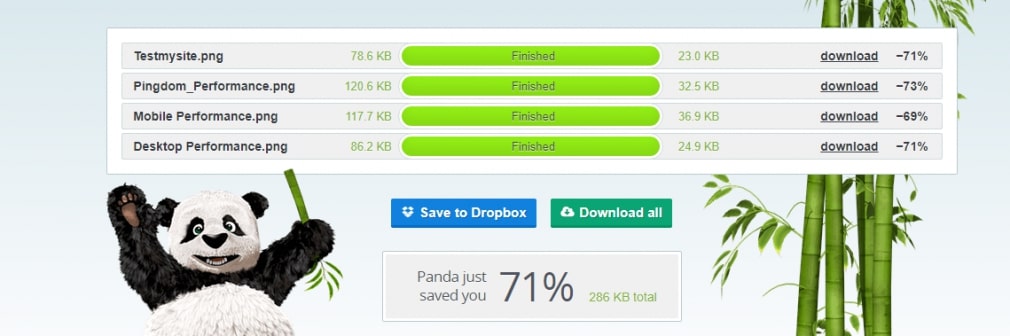
Image compression is crucial and required for quicker web page loading. When optimizing pictures, make sure they are reasonable and there aren’t too many on a single page. When doing image compression, you must keep the image’s quality in mind.
To minimize the size of new images, you can use tinypng.com or tinyjpg.com for free.
When you replace all of the pictures with optimized ones, the website load speed improves immediately. You may also use Crush.pics or Picture Optimizer to compress image files on a Shopify shop without sacrificing quality.
Download a lightweight and responsive Shopify theme
The truth is the site theme mostly determines that site store speed, thus it is usually suggested that you verify the following before installing a theme:
- Look for a theme that is both quick and responsive.
- Check for an up-to-date copy of your theme and the theme’s live preview. Run the theme preview page via Google PageSpeed Insight to evaluate what improvements may make the page quicker.
- Remember to keep your theme up to date once you’ve decided on one.
Reduce the number of apps
The vast majority of Shopify applications upload some JavaScript/CSS files to your shop. The primary issue is that while you are not using the app, the JavaScript/CSS files run in the background, slowing down your site’s speed.
As a result, you should go through your store and uninstall any applications that you are no longer using. There might be some programs that you tried out but forgot to delete.
Reduce the number of HTTP requests
To determine the overall number of HTTPS requests made by your page, use GiftOfSpeed’s HTTP Requests Checker tool. HTTP requests can be reduced by performing the following:
- CSS scripts should be combined and inlined.
- Smaller JavaScripts should be inlined.
- All JavaScripts should be combined.
- Reduce the usage of design and functional imagery.
- Sprites are picture sprites in CSS.
- Images should be converted to Base64 code.
- Keep the number of social buttons to a minimum.
Reduce the number of redirects and broken links.
The performance problem might be caused by too many redirects and broken links. What is the simplest approach to reduce the number of redirects and broken links? Redirects should be avoided, and broken links should be repaired.
For redirects
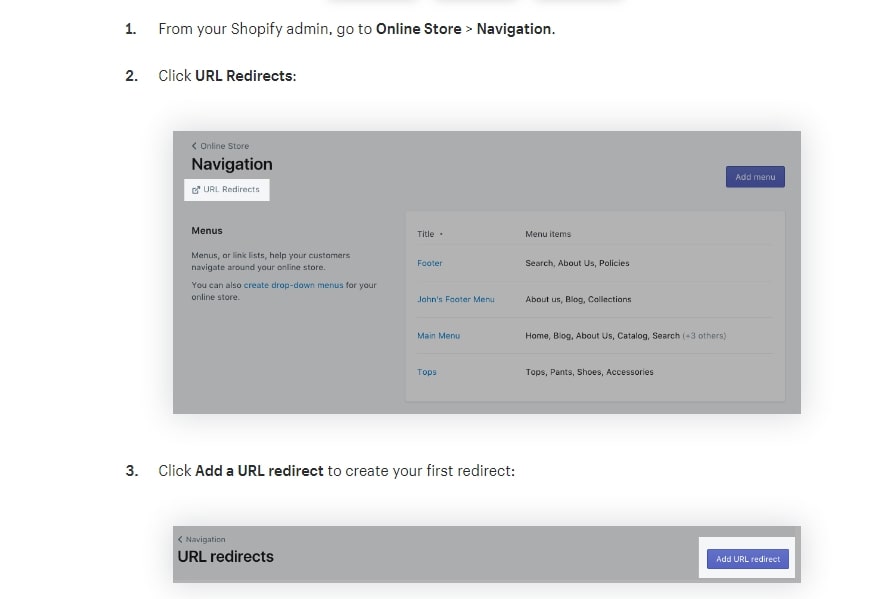
Unnecessary redirection degrades performance and speed, which might influence the total load time of the page. In Shopify, you may use the built-in redirects function named “URL redirect” to implement 301 redirects.
For broken links
Broken links on your website may be damaging, increasing your needless HTTP requests and providing a poor user experience. You may use free programs like Broken Link Checker and Xenu to detect and repair broken links on your website.
Using Google Tag Manager to organize your tracking codes
!Google Tag Manager](https://cdn4.avada.io/media/shopify/0teUUDG.jpg)
Typically, you add different tracking codes for Google Analytics, AdWords conversions, objectives, and remarketing tags, among other things, on your own or submit it to the developer; this procedure takes time and eventually slows down overall site performance. All of your tags are saved in one location with the aid of Google Tag Manager.
Instead of using sliders, use the Hero Layout
Sliders have been popular for a long time, and most users add 5-6 high-quality photos to the slider, which increases the total load speed of the page. According to research, it is now time to entirely disregard them.
Some intriguing statistics on why we should disregard Sliders
- Users do not click on sliders; in fact, just 1% of users click on a slider.
- Sliders and carousels irritate users and reduce visibility.
- Sliders and carousels are detrimental to SEO.
- Sliders are unsuitable for mobile.
- Sliders push your content down Source Sliders can harm your SEO.
Use a single, high-quality Hero Layout picture with a clear call to action instead of a slider. Check out Dropbox; they use a hero layout.
Summary
You may drastically increase your site’s page performance by establishing guidelines for how browsers should cache your website.
Once these guidelines are in place, your website should load faster for the majority of people, especially repeat visitors. You can always use a free tool like Google’s PageSpeed Insights or a premium alternative like GTmetrix to assess the impact of your caching on page performance.
I hope this article will help you leverage browser caching in particular and grow your business. Just remember that with Shopify, browser caching is a server-side operation, and if there is a third-party library or any program that is unneeded or wishes to be removed, the client authorization is required. Accessing the leveraging browser caching in Shopify requires the client’s authorization.


