
Besides scheduling a page, WordPress also allows you to schedule a post to publish it automatically at a specific time in the future.
In this tutorial, you will be instructed on how to schedule a post on WordPress.
How to schedule a post on WordPress
Schedule and publish a post
-
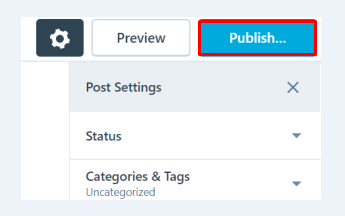
Step 1: First, you can go to the menu on the right of your post editor.
-
Step 2: Click on Publish button, but don’t worry because it will not be published yet.
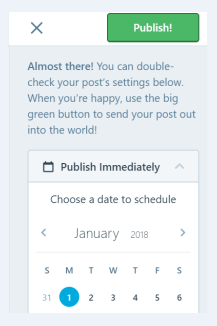
- Step 3: Choose Publish Immediately or set time and date to schedule your posts first. You can use the calendar appearing to select the date and time you want to publish your post.
Here are some handy tips for using this calendar:
-
Change the month by using the right or left arrows.
-
Change the year by getting your cursor moved over the year before clicking on the arrows appearing.
-
Select any day in this calendar.
-
Use to inputs at the bottom to adjust the time.
-
Your site is based on the
time zone setting. You will notice a note that the button if you post from different time zones. -
Right after you schedule dates and time, the Publish button will modify to Schedule button. You will see that the current date is indicated by the orange circles, meanwhile, today’s date is circled with black color.
-
Always double check the date at the top of the calendar before publishing and confirm if it is AM or PM.
-
Step 4: After selecting your date and time, don’t forget to click on Schedule. This action will help schedule your posts and the button now says Update.
However, there is a thing you should bear in mind. Scheduled posts can be triggered by the first visit to the page on or after you set exact date and time. In case you see your scheduled time is gone and your posts have not been published yet, you need to log out your WordPress dashboard and check the front’ page. Sometimes, your visit can cause your posts to appear. In addition, you should not schedule your posts over 100 posts. Any post which is schedule more than that number cannot be published.
Republish a post
Sometimes, you want to republish your old posts. This is not a difficult task since you have two different choices.
-
You can easily schedule your old posts by getting the date and time you previously published edited and replacing with new date and time before clicking Schedule. As the posts are scheduled, it will jump from the current position to the most recent position in your post timeline. The post’s link also changes to get the new date reflected. When a post is rescheduled, it won’t redistribute to the email of subscribers.
-
Or, you can republish the posts by changing the post’s status to
Draft, then click on Update and Publish. After you do this, the post will be redistributed immediately to your subscribers’ emails. But, the publication time and date can stay the same, therefore, the link of the posts will also stay unchanged.
Un-schedule a post
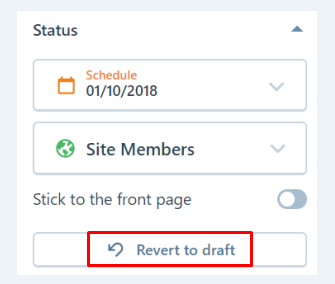
If your posts are already published, however, you think again and do not want to publish them yet, go back to the Edit Post page for the scheduled posts.
As you can see, in the menu located on the right of your post editor, you can head to the status of the post. After that, click Revert to draft button and this will delete the schedule from the post. From now, your posts cannot be posted at the originally scheduled time. Click on Schedule button to schedule back your post.
Troubleshoot schedule posts
In case your scheduled posts are not present on the front’s page, you should check the following lists:
- Is the time zone correct in the Settings -> General page?
- Have you saved your posts as drafts instead of scheduling it? You need to click the Schedule button for the posts you want to publish.
- Did anyone visit your posts? If not, you had better try to log out WordPress and visit the front’s page again.
- Do not reschedule over 100 scheduled posts. Try to reduce that number to less than 100.
- Is the
Post VisibilitysetPrivate?
Conclusion
With our post on how to schedule a post on WordPress, we hope that you can complete your task successfully. By scheduling your posts, you do not need to worry about when your posts will be published. Don’t forget to help us share this article if you find it helpful.

