
Webhooks are known as an easy way to aid in push notifications. In fact, the push notification is a HTTP POST, which can be triggered by some actions. This is a function which is aimed at developers who really want to receive data from actions occurring on a blog. However, only admin level users are able to add and manage the Webhooks.
In this article, you will be guided on how to insert a Webhook on WordPress. But before that you should spend time discovering WP Webhooks with us now.
To insert a Webhook on WordPress
What is a Webhook and its features?
If you want to perform some typical actions on the WordPress site from anywhere, this will be your plugin. It helps to turn the site into a Webhook system optimized so that users can connect with their third-party apps through automate.io, Zapier or another third-party service on your WordPress site.
As mentioned earlier, a Webhook lets you get the data from another services. For instance, it aids in creating a post or a user on your WordPress site, then sends you the data, followed by some certain actions.
USAGE FUNCTIONS:
-
Generate a WordPress user when new signup appears on Teachable
-
Generate a WordPress post using Alexa (known as the Voice Control)
-
Generate WordPress users from the list of Excel
-
Send data to intercom as soon as a user logs into your own WordPress website
FEATURES:
-
Advanced Developer Hooks
-
Generate posts and users through external webhooks on your site (Custom post types supported)
-
Send data on the register, login new post, update, update post, and many more
-
Insert multiple Webhooks for every trigger and for actions
-
Test available triggers with a single click
-
Test available actions within the plugin
-
Fully translatable as well as ready for multilingual sites
-
Settings page optimized for more control
-
Supports JSON, XML, plain text/HTML and form under-code
-
Supports Zapier, automate.io and more
-
Full WPML Support
How to add a Webhook to WordPress
Here is the instruction to help you insert a Webhook.
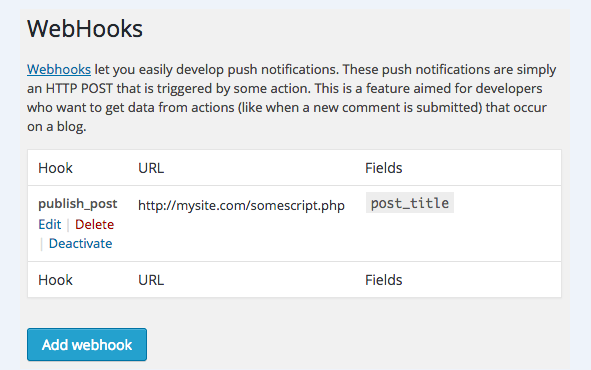
- Step 1: The first thing you need to do is to find Webhooks by clicking on Settings -> Webhooks in your dashboard.
- Step 2: You can start adding a webhook by choosing Add webhook button, then filling in a room.
-
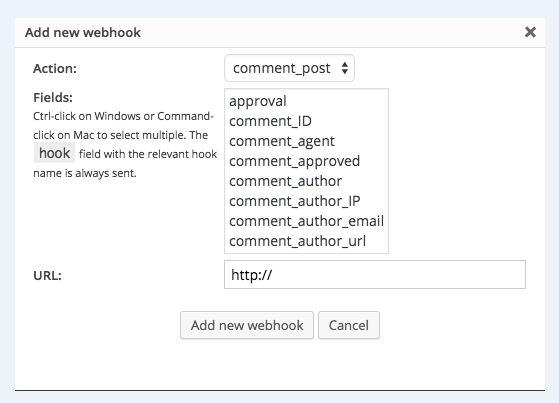
Step 3: After that, you can select actions as well as fields that are linked with an action to be inserted into the URL. In addition, the URL can receive the HTTP POST requirement as the chosen action fires. The post data will have selected fields and an additional field that is called a hook, containing an action field.
-
Step 4: It is time for you to modify, remove, activate and deactivate the webhook which uses the selections in your webhook row.
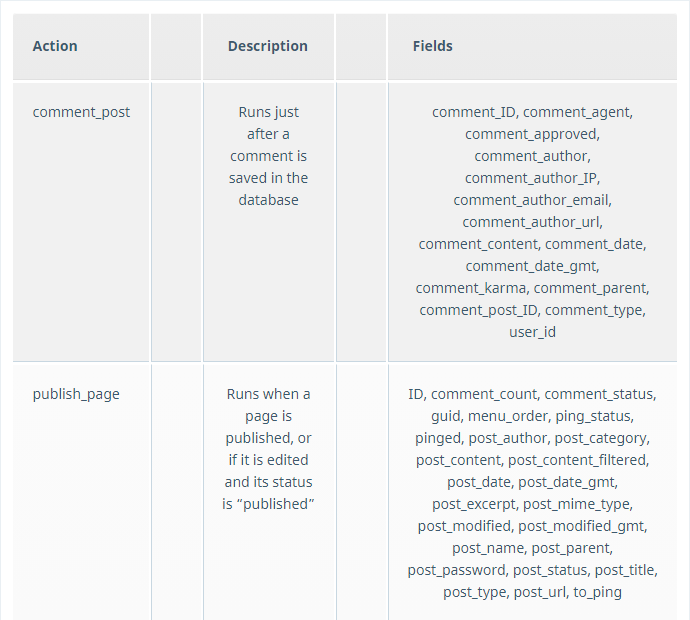
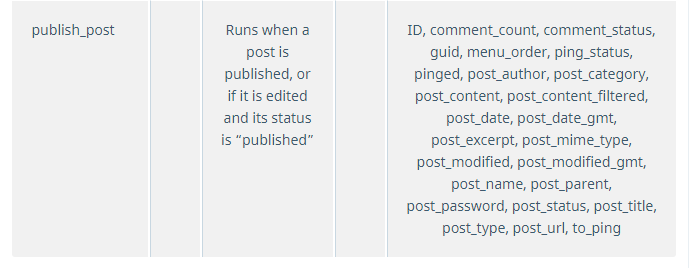
Possible Actions or fields
Let’s look at the following table to know some of the possible actions or fields of Webhooks.
Conclusion
With this above article on how to insert a Webhook on WordPress, we hope that you now can have a basic knowledge of what a Webhook is and how to add it on your WordPress site successfully. For more information and advice, don’t forget to keep in touch with us by leaving us a comment or sending us an email.

