
As you might not know about, posts are designed to be shown in the reverse chronological order (it means from the newest to the oldest), but, sometimes, you want to reverse this order and display the posts in chronological order (it means from the oldest to the newest). In this article, we will instruct you how to arrange your posts chronologically on WordPress with few options.
How to arrange your posts chronologically on WordPress
Add a string to the URLs
- Step 1: You can find the URL of your posts you want to display them chronologically. Select your blog feed, a specific category, and even a tag. Then, you can have your URL like this:
http://dailypost.wordpress.com/
- Step 2: Start choosing a date. You can opt the date you want to be starting points of your posts. For example, let’s take March 01, 2019.
- Step 3: Insert the date to the URL, then your URL looks like:
http://dailypost.wordpress.com/2019/03.
This will give you all posts from March, beginning with the newest posts.
- Step 4: Reverse this order by inserting
/?order=ascto the end of this above URL:
http://dailypost.wordpress.com/2019/03/?order=asc.
Now, you can see all posts from March with the oldest posts first.
- Step 5: You can create your custom menu with a link to your created URL (optional). If you want to show all posts for a year, the URL will like this:
http://dailypost.wordpress.com/2019/?order=asc
If you want to show posts for a specific category like the substitute topic-ideas for the category name:
http://dailypost.wordpress.com/category/topic-ideas/?order=asc
If you want to show posts for a tag like chocolate tag, the URL looks like this:
http://dailypost.wordpress.com/tag/chocolate/?order=asc
Use a shortcode
A shortcode is known as a WordPress specific code which allows you to do some things with such little efforts. In addition, shortcodes are able to embed files or create things requiring a lot of complications.
You can create a page to help show your posts and don’t forget to add a Display Posts Shortcode to that page. However, you need to make sure to insert the order parameter to the shortcode (order = “asc”). Another choice is to form a sticky post and insert the shortcode into it if the shortcode works on your post also.
Alter publish date
Before publishing your posts, you can adjust the date on them manually to set the order you would like your posts to be displayed. In case your post has been published, you can help edit them as well as adjust the date publishing. This choice might be ok if you do not have a huge amount of published posts.
Create a book-like structure
If you want to create a book, let’s follow these steps:
- Step 1: Create a new page from Pages -> Add called Index.
- Step 2: Create a new page from Pages -> Add called Chapters.
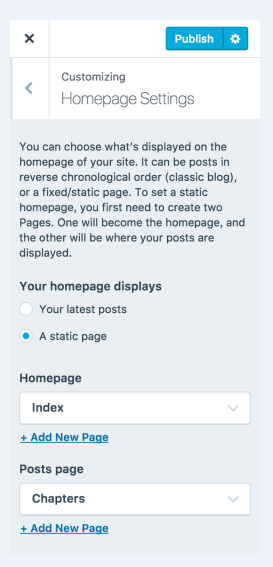
- Step 3: Head to Customizer -> Homepage Settings. Choose A static page located under Front page displays. Don’t forget to set Index as Homepage and set Chapters as Posts Page.
- Step 4: Create a new post from Blog Posts -> Add and this will be the Chapter 1. After publishing it, you can copy the URL of this new post.
- Step 5: Edit Index page, then create a link to your Chapter 1.
- Step 6: Repeat step 4 and 5 for each chapter of the book.
Bear in mind that recent comments, posts or archives widgets can break the book’s flow, hence you may need to get rid of them. You can use pages for chapters rather than posts.
If you want to place your posts in chronological orders, follow those instructions below.
Conclusion
With the above options on how to arrange your posts chronologically on WordPress, we hope that you can do this job without difficulties. You can opt for different options to show your posts in order you want. Do you have any questions on arranging all of your posts in chronological order? If yes, don’t hesitate to contact us or leave us a comment.

