
Shopify webhooks: A complete guide for Shopify store owners

This is a complete guide for Shopify store owners about Shopify webhooks. It is a concept that has become increasingly popular in recent years. You may have heard or not. However, in this article, I will take you through to learn about Shopify webhooks in a more in-depth manner.
As we all know, interactions on the website are described by events. As a result, webhooks are increasingly used because they are relatively easy and useful to reflect events. Let go ahead to find out more and know how to take advantage of webhooks effectively.
What is Shopify webhooks?
Shopify webhook is a feature that allows a website to notify other systems when events arise. For example, when you create a new order or customer, it will help other systems can actively take information from CRM when data arises. In particular, webhooks can also store those data.
With webhooks, you will receive push notifications when an event occurs. You will not need to probe the API to determine whether these events have occurred or not. Webhooks allows you to provide a URL for the webhook provider to send requests to. This means you need to set up a URL for your application to be accessible on the public web. Most webhooks will post the event data to the URL provided in one of two forms: as JSON (regular) or XML.
At the moment, most shop owners use Webhooks for:
-
Adjusting the product’s price
-
Creating an order
-
Integrating accounting software
-
Notifying your pager or IM customers when you are offline
-
Collecting data to the data warehouse
-
Deleting customer data from your database when they uninstall the application.
-
Notifying shippers about orders and filter orders.
Supported Shopify webhook events and topics
We learned about the concept of Shopify webhooks and know what it is often used for. Below is a list of supported Shopify webhook events and topics.
| Events | Topics |
|---|---|
| Cart | carts/create, carts/update |
| Checkout | checkouts/create, checkouts/update checkouts/delete |
| Collection | collections/create, collections/update collections/delete |
| CollectionPublication | collection_listings/add, collection_listings/remove, collection_listings/update |
| Customer | customers/create, customers/disable, customers/enable, customers/update customers/delete |
| CustomerSavedSearch | customer_groups/create, customer_groups/update customer_groups/delete |
| DraftOrder | draft_orders/create, draft_orders/update draft_orders/delete |
| Fulfillment | fulfillments/create, fulfillments/update |
| FulfillmentEvent | fulfillment_events/create fulfillment_events/delete |
| InventoryItem | inventory_items/create, inventory_items/update inventory_items/delete |
| InventoryLevel | inventory_levels/connect, inventory_levels/disconnect, inventory_levels/update |
| Location | locations/create, locations/update locations/delete |
| Order | orders/cancelled, orders/create, orders/fulfilled, orders/paid, orders/partially_fulfilled, orders/updated orders/delete |
| OrderEdit | orders/edited |
| OrderTransaction | order_transactions/create |
| Product | products/create, products/update products/delete |
| ProductListing | product_listings/add, product_listings/remove, product_listings/update |
| Refund | refunds/create |
| Shop | app/uninstalled, shop/update |
| ShopAlternateLocale | locales/create, locales/update |
| TenderTransaction | tender_transactions/create |
| Theme | themes/create, themes/publish, themes/update themes/delete |
What can you do with Shopify webhook resource?
The Shopify API allows you to do the below with Shopify webhook resource:
GET /admin/api/2021-01/webhooks.json(Bring back a list of webhooks)
Note: This endpoint implements pagination using the links provided in the feedback header since version 2019-10.
| address | Retrieve webhook subscriptions that send a POST request to this URI. |
|---|---|
| created_at_max | Retrieve created webhook subscriptions before a certain date and time (format: 2014-04-25T16: 15: 47-04: 00) |
| created_at_min | Retrieve created webhook subscriptions after a certain date and time (format: 2014-04-25T16: 15: 47-04: 00) |
| fields | List of properties separated by commas for the items in the result list. Use this parameter to restrict the list of items returned to the properties you specify. |
| limit | The maximum number of webhook subscriptions should be returned. Setting this parameter outside of the maximum range will return an error. (Default: 50, maximum: 250) |
| since_id | Restrict the list returned for webhook subscriptions with id greater than the specified since_id. |
| topic | Display registers webhook with a certain topic. For a list of valid values, refer to subject property.> |
| updated_at_min | Retrieve updated webhooks before a certain date and time (format: 2014-04-25T16: 15: 47-04: 00). |
| updated_at_max | Retrieve updated webhooks after a certain date and time (format: 2014-04-25T16: 15: 47-04: 00). |
Bring back the list of all webhook subscriptions for your store
GET /admin/api/2021-01/webhooks.json
Bring back the list of all webhook subscriptions for your store after a specified id
GET /admin/api/2021-01/webhooks.json?since_id=4759306
GET /admin/api/2021-01/webhooks/count.json(Bring back a count of all existing webhook subscriptions)
| address | Retrieve webhook subscriptions that send a POST request to this URI. |
|---|---|
| topic | Display registers webhook with a certain topic. For a list of valid values, refer to subject property.> |
Count all webhook subscriptions for your store
GET /admin/api/2021-01/webhooks/count.json
Count all webhook subscriptions for the subject orders/create
GET /admin/api/2021-01/webhooks/count.json?topic=orders/create
GET /admin/api/2021-01/webhooks/#{webhook_id}.json(Retrieve a single Webhook)
| fields | List of properties separated by commas for the items in the result list. Use this parameter to restrict the list of items returned to the properties you specify. | |——–|——————————————————————————————————————————————————————-|
Bring back a single webhook by its id
GET /admin/api/2021-01/webhooks/#{webhook_id}.json
POST /admin/api/2021-01/webhooks.json(Create a new Webhook)
Make a new webhook subscription by specifying both the address and the topic.
| format | Use this parameter to select the data format for the payload. Valid values are JSON and XML.
(JSON is the default value) |
|——–|———————————————————————————————————————————|
Sign up to order create webhooks
POST /admin/api/2021-01/webhooks.json
{
  "webhook": {
    "topic": "orders/create",
    "address": "https://whatever.hostname.com/",
    "format": "json"
  }
}
Trying to create a webhook register without address and subject will return error 422 - Entity could not process
POST /admin/api/2021-01/webhooks.json
{
  "webhook": {
    "body": "foobar"
  }
}
PUT /admin/api/2021-01/webhooks/#{webhook_id}.json(Customize an existing webhook) Update the webhook registration topic or address URIs
Update your webhook registration, so it POSTs to another address
PUT /admin/api/2021-01/webhooks/#{webhook_id}.json
{
  "webhook": {
    "id": 4759306,
    "address": "https://somewhere-else.com/"
  }
}
DELETE /admin/api/2021-01/webhooks/#{webhook_id}.json(Delete an existing Webhook)
Remove an existing webhook from a store
DELETE /admin/api/2021-01/webhooks/#{webhook_id}.json
The above is a summary of all you can do with Shopify’s webhook resource. Next, let learn about how to create Shopify webhooks with a few simple steps.
How to create Shopify webhooks?
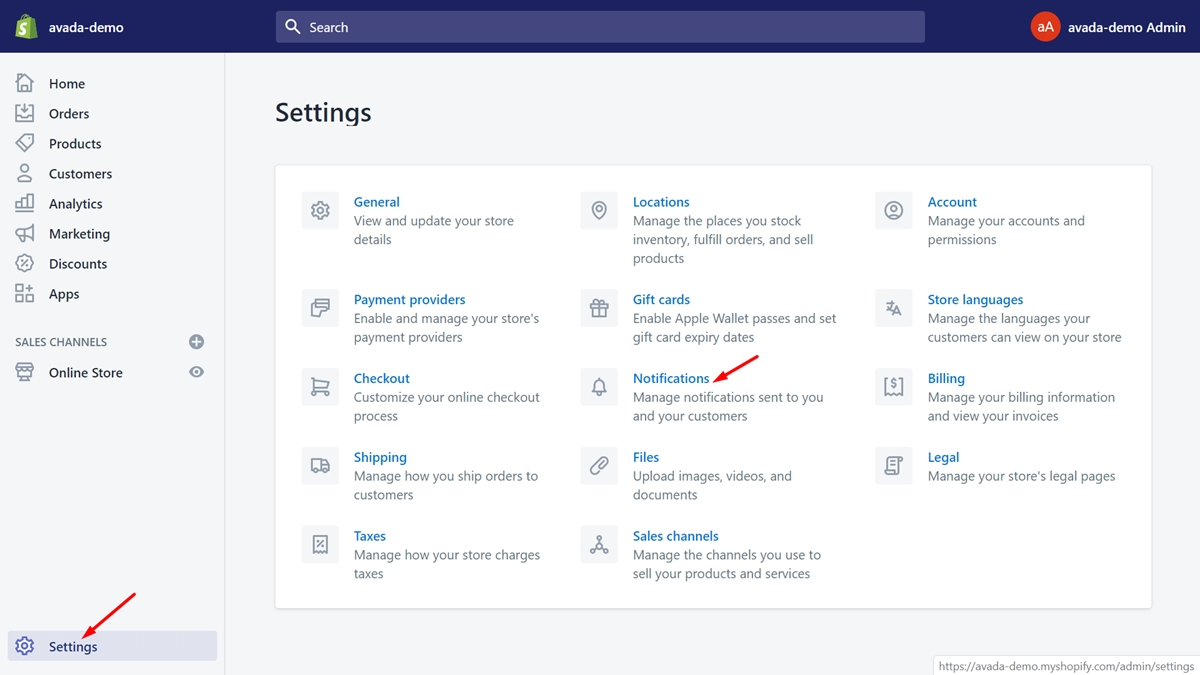
Step 1: Go to Notifications
You must be in your Shopify admin page now. Then, make sure to tap on Settings in the left-hand menu and click Notifications.
Step 2: Go to the Webhooks section
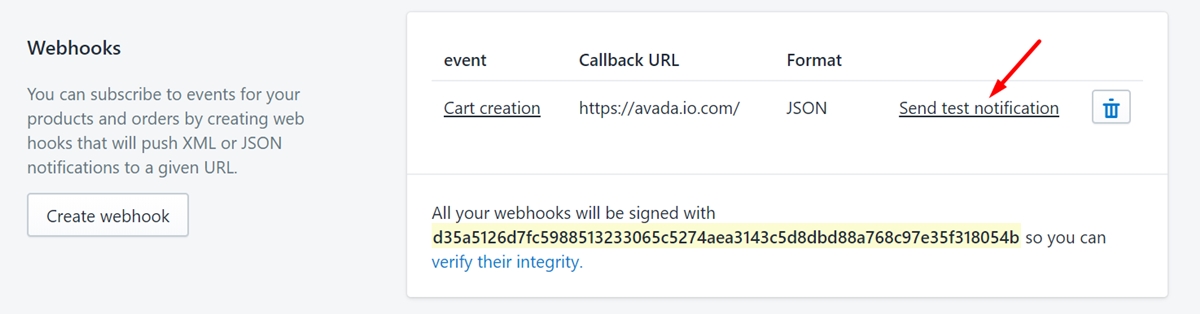
In this step, you need to scroll down to find the Webhooks section.
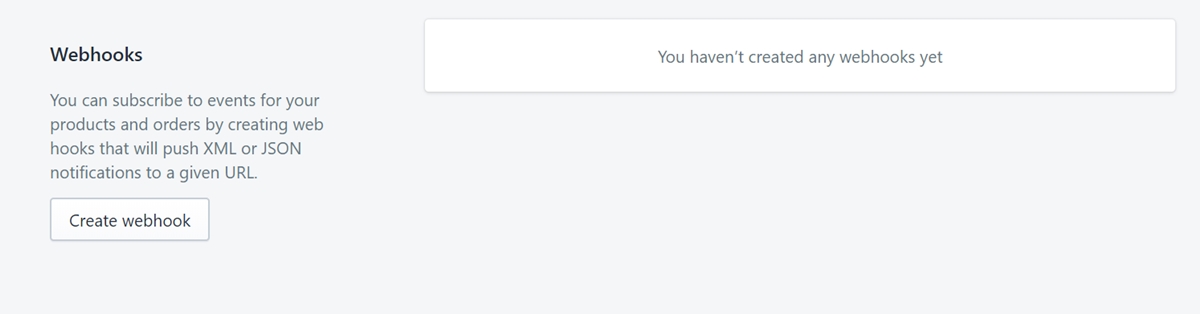
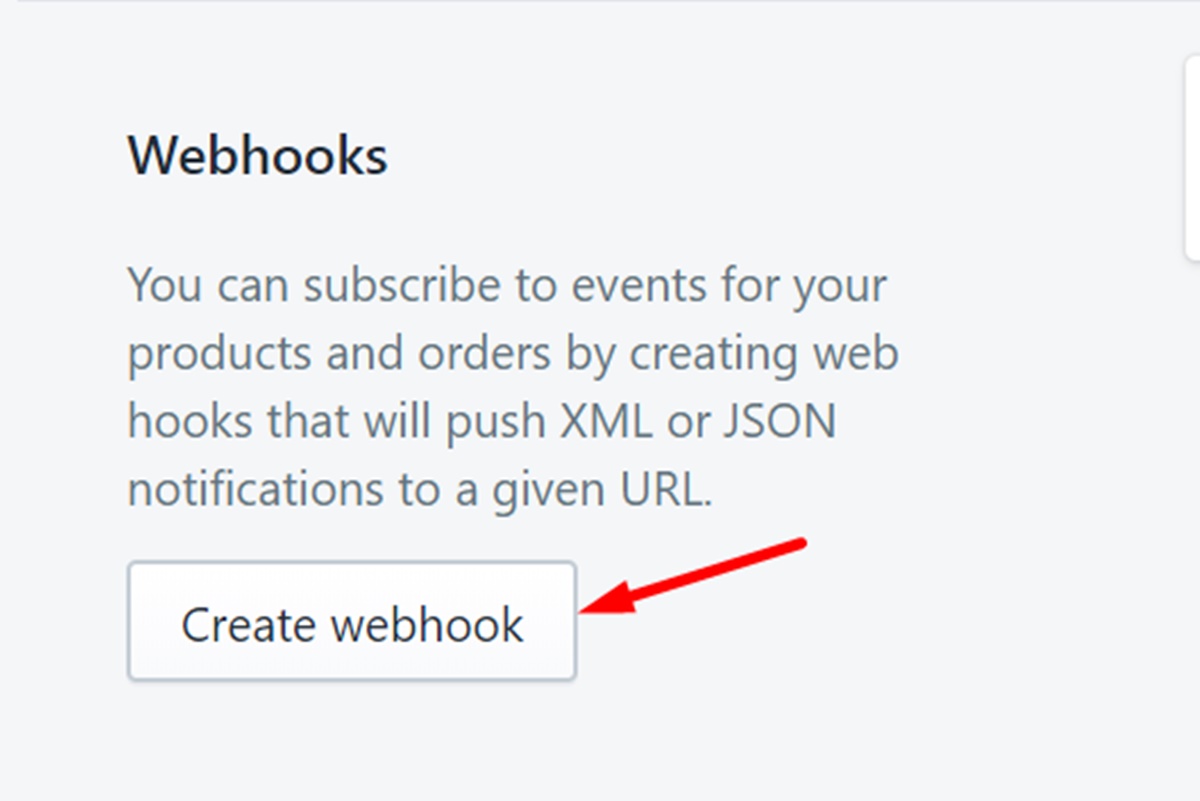
Step 3: Click Create webhook
After you’ve found the Webhooks section, you will see a button called Create webhook. Click it now and a new dialog will appear.
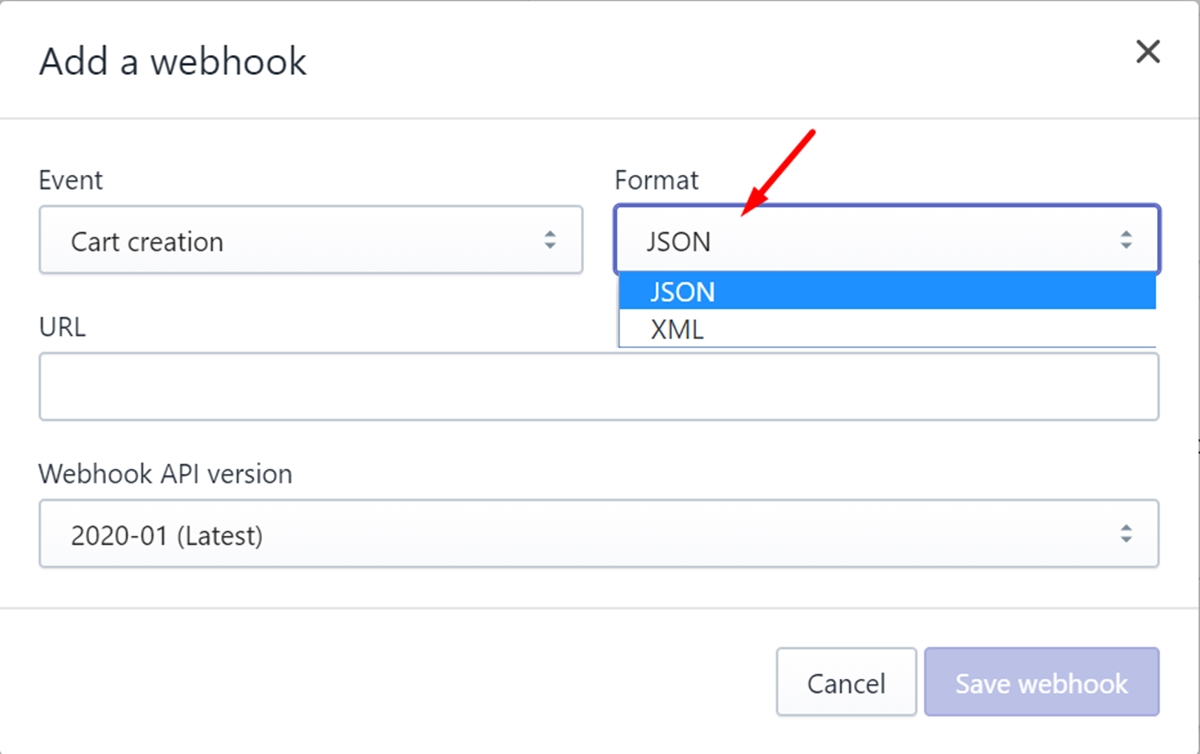
Step 4: Select Event
In the first drop-down, what you need to do is select Event from the list below:

| Events | Actions |
|---|---|
| Cart creation | it will send a webhook every time a cart is created |
| Cart update | it will send a webhook every time a cart is updated |
| Checkout creation | it will send a webhook every time a checkout is created |
| Checkout deletion | it will send a webhook every time a checkout is deleted |
| Checkout update | it will send a webhook every time a checkout is updated |
| Collection creation | it will send a webhook every time a collection is created |
| Collection deletion | it will send a webhook every time a collection is deleted |
| Collection update | it will send a webhook every time a collection is updated |
| Customer group creation | it will send a webhook every time a customer group is created |
| Customer group deletion | it will send a webhook every time a customer group is deleted |
| Customer group update | it will send a webhook every time a customer group is updated |
| Customer creation | it will send a webhook every time a new customer is created |
| Customer deletion | it will send a webhook every time a customer record is deleted |
| Customer disables | it will send a webhook every time a customer account is disabled |
| Customer enables | it will send a webhook every time a customer account is enabled |
| Customer update | it will send a webhook every time a customer record is updated |
| Draft order creation | it will send a webhook every time a draft order is created |
| Draft order deletion | it will send a webhook every time a draft order is deleted |
| Draft order update | it will send a webhook every time a draft order has been updated |
| Fulfillment creation | it will send a webhook every time fulfillment is created on order |
| Fulfillment update | it will send a webhook every time fulfillment is updated on order |
| Order cancellation | it will send a webhook every time an order is canceled |
| Order creation | it will send a webhook every time an order is created |
| Order deletion | it will send a webhook every time an order is deleted |
| Order fulfillment | it will send a webhook every time an order is fulfilled |
| Order payment | it will send a webhook every time an order has been paid |
| Order update | it will send a webhook every time an order has been updated |
| Product creation | it will send a webhook every time a product has been created |
| Product deletion | it will send a webhook every time a product has been deleted |
| Product update | it will send a webhook every time a product has been updated |
| Refund creates | it will send a webhook every time a refund is issued |
| Shop update | it will send a webhook every time a shop property is updated |
| Theme creation | it will send a webhook every time a theme is created |
| Theme deletion | it will send a webhook every time a theme is deleted |
| Theme update | it will send a webhook every time a theme property is updated |
Step 5: Select the format between JSON or XML
Now, take a look at the second drop-down. Select the format between JSON or XML which you expect to get information from Shopify.
Step 6: Enter the URL
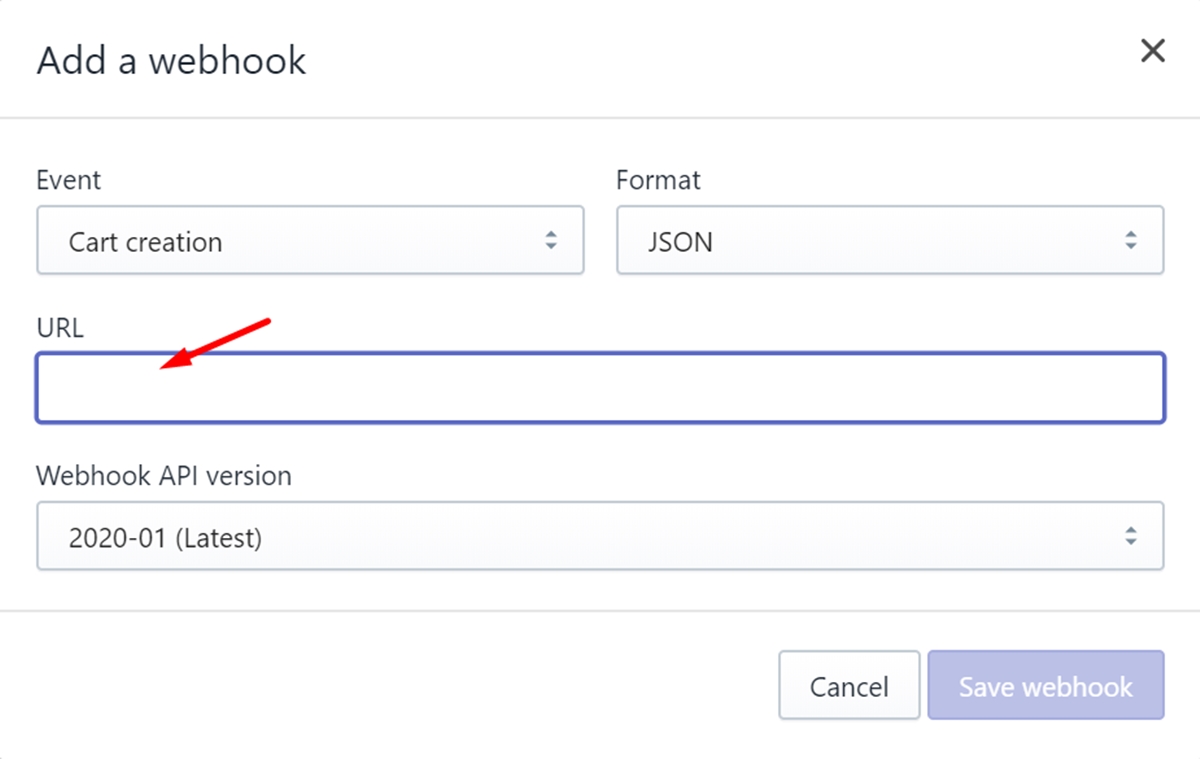
The URL section is the place that allows you to enter a URL that will store data. Please note that webhooks cannot return the following URLs:
- Any URL that ends with the word “internal” (i.e. thisshop.com/i Internal)
- Localhost
- Shopify domain names (i.e. shopify.com and myshopify.com)
- FAKE domains like www.example.com
Step 7: Tap on Add webhook
After you’ve entered the URL, tap on Save webhook. Now, you can see your webhook display in the Webhooks field.
Step 8: Optional: Test your webhook
To make sure the information you want is sent to the correct URL, you can test your webhook by tapping on the send test notification link. Verify at the URL you have entered above to know that it is working properly.
How to use Shopify webhooks?
How to configure Shopify webhooks?
To configure Shopify webhooks, you can carry out in 2 different ways. The first one is using the API and the second is configuring in your Shopify admin.
If you choose to do the first way which is using the API, you need to create an HTTP POST request. Then, send it to the Webhook resource which is in the REST Admin API.
If you expect to configure a webhook in your Shopify admin, you can follow 3 steps below:
-
Step 1: Make sure to click
Settingsin your admin page and go toNotification. -
Step 2: Find the
Webhooksfield and tap onCreate a webhook. -
Step 3: Select the format between JSON or XML that you expect to listen to.
After you finish creating a Webhooks, you want to validate its integrity. To do this, continue to learn about the way to test Shopify webhooks.
How to test Shopify webhooks?
You are able to use a publicly available service like Beeceptor. Or else, you can also run the local server. If you want to run a local server, then you need to make it public using a service like ngrok or Pagekite. Below are the URLs which do not work as endpoints for webhooks:
-
Any URL that ends with the word “internal” (i.e. thisshop.com/i Internal)
-
Localhost
-
Shopify domain names (i.e. shopify.com and myshopify.com)
-
FAKE domains like www.example.com
You can test your webhook by using your Shopify admin by doing the followings:
-
Step 1: Find the
Webhookssection in theNotificationsfield. -
Step 2: Make sure to tap on the
Send test notificationbutton which is beside the webhook you expect it to be tested.
You may notice an example webhook sent to the configured webhook URL.
How to create an endpoint for Shopify webhooks?
You must keep in mind that your endpoint needs to meet the requirement that it has to be an HTTPS webhook address with a valid SSL certificate. So it can handle event notifications correctly. Furthermore, you also need to perform a verification implementation to ensure the webhook requests originate from Shopify.
Payloads
For each payload, it will contain an XML or JSON object along with data for the webhook event. Depending on the event registered, the structure and content of each payload will vary.
Receiving a webhook
After you’ve just registered the webhook URL, you will receive an HTTP POST request sent by Shopify to the specified URL every time that event happens. The request contains JSON / XML data including POST parameters. For those parameters that are related to the event, they have triggered the request.
Note: You need to disable Cloudflare on your domain for registered webhook URLs if you are using it.
When distributing payloads to webhook HTTPs, Shopify will verify the SSL certificate. Ensure that your server has a standard configuration to support HTTPS. In addition, the SSL certificate is validated.
Responding to a webhook
It’s undeniable that your webhook receives data by sending a 200 OK response. This means that for any response outside the 200 range (including 3XX HTTP redirect code), you will not receive webhooks. Shopify will treat them as an error response and will not track redirects for webhook notifications.
Frequency
Shopify has applied a five-second waiting time, which means Shopify will wait five seconds to respond to each request for a webhook. Furthermore, Shopify has also implemented a retry period for subscriptions. In case of an error or no response, it will retry the connection with frequency 19 times / next 48 hours. Registration for webhook will be deleted if all 19 times fail in a row. The application’s emergency developer will receive an email warning that the subscription will be deleted.
To avoid such situations happening, you should consider delaying application processing until successfully sending webhook feedback.
Verifying webhooks
That electronic signature calculation is primarily used to verify webhooks created through APIs by a Shopify application. Each webhook request (including base64-encoded X-Shopify-Hmac-SHA256 header) is created by the application’s general secret along with the data sent in the request.
In addition, for webhooks created through Shopify administrators, they will be verified using the secret shown in the Webhooks field of the Notification page.
You can calculate the HMAC message using the following algorithm and compare it with the value in X-Shopify-Hmac-SHA256 to make sure it is a request from Shopify. It is true if two values match. Conversely, if two values are different, it is not required from Shopify.
Note: For Rack-based frameworks like Sinatra or Ruby on Rails, you’re looking for a title: HTTP_X_SHOPIFY_HMAClisher256.
Below are three examples using a different method to verify a webhook request:
- Ruby:
require 'rubygems'
require 'base64'
require 'openssl'
require 'sinatra'

# The Shopify app's shared secret, viewable from the Partner dashboard
SHARED_SECRET = 'my_shared_secret'

helpers do
  # Compare the computed HMAC digest based on the shared secret and the request contents
  # to the reported HMAC in the headers
  def verify_webhook(data, hmac_header)
    calculated_hmac = Base64.strict_encode64(OpenSSL::HMAC.digest('sha256', SHARED_SECRET, data))
    ActiveSupport::SecurityUtils.secure_compare(calculated_hmac, hmac_header)
  end
end

# Respond to HTTP POST requests sent to this web service
post '/' do
  request.body.rewind
  data = request.body.read
  verified = verify_webhook(data, env["HTTP_X_SHOPIFY_HMAC_SHA256"])

  # Output 'true' or 'false'
  puts "Webhook verified: #{verified}"
end
- PHP:
<?php


define('SHOPIFY_APP_SECRET', 'my_shared_secret');


function verify_webhook($data, $hmac_header)
{
  $calculated_hmac = base64_encode(hash_hmac('sha256', $data, SHOPIFY_APP_SECRET, true));
  return hash_equals($hmac_header, $calculated_hmac);
}


$hmac_header = $_SERVER['HTTP_X_SHOPIFY_HMAC_SHA256'];
$data = file_get_contents('php://input');
$verified = verify_webhook($data, $hmac_header);
error_log('Webhook verified: '.var_export($verified, true)); //check error.log to see the result
- Python: ```
from flask import Flask, request, abort import hmac import hashlib import base64
app = Flask(name)
SECRET = ‘hush’
def verify_webhook(data, hmac_header): digest = hmac.new(SECRET, data.encode(‘utf-8’), hashlib.sha256).digest() computed_hmac = base64.b64encode(digest)
return hmac.compare_digest(computed_hmac, hmac_header.encode(‘utf-8’))
@app.route(‘/webhook’, methods=[‘POST’]) def handle_webhook(): data = request.get_data() verified = verify_webhook(data, request.headers.get(‘X-Shopify-Hmac-SHA256’))
if not verified: abort(401)
```
Best practices for Shopify webhooks
This part of our article is to make sure you can take advantage of all of your webhook integration functions smoothly and seamlessly. Here are some processes that give you information and workarounds on webhook issues.
Recover webhooks
There will be times when webhooks are temporarily unavailable due to some objective reasons like your application has been offline for a long time. Therefore, you will probably find a way to recover webhooks when you return. To do this, you just need to register the webhooks again and add the missing data.
-
Re-register webhooks: As mentioned above, you need to do this to recover your webhooks. First, refer to the code of the application that originally registered the webhooks. Then you just need to add a check to fetch all existing webhooks. Finally, just register the ones you need.
-
Adding the missing data: You need to fetch data from the time you shut down and then add them to your webhook processing code.
Duplicate webhooks
Shopify uses a very powerful weapon which is de-duplication to protect against duplication and flooding. As such, the fact that multiple actions are taken does not mean that there are also webhooks. De-duplication ensures that every 10-second window of time, only one webhook will be created. Webhook is released after 10 seconds containing the most updated payload.
For example: When you create a new product and update it multiple times within 10 seconds, only two webhooks will be created. The first webhook reports the event creating the webhook. The second webhook reports the latest status of the object after 10 seconds. You can also protect against duplicate webhook events by making your webhook handling behavior normal.
How to delete Shopify webhooks?
As a shop owner, you can certainly make wise decisions when operating the store. Webhooks is a powerful tool if you really know how to take advantage. However, everything has two sides. So if you find webhooks annoying or no longer needed and want to delete them, please follow four simple steps below.
Step 1: Go to Notification
You must be in your Shopify admin page now. Then, go to Settings and tap on Notifications.
Step 2: Find the Webhooks section
What you need to do is scroll down to look for the Webhooks section.
Step 3: Find a little trash can icon
There must be the webhook you want to delete. Take a look at a little trash can icon that is next to that webhook.
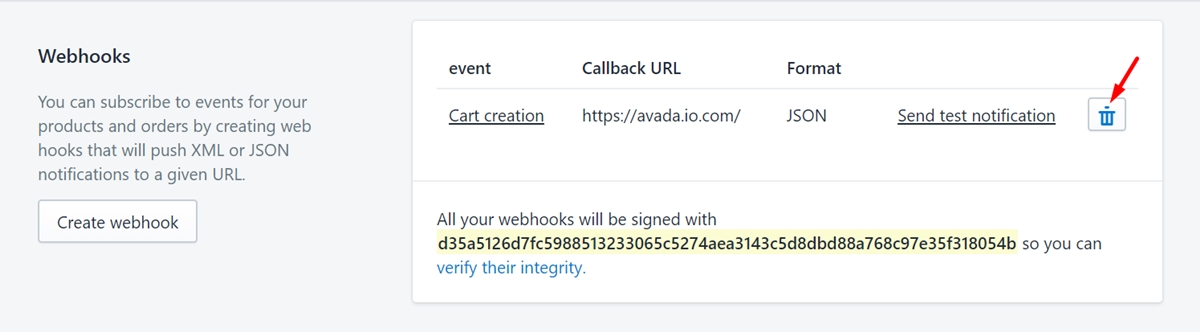
Step 4: Tap on the trash can icon
In this final step, you just need to tap on the trash can icon. Everything is done.
Final words
This article has talked about Shopify webhooks in a detailed and complete manner. Hopefully, you will learn more about webhooks and how to use them effectively. Or else, you can easily delete it with these simple steps above. If you have any questions, we’d be happy to help.
Related Posts:
- How to put Shopify store under construction?
- How to spy on other Shopify stores?
- What programming language does Shopify use?


