
How to Create Subcategories within categories in Shopify

Creating subcategories within categories will allow your customers to find the product that they want easier. They will not have to search out of a big category of many products with different features. For example, in the main collection full of dresses, you can create subcategories within categories for evening dresses, day dresses and different types of dresses. Therefore, your customers can find what they want with zero effort.
However, the process of creating subcategories can easily go wrong if you are inexperienced in this. Thus, in this post, we will show you the way to create subcategories within categories in Shopify.
In this post, you will be provided with the importance of subcategories and led step-by-step through a tutorial showing you exactly to create subcategories within categories in Shopify.
Related Posts:
- How to Change Prices of Products on Shopify?
- How to Upload Products using CSV Files on Shopify?
- How to Add a Collection to a page in Shopify?
Why you need to create Subcategories in the Shopify store?
The main reason why people decide to use sub-categories is that everyone wants to give their customers the best shopping experience. The better the shopping experience is, the more customers you have. And also, the more customers you have, the more profit you will gain.
Adding and managing sub-categories is a piece of cake. You only need a few clicks, and your sub-categories will be ready to use. You can easily do that from your Shopify Admin Panel.
How your categories tree will look like
Here is how your categories and subcategories will be like:
 Food
 - Breakfast
  - Cereal
  - etc.
- Lunch
  - Sandwich
  - etc.
- Dinner
  - Fish
  - etc.
Another example which can be called as the hierarchy tree is:
Clothes

 - Men
   - T-shirts and Tops
   - Pants
   - etc.

 - Women
   - Dresses
   - Skirts
   - etc.

  - Kids
   - Outwear
   - Jumpers
   - etc.
One thing you must not forget when creating sub-categories and also new categories is the handle. The handle is like the parent categories; in other words, it is the big and main category. The principle of creating sub-categories is extremely simple, with only two basic steps: create all your parent categories then create the hierarchy with a navigation link list.
There is no restriction when adding or creating sub-categories. You can create whatever and however you want, depending on your products. All your products can be added manually or by particular criteria.
Immediately after you finish creating your link list, you can start to add all your sub-categories in it. No rules and restrictions are implemented so you can place and name the sub-categories whenever there is a new variant of your products. You can do whatever you want and decide the order of it easily.
Adding Shopify SubCollections within Collections
Here are the steps needed to create Shopify subcollections within Collections. Please carefully read and follow all the steps.
1. Checking theme settings
Checking theme settings means that you have to check if your theme has a drop-down menu to add subcollections in the Shopify store. In order to know whether your theme has this option or not, please read and follow these steps:
Step 1: Choose Collection Page
Sign in your Shopify admin, visit the Customize themes page and then choose Collection Page in theme preview.
Step 2: Tick Enable filtering by product tag
Navigate the Collection pages tab which can be found in the theme editor and then selects it. With the theme that has the option to filter with tag, the option that says Enable filtering by product tag in the theme editor will show up.
After that, tick the checkbox which says Enable tag filtering.

Step 3: Save changes
Select the Save button.
2. Editing the theme.liquid file of your theme
There are five small steps in this part, which are:
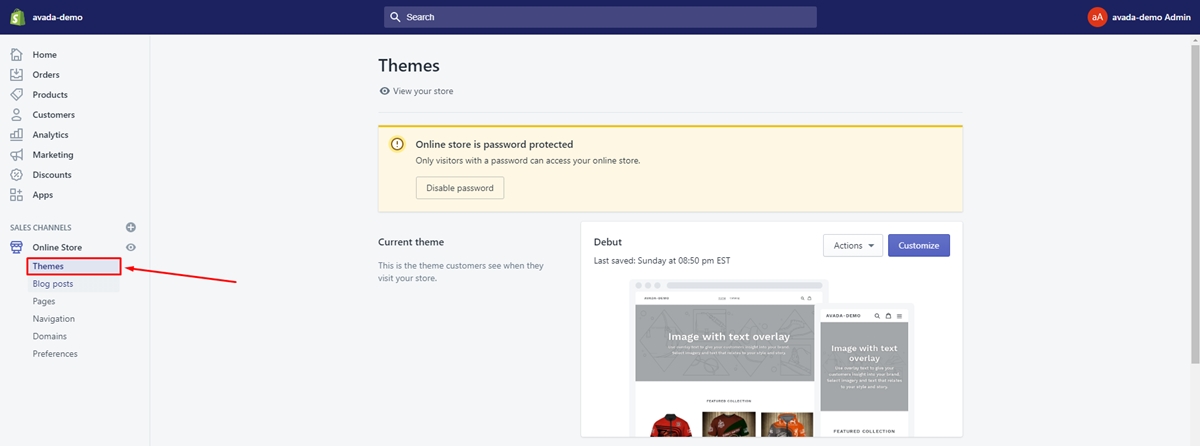
Step 1: Choose Themes
Open your Shopify admin, find Online Store and select Themes after that.
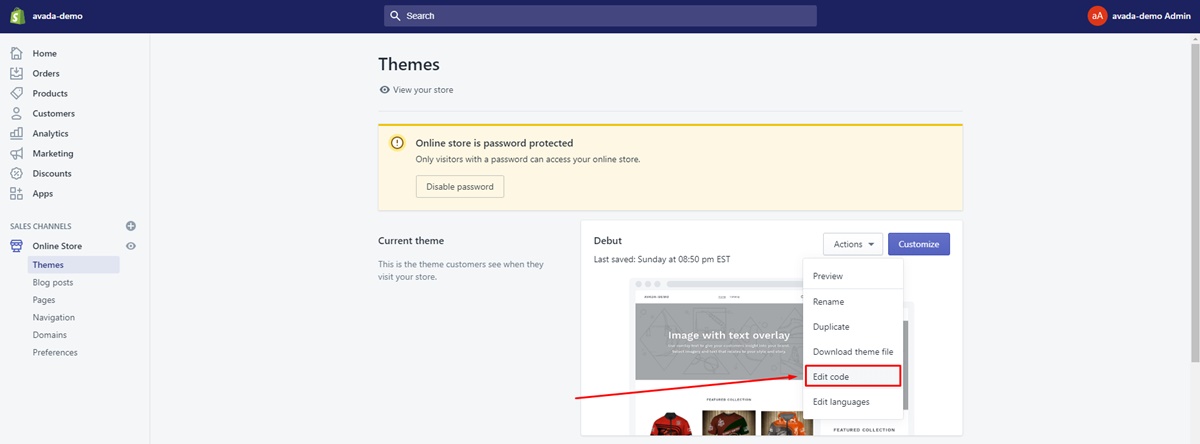
Step 2: Select Edit Code
Find the theme that you would like to edit and then select in Actions then Edit Code.
Step 3: Choose liquid
Navigate the Layout directory and choose liquid.
Step 4: Paste code
As you can see at the bottom of the file, please find the closing </body> tag. After that, please copy and paste the code below above the closing tag </body> and in a new line.
<script>

/* Product Tag Filters – Good for any number of filters on any type of collection pages */

var collFilters = jQuery('.coll-filter');

collFilters.change(function() {

var newTags = [];

collFilters.each(function() {

if (jQuery(this).val()) {

newTags.push(jQuery(this).val());

}

});

if (newTags.length) {

var query = newTags.join('+');

window.location.href = jQuery('{{ 'tag' | link_to_tag: 'tag' }}').attr('href').replace('/' + 'tag', '/' + query);

}

else {

{% if collection.handle %}

window.location.href = '/collections/{{ collection.handle }}';

{% elsif collection.products.first.type == collection.title %}

window.location.href = '{{ collection.title | url_for_type }}';

{% elsif collection.products.first.vendor == collection.title %}

window.location.href = '{{ collection.title | url_for_vendor }}';

{% endif %}

}

});

</script>
Step 5: Save
Select Save button.
3. Adding a Drop-down menu to the Category page
If you want to use the radio button, then you can skip this part. Adding a drop-down menu to the Category page needs these following 2 steps:
Step 1: Add drop-down code to the theme
The first thing you need to do is to add drop-down code to the theme. Not all themes use the same code, so here are the codes for each theme.
- Brooklyn Theme
Go to the Snippets directory and then select collection-template.liquid. After that, copy and paste the code below to the closing
</header>tag. Please remember to paste it in a new line above. Here is the code:
<div class="clearfix filter"> <p>Browse by tag:</p> <select class="coll-filter"> <option value="">All</option> {% for tag in collection.all_tags %} {% if current_tags contains tag %} <option value="{{ tag | handle }}" selected>{{ tag }}</option> {% else %} <option value="{{ tag | handle }}">{{ tag }}</option> {% endif %} {% endfor %} </select></div>
- Jumpstart theme
Go to the Section directory and then select collection-template.liquid. After that, copy and paste the code below to the opening
<div class="wrapper wrapper–margins">. Please remember to paste it in a new line below. Here is the code:
<div class="clearfix filter tag-filter"> <p>Browse by tag:</p> <select class="coll-filter"> <option value="">All</option> {% for tag in collection.all_tags %} {% if current_tags contains tag %} <option value="{{ tag | handle }}" selected>{{ tag }}</option> {% else %} <option value="{{ tag | handle }}">{{ tag }}</option> {% endif %} {% endfor %} </select></div>
- Other themes
Go to the Template directory and then select collection.liquid. After that, copy and paste the code below to
{% section ‘collection-template’ %}tag in the file. Please remember to paste it in a new line above. Here is the code:
<div class="clearfix filter"> <p>Browse by tag:</p> <select class="coll-filter"> <option value="">All</option> {% for tag in collection.all_tags %} {% if current_tags contains tag %} <option value="{{ tag | handle }}" selected>{{ tag }}</option> {% else %} <option value="{{ tag | handle }}">{{ tag }}</option> {% endif %} {% endfor %} </select> </div>
Step 2: Hit the Save buttons
Select the Save buttons for other themes except for Jumpstart. For Jumpstart theme, you need to go to the step edit the drop-down menu style.
4. Adding Radio button to Category page.
If you want to use the drop-down button, then you can skip this part. Adding a radio button to the Category page needs these following 2 steps:
Step 1: Add code to your theme
You have to add the code below to your theme; however, the file to which your code is added is different for each theme.
-
Brooklyn Theme: Go to the Snippets directory and then select collection-template.liquid. After that, copy and paste the code to the closing </header> tag. Please remember to paste it in a new line above.
-
Jumpstart theme: Go to the Section directory and then select collection-template.liquid. After that, copy and paste the code to the opening
<div class="wrapper wrapper–margins">. Please remember to paste it in a new line below. -
Other themes: Go to the Template directory and then select collection.liquid. After that, copy and paste the code to
{% section 'collection-template' %}tag in the file. Please remember to paste it in a new line above.
And here is the code your need for the radio button:
<ul class="subnav clearfix"> <li{% unless current_tags %} class="active"{% endunless %}> {% if collection.handle %} <a href="/collections/{{ collection.handle }}{% if collection.sort_by %}?sort_by={{ collection.sort_by }}{% endif %}">All</a> {% elsif collection.current_type %} <a href="{{ collection.current_type | url_for_type | sort_by: collection.sort_by }}">All</a> {% elsif collection.current_vendor %} <a href="{{ collection.current_vendor | url_for_vendor | sort_by: collection.sort_by }}">All</a> {% endif %} </li> {% for tag in collection.all_tags %} {% if current_tags contains tag %} <li class="active"> {{ tag | link_to_remove_tag: tag }} </li> {% else %} <li> {{ tag | link_to_tag: tag }} </li> {% endif %} {% endfor %}</ul><style>/* Contain floats: nicolasgallagher.com/micro-clearfix-hack/ */.clearfix:before, .clearfix:after { content: “”; display: table; }.clearfix:after { clear: both; }.clearfix { zoom: 1; }/* Subnavigation styles */.subnav { clear: both; list-style-type: none; margin: 35px 0; padding: 0; }.subnav li { display: block; float: left; }.subnav li a { display: block; height: 28px; line-height: 28px; padding: 0 7px; -webkit-border-radius: 7px; -moz-border-radius: 7px; border-radius: 7px; background: #eee; margin: 0 7px 7px 0; color: #666;}.subnav li a:hover, .subnav li.active a { background: #666; color: #fff;}</style>
Step 2: Save
Select the Save button.
5. Editing drop-down menu styling for Jumpstart theme
If your Jumpstart theme has a drop-down menu by following the steps above then you can follow this part to edit CSS for your menu:
Step 1: Copy and paste the code
Go to the Asset directory and then select scss.liquid. After that, you need to copy and paste the following code:
div.tag-filter { svg, .arrow { display: none; } text-align: center; margin-bottom: $gutter * 2;}
Step 2: Click the Save button
Select the Save button.
Final words
To summarize, creating subcategories within categories in Shopify is the best option for you, especially when you have a lot of products and collections. Creating subcategories within categories in Shopify enables you to provide the best shopping experience for your customers and also helps your customers to find the product they need in a shorter time. Therefore, more customers are satisfied and more sales you will gain.
When creating subcategories, you need to go through several steps. First, you have to check your theme settings. Second, you need to edit the theme.liquid file of your theme. Then you need to add a drop-down or a radio menu to the category page. Finally, you need to edit drop-down menu styling for Jumpstart theme.


