
How to Change Domain Name on Shopify

If you are running an online business or maybe just a blog, you may want to have a strong online presence. Oftentimes the first thing your visitors will do when in need of looking for a specific product or service is to conduct a web search. So, of course, if your web store’s domain is easy to remember, find, and navigate, then you will get more opportunities to increase sales. That expectation accounts for why there are so many online store runners in need of custom domain names.
Similar to them, Shopify online stores’ runners, now and then, want to replace the default domain name with a more creative, shorter, more memorable, more product-focused, and more top-level domain name. If you are one of them, wondering how important it is to have a custom domain name and looking for a solution that best works for your online store, then please take a look at our informative writing on How to Change Domain Name on Shopify.
Why changing the Shopify Domain Name is necessary?
A domain, or domain name, is the address that customers and visitors will use to visit your online store on the Internet. You can see it located in the address bar of your web browser (such as Chrome, Safari, IE, or Firefox).
Regarding the default Shopify domain name, which is shop.myshopify.com, it is automatically created once your account is created and will go with your website for a lifetime if there is no additional purchase for a custom domain name. It might cause a mistake for customers when trying to remember your domain name. Also, short, easy-to-remember and brand-focused, service-focused domain names always hold a higher trust and professional in visitors’ eyes. Therefore, mostly no vendors and store owners want to keep the default domain name.
On top of that, choosing the right domain name can give your site many benefits. It is a distinctive identity that stands out from millions of other websites thanks to the fact that no more than a single person or organization can register exactly the same domain name. Also, the domain name is considered valuable marketing and search tool that will successfully lead customers to your site thanks to the fact that you are allowed to generate a domain name related to your brand name. Moreover, even if you actually sell your products online or not, claiming your territory online is still a to-do job for your reputation. In case you want to change web hosting services, relocate to another country, or shift to using your in-house server, the domain name stays with you, generating mobility for your internet presence.
Among many competitors nowadays, your domain name has to become more recognizable in search engines like Google to increase your search engine ranking and draw more attention along with your population.
What is a strong domain name?
A domain name is considered a strong one when it does qualify some of the evaluation criteria below:
-
Length of the domain name - Short and easy to remember. Being between 6 to 10 letters (8 should be the sweet spot) must be so great. Also, it should be as descriptive as possible.
-
Keywords - Keywords are words related to the product or service used in a domain name. For example, lovely-balloons.com. Although most people believe that using keywords will drive traffic to their website, Google has changed their algorithm in the past few years to downplay the strict use of keywords and instead, now rewards websites with a strong sense of branding.
-
Country-code TLD (ccTLD) - A country-specific TLD is considered helpful if you run your online business in a specific country. For example, if you have a business in Viet Nam, a domain name like
washingmachines.vnwill prompt Google to locally target searches in Viet Nam straight to your web store.
How to have a new domain buying from Shopify
As aforementioned, having a custom domain name is nowadays very popular because of its benefits. Therefore, mostly all merchants want to own a custom domain name for their websites. One of the ways to have a custom name is to pay for one in Shopify. In fact, custom domains purchased through Shopify start at 11 USD per year. Once paid, your domain will be automatically set up for you. Even if you leave Shopify, you still keep its ownership.
Please kindly note that domains purchased through Shopify are registered for 1 year. You can renew it after you cancel your domain or Shopify store. Also, keep in mind that Shopify does not come with unrestricted email forwarding accounts for your domain name and domain purchases are unable to be refunded.
To buy a domain from Shopify, please follow these steps listed below:
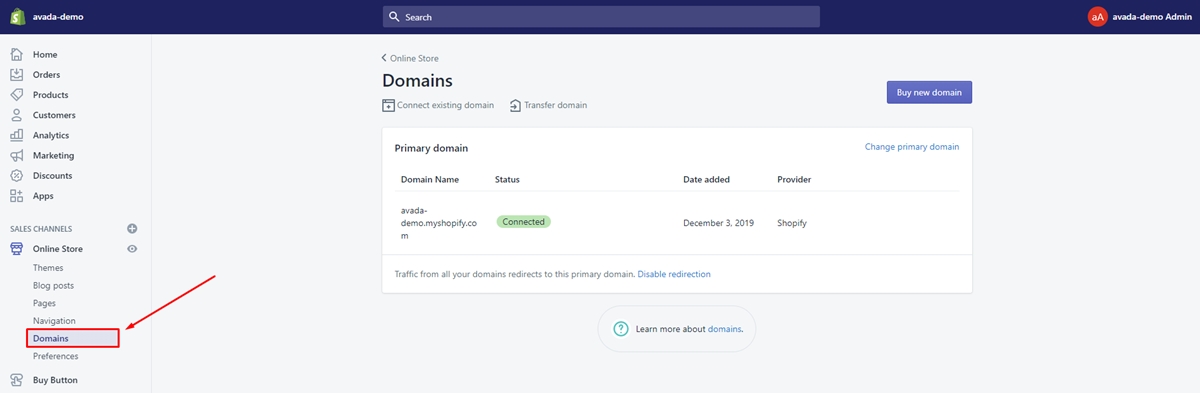
Step 1: Go to Domains
From your Shopify admin panel, go to Online Store > Domains.
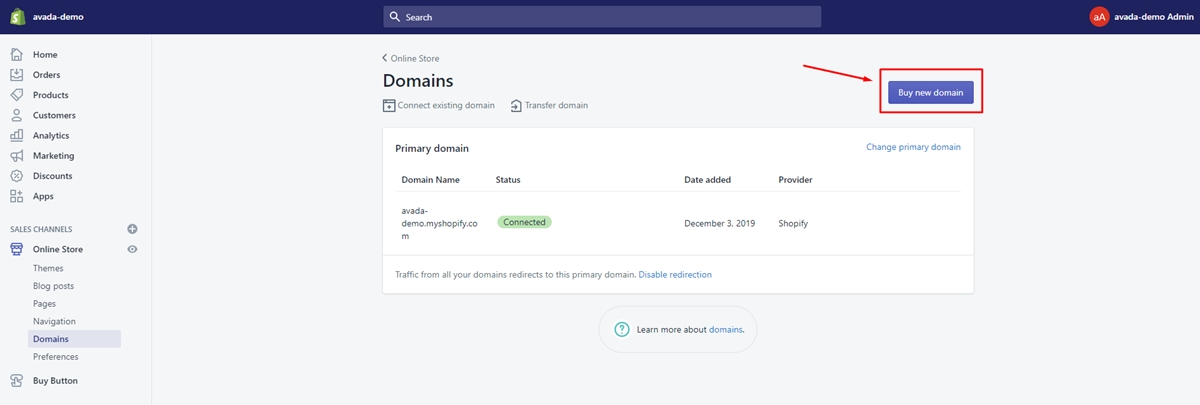
Step 2: Choose Buy new domain
Next, choose Buy new domain.
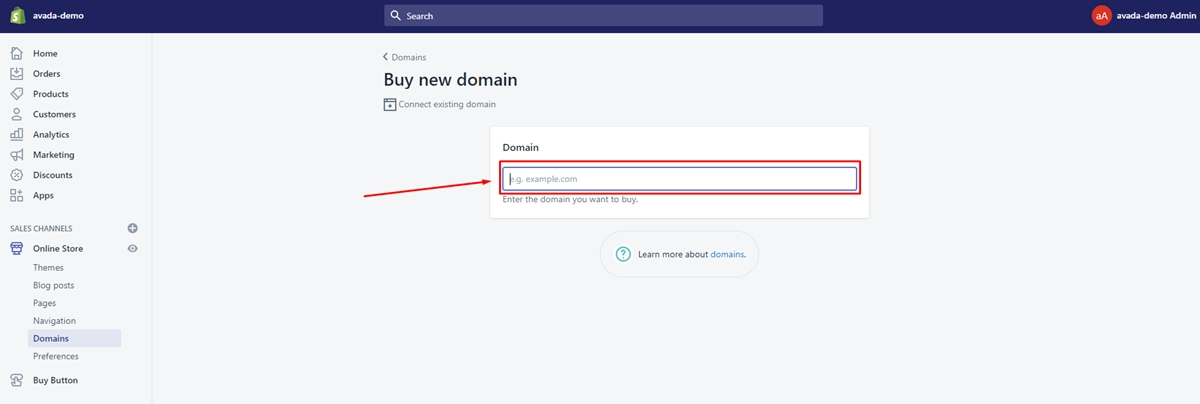
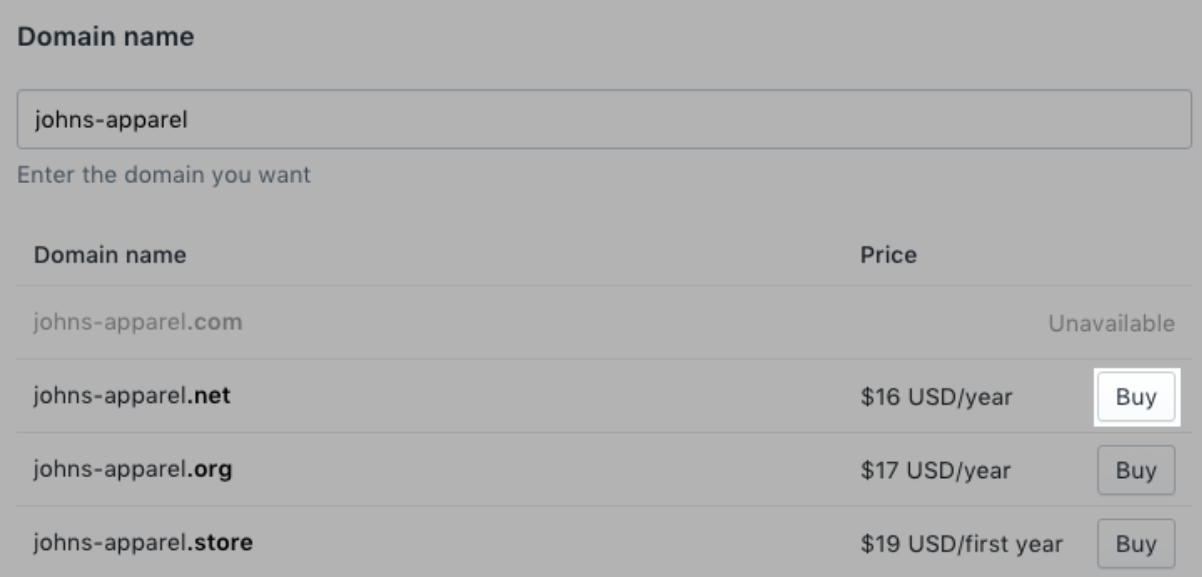
Step 3: Fill in domain name
Fill in the domain name that you desire to own.
Step 4: Review options
Available extensions related and their prices will be listed. Extension options include common extensions like .com or .biz, country extensions like .co.uk or .ca, and premium extensions. Review the options with care because prices may vary.
Step 5: Click Buy
Click the Buy button in the same line of the domain name that you want to buy.
Step 6: Review the payment details
a. Review the personal information. The Shopify store owner’s email and information are used to purchase and renew domains by default.
b. Tick Auto-renew this domain every year in case you want your domain to be renewed annually before its expiration.
c. Confirm if this domain offers WHOIS Privacy.
This privacy permits people to look up information regarding the domain name’s owner. It is a service that can hide your information from a WHOIS lookup so that you can keep your personal contact and information hidden from the public.
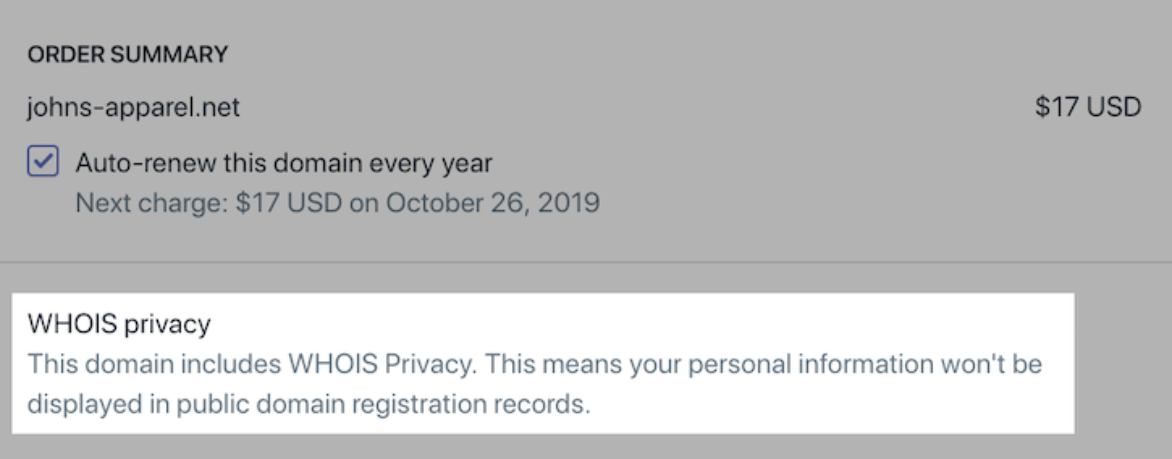
If you see no WHOIS Privacy and still want it on your domain, tap the Cancel button and select a different domain extension that is not on the WHOIS Exceptions list.
d. Check the ICANN policy and the Domain Registration Agreement.
Step 7: Confirm
If you feel okay with it, click Buy Domain There will be a confirmation email sent by the Shopify team to confirm your purchase. Your new domain will be working in up to 48 hours.
How to transfer a domain
When a domain is transferred, management of that domain moves to Shopify, which means you adjust your domain settings, pay for that domain and renew your domain right in your Shopify Admin panel. Shopify does not come with email accounts as part of its domain services. However, it does include unrestricted email forwarding accounts for your domain name.
To transfer a domain to Shopify, first, you need to have signed up your domain more than 60 previous days and have access to your original domain provider account. Please kindly note that to transfer your domain, you will need to keep an eye on and respond to important confirmation emails. Then, it takes you no more than 20 days from the time of initiation until the transfer gets completed.
Also, note that you have to pay for your domain annually to have it in use. For instance, if you have 3 months left until your domain’s expiration and then you transfer your domain to Shopify and add 12 more months of registration, you will not have to renew your domain for 15 months.
Step 1: Check your domain provider’s transfer policy
In fact, there are a lot of providers that support domain transfers such as Bluehost, Godaddy, Google Domains, and Namecheap. Yet please check your domain provider’s transfer policy before you begin the transfer process.
Where to find it? It is very simple. Search in the domain provider’s help center for the transfer domain keyword.
Step 2: Prepare your domain for transfer
You need to prepare some things before transferring your domain to Shopify.
- 1: Sign in to your 3rd party domain provider account.
- 2: Confirm that the email associated with your account stays updated. You will receive significant emails that need responding to that account during the domain transfer process.
- 3: Unlock the domain that you desire to transfer. Typically, this will concern finding the settings for the domain you want to transfer, then tap the
Unlockbutton. Several domain providers ask you to approve this choice by click on a link in the confirmation email. - 4: Receive a transfer authorization code from your provider. Typically, this concerns finding the settings for the domain you want to transfer, then tap the
Transfer this domainorTransfer outbutton.
Kindly note that Shopify Support cannot log in to your 3rd party domain account for you, so in case you have trouble in domain transferring preparation, please contact your 3rd party domain provider!
Step 3: Transfer your domain
The first thing to know about this step is that your domain needs to be unlocked and you need to have a transfer authorization code before you transfer your domain. In case there is no transfer authorization code yet, you can follow these steps below:
- 1: From your Shopify admin panel, go to
Online Store > Domains. - 2: Choose
Connect existing domainand then choosetransfer in your domainif this is your first time connecting to your Shopify Store.
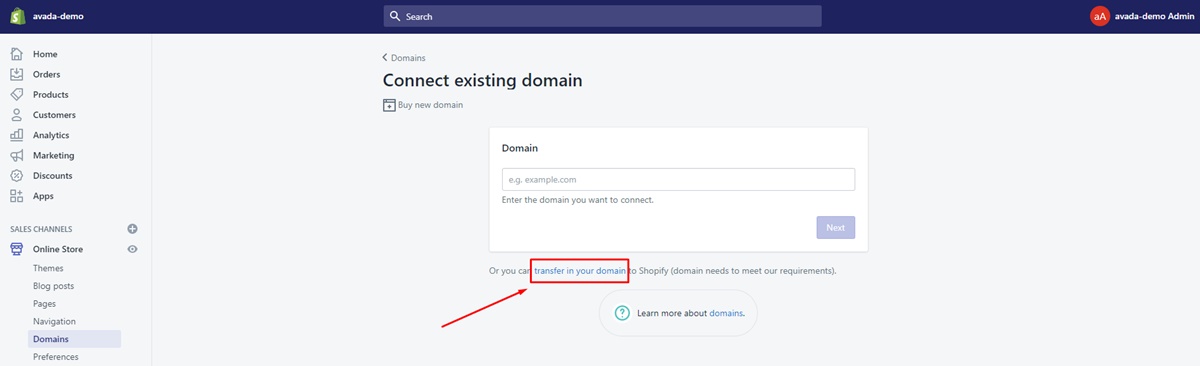
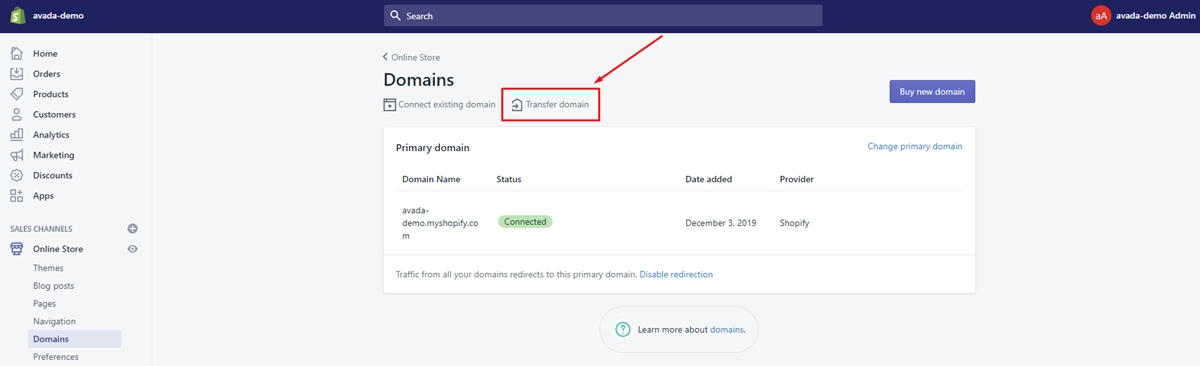
In case you already have a domain connected to your online store, tap the Transfer domain button:
- 3: Fill in the domain that you want to transfer to Shopify. Note that DO NOT include
www.at the domain’s beginning. - 4: Choose
Next. - 5: Choose
Verify domain. - 6: You will see the
DOMAIN UNLOCKEDbe displayed once the domain is ready to be transferred, then clickNextto continue. In contrast, if it is displayed asDOMAIN LOCKED, please review your preparation for your domain transformation. - 7: Enter the authorization code or EPP code that the domain provider gave you in the
Verification codebox. - 8: Tap the
Nextbutton. - 9: Click
Buy and transfer. - 10: Check the email account that is associated with your domain for the domain provider’s email. You need to approve the domain transfer by clicking in a link such as
Approve TransferorConfirm transfereven when the email varies by the domain provider.
After your domain transfer approval, it takes no more than 20 days for the transfer to be completed. You will get an email from Shopify confirming that your domain is successfully transferred.
How to use a third-party domain
If you already have a domain from a 3rd party provider such as Bluehost or Godaddy, you can use it for your Shopify online store so customers or visitors will end up on your website when they type your domain into their browsers. You can employ your 3rd party domain for your Shopify store by connecting it to Shopify or transferring it to Shopify:
-
Transferring your domain to Shopify - Transferring your domain might be the first way to think about when it comes to pointing your custom domain at Shopify stores. Almost all domains can easily be transferred to Shopify. When you transfer a domain, management of the domain moves to Shopify, which means you adjust your domain settings, pay for the domain and renew your domain right in your Shopify admin panel.
-
Connecting your domains to Shopify - Integrating your 3rd party domain to Shopify points your domain name at your Shopify store. You still employ the 3rd party domain provider to have control over your domain settings, pay for your domain and renew it.
Anyway, Shopify comes with a very easy-to-use DIY platform to help you make changes to the store name into a new Shopify store name address. Once you pay for a new domain, you need to add it to your Shopify web store. Please follow our given instructions below to add a new domain as you expect.
How to add the new domain
-
Step 1: Go to Connect existing domain sections in your Shopify admin (Alternatively, you can tap
Domainsfrom theOnline StoreSales Channels, then clickConnect existing domain) -
Step 2: Fill in your new Shopify domain that you want to change in the given text field:
- Step 3: Tap the
Nextbutton to finish the first step.
If you want to set your new domain with www as a subdomain, you can enter the same in the given field.
For example, given that your new domain name is the-new-look, you can enter www.the-new-look.net. You are allowed to view all added domains in the Manage domain section of the Shopify. (Click the Delete button to remove any domain).
Now you need to have the CNAME record of Shopify updated to the newly purchased new domain.
How to update CNAME record
With regard to all the domains that are purchased from any 3rd party vendor such as Fatcow, Hostgator, GoDaddy, and more, you need to get your DNS (Domain) settings updated and point your A record to Shopify’s IP address (23.227.38.22) and CNAME record to shops.myshopify.com
-
Step 1. Go to your Domain provider website and sign in to the account with the new Shopify store domain.
-
Step 2. Search for DNS settings.
You are allowed to locate your domain account admin panel or the domain management area or DNS configuration, and more, on your own.
-
Step 3. When choosing DNS settings, look for a list of editable fields or a table or checkboxes or drop-downs
- Add a new record with
Aor@ - Then, add the IP address of Shopify in the destination field
Shopify’s IP Address: 23.227.38.32 -
Save the recently added
Arecord -
Step 4. Now, to point it to Shopify, you need to add CNAME
- Locate CNAME record and get the “WWW” CNAME record updated to point to
shops.myshopify.com
Note: Some domain providers have a Name field with a CNAME record, then add a relevant Name if it is shown.
- Save the CNAME Record (Click the
Savebutton, if available or simplyAdd a new recordor similar)
Good job! The CNAME record is now added successfully. Once it is added, you can proceed to verify your new domain for your Shopify store.
How to verify the new domain
Tap the Verify connection button to confirm the new domain connection in your Shopify admin panel.

It might take no more than 48 hours for your new domain to point your Shopify store. Then you need to set the recently added domain as the primary one in your Shopify Admin panel once it is successfully verified and pointed to your online store.
How to set your primary domain
In Shopify, a primary domain is known as the domain name that visitors or customers can see in the search bar when they browse your web store. You can employ your root domain or a subdomain as the primary domain, but it’s a must that there is no more than a single domain. You can assign your primary domain from the Domains page in your Shopify admin panel.
Hold on! Before setting a primary domain, make sure that you:
- did buy a domain (maybe from a 3rd party or in Shopify store)
- did add your domain and all the subdomains you need to use with that website
- did set up your root domain
- did set up your subdomains.
Note that: If you have just made changes to your domain, please wait for it for around 4 hours to fully take effect.
Now let’s move to your primary domain setting:
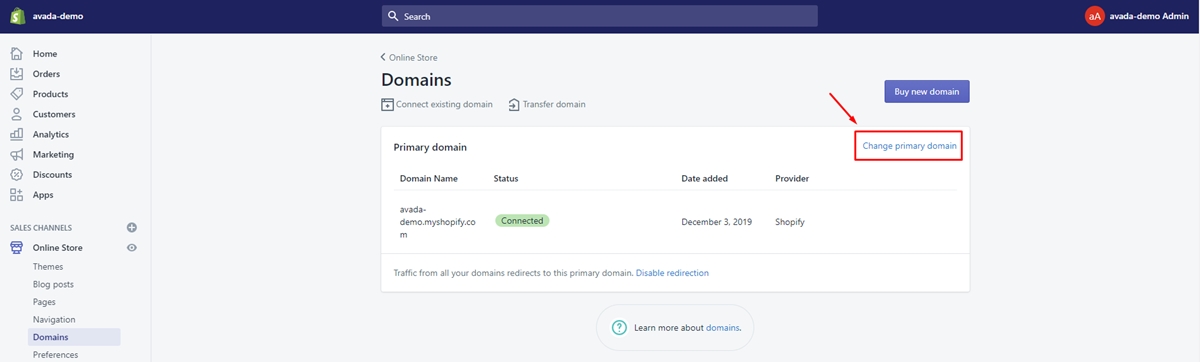
Step 1: Go to Domains
From your Shopify Admin panel, go to Online Store > Domains
Step 2: Tap Change primary domain
Tap Change primary domain in the Primary domain section as below:
Step 3: Select a domain
Select the domain that you desire to set as the primary domain:
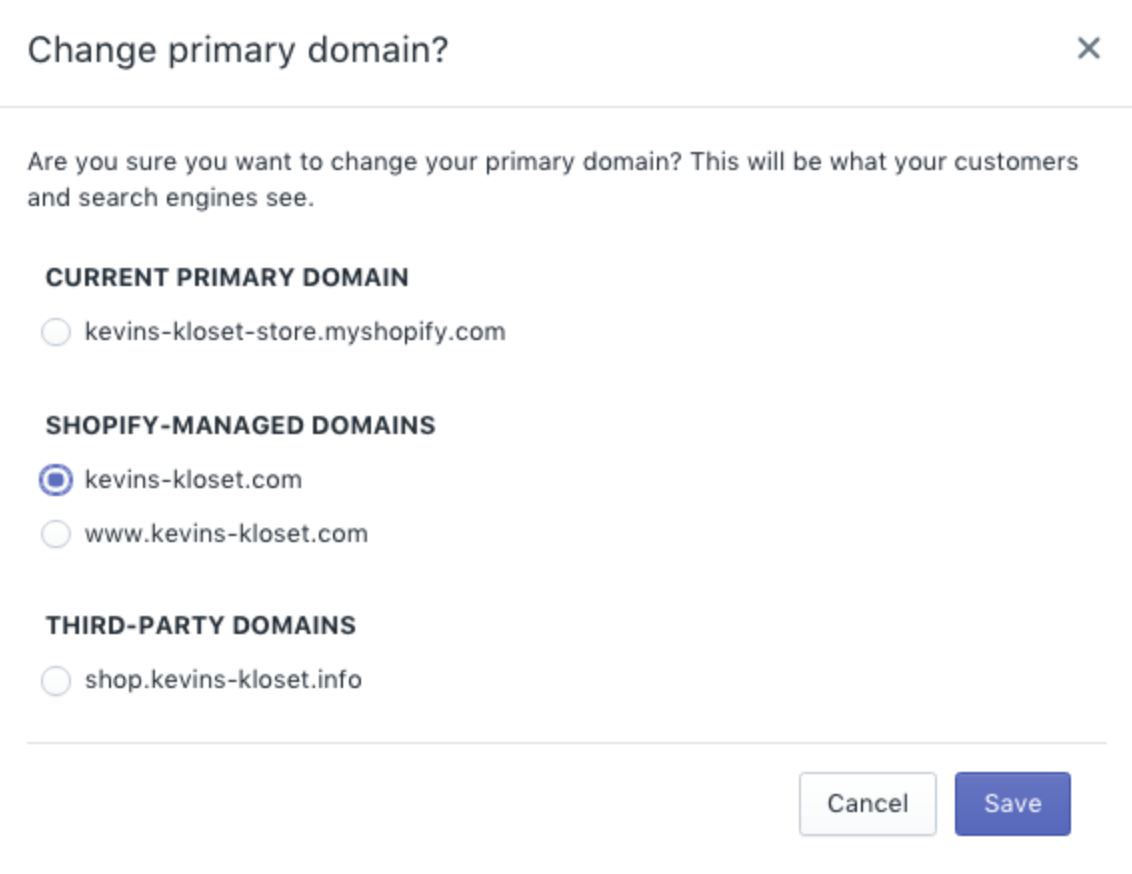
Step 4: Tap the Save button
Tap the Save button to save changes to have just made.
Now go to your storefront to check how it works! Your visitors are now able to access the new look of your online store. You can also develop a mobile app for your store in no more than 15 minutes using the Shopify mobile app DIY platform!
Understanding Domains
Now let’s figure out how important it is for many merchants to own a custom domain name, what kind of language you need to understand and what settings to configure with a 3rd party provider.
Final Words
At any stage of development, a strong domain name is a lot meaningful for any size business. Thanks to the increasing number of online orders made on the Internet, the dynamic of marketing has changed significantly. As a result, one of the most useful and lasting methods of reaching target customers is through a well-developed and maintained the website.
It might capture visitors’ attention with an impressive slogan or a unique title. Also, when it comes to its commercialization, it should promote a sense of professionalism and make your brand stand out from many other competitors in the same industry, so why using a default domain name when you can customize a new domain yourself? Let’s make a good reflection of your brand and style today! We hope that you enjoy the provided information.


