
Web Browser Push Notification: Everything You Should Know
By Sam Nguyen

Drive 20-40% of your revenue with Avada
Would you like to communicate with your audiences at the right time and place at all times?
Web browser push notifications might have you covered!
Web browser push notifications are built on the experience of existing marketing services - such as email, SMS, and app push notifications - but better.
With web browser push notifications, visitors can subscribe to receiving communications from your brand without providing their personal details. On the other hand, you’ll get a new avenue to reach your audience even while they are looking at your competitors, and drive 20%-30% higher engagement on your website on both desktops and mobile devices.
Amazing, right?
If you want to master web browser push notifications, you’ve come to the right place! In this blog post, we’ll show you everything you should know about web browser push notifications!
Let’s dive into it!
What are web browser push notifications?
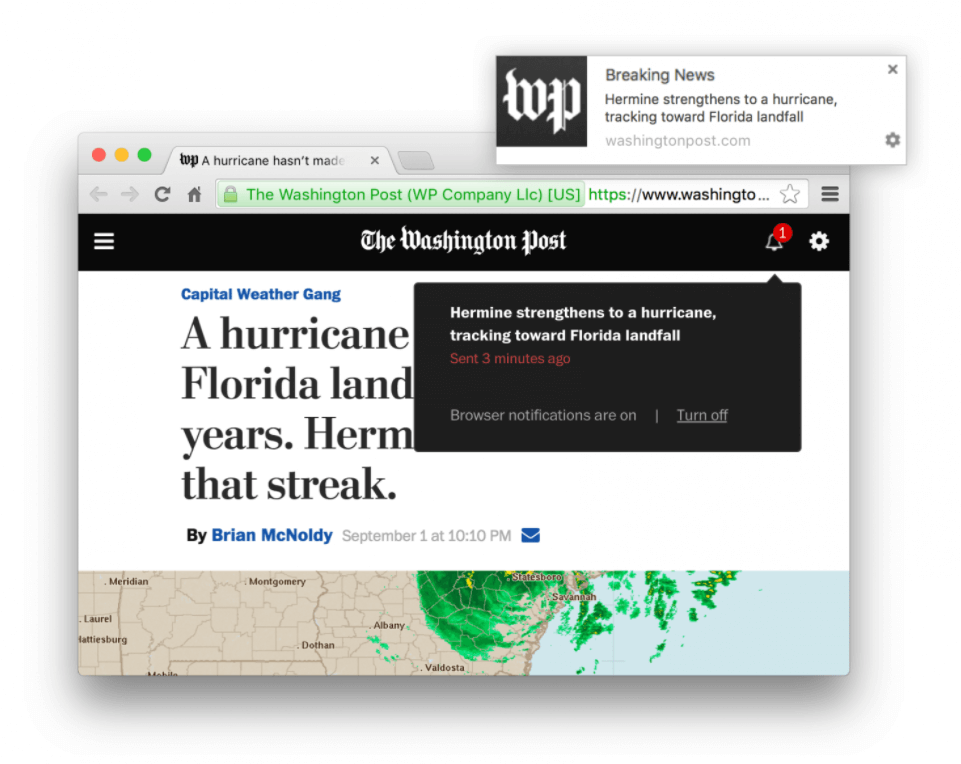
Web push notifications (also known as browser push notifications) are sent to a user’s desktop screen or mobile device. These notifications can be triggered through open browsers at any time on any device connected to the Internet as long as they opt-in to receive push notifications from your website.
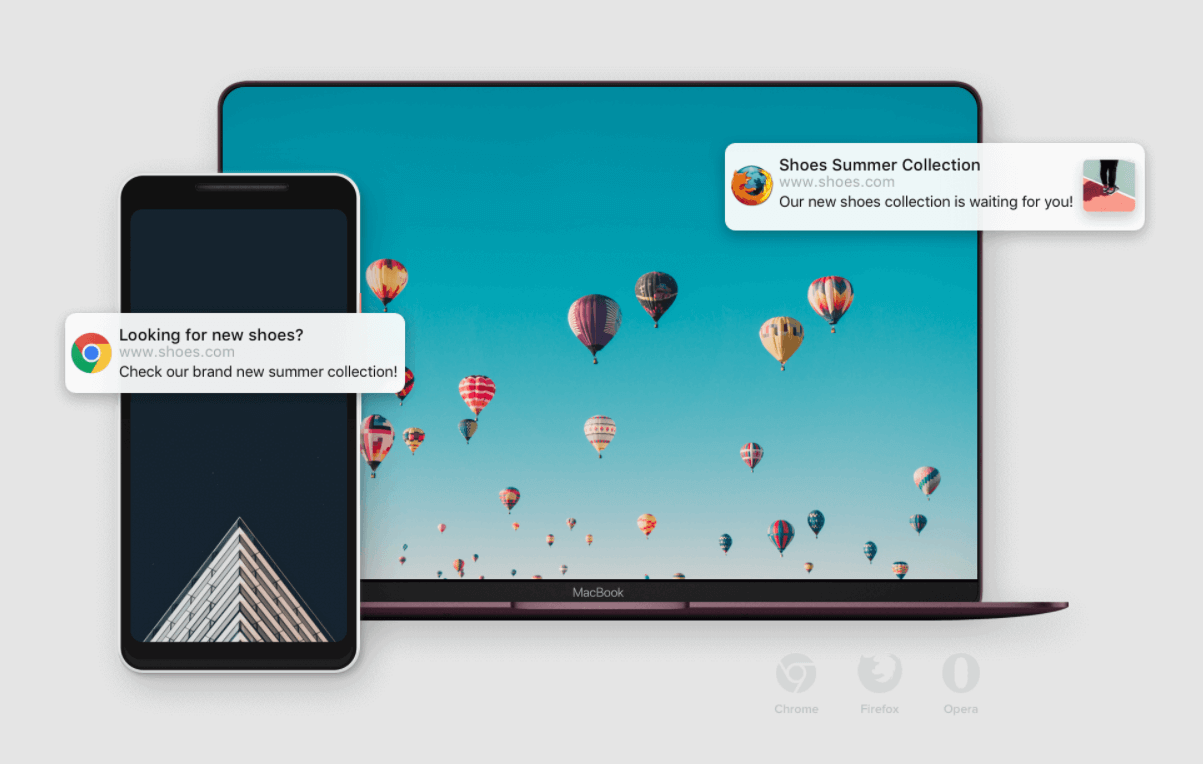
Web browser push notifications give you an instant mode of direct communication with your visitors. You can directly reach customers who have abandoned their cart or added to their wishlist, and then nudge them to convert through strategic alerts.
To keep up with the emergence of push notifications over the last few years, more and more brands have offered both their free and paid push notification technology services for business owners and marketers alike.
Read more: What is a Push Notification? We Explained It Simply For You…
How do web browser push notifications work?
Typically, there are three stages in starting with web browser push notifications.
Step 1: Users are asked for permission to receive push notifications. This is often in the form of an opt-in box that pops up on one side of the browser. Once they click an agreement, their details are saved for further communication.
Step 2: Then comes the task of sending periodic push messages. They are sent from the marketer’s server to a web push notification service.
Step 3: Once the user is online and using a browser, the push notification arrives. Data can be collected on specific user actions, such as signing up for a newsletter or clicking on a link.
The above three steps are carried out via APIs: the Notifications API and the Push API. They are interfaces that are used to configure and display push notifications to users.
Browsers & devices that support web push notifications
Browsers
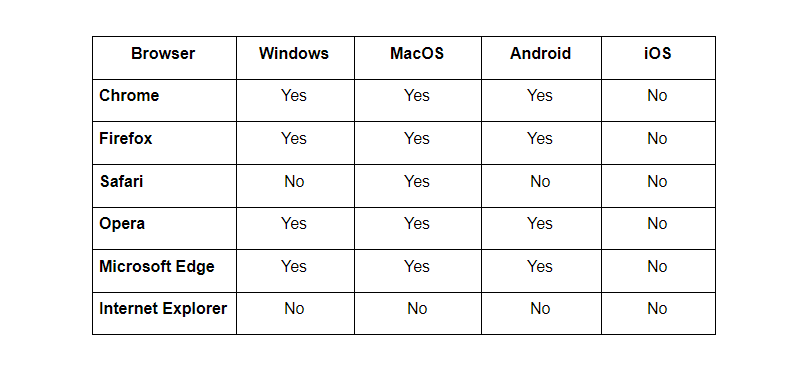
Chrome, Firefox, Safari, and Opera currently support web push notifications. Supported browsers actually vary by vendor.
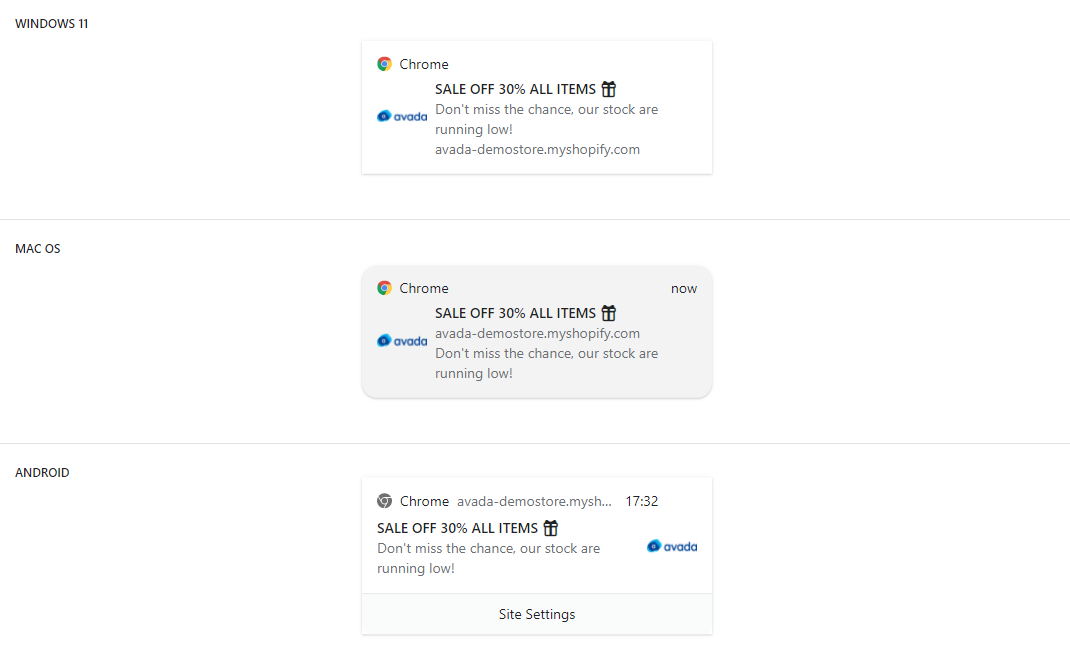
Push notifications also vary in appearance between browsers and operating systems. Some push notifications use native notification centers, while others don’t - this also varies by browsers and operating systems.
You can see the details in the below table.
Devices
Web push notifications work on any device running a supported browser, whether it’s a PC or Mac.
However, not every mobile device user can receive web push notifications. iOS (Apple) mobile devices don’t currently support mobile web push notifications. This means even when an iPhone or iPad has a supported browser like Chrome installed, users can’t receive web push notifications on the device.
On the other hand, Android mobile devices support mobile web push notifications for anyone running Chrome, Firefox, and Opera on their device.
Advantages of web browser push notifications
At first glance, web browser push notifications may seem like any other marketing channel, or maybe even like a throwaway channel that is “not right” for you. However, if you look closer, you can realize that these notifications provide considerable advantages. Let’s explore some advantages of web browser push notifications right below!
-
Real-time communication. Users will immediately see your push message with web browser push notifications. That’s very different from emails that we’ve grown accustomed to, to be honest, ignoring. Whereas it may take time before people see your email, a push notification is instant.
-
Easier to implement. It’s easy to build your own web push notification strategy and run your campaign. This is also a simple way to engage more visitors.
-
Non-disruptive delivery. You’ll be able to reach out to users in a natural environment without having them log in or do anything. That’s why these push notifications have extremely high open rates or view rates.
-
No personal information required. You can directly communicate with users without persuading them to hand over their email addresses or phone numbers. All they need to do is opt-in to receive push notifications from their browser. Painless and private!
-
Simple yet intuitive engagement. When users click on your message, they’ll be redirected to your website or a certain landing page, blog, or whatever else you’d like to promote and drive traffic to. It’s unlike SMS notifications which are more difficult to engage with due to the platform’s closed nature.
Elements of a web browser push notification
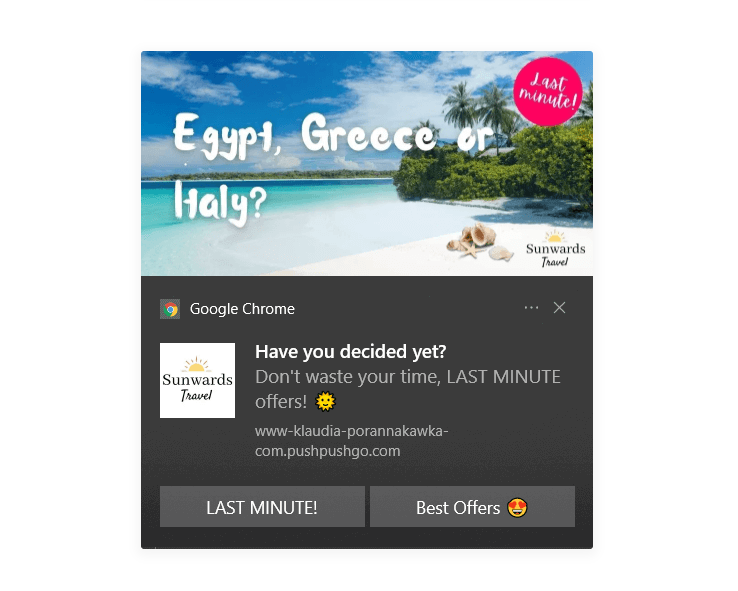
Web browser push notifications are composed of different elements, including icon, title, description, URL, image, and CTAs (calls to action). All the elements are modifiable for each push notification; if you want, you can change the icon, image, text, and CTA for each one.
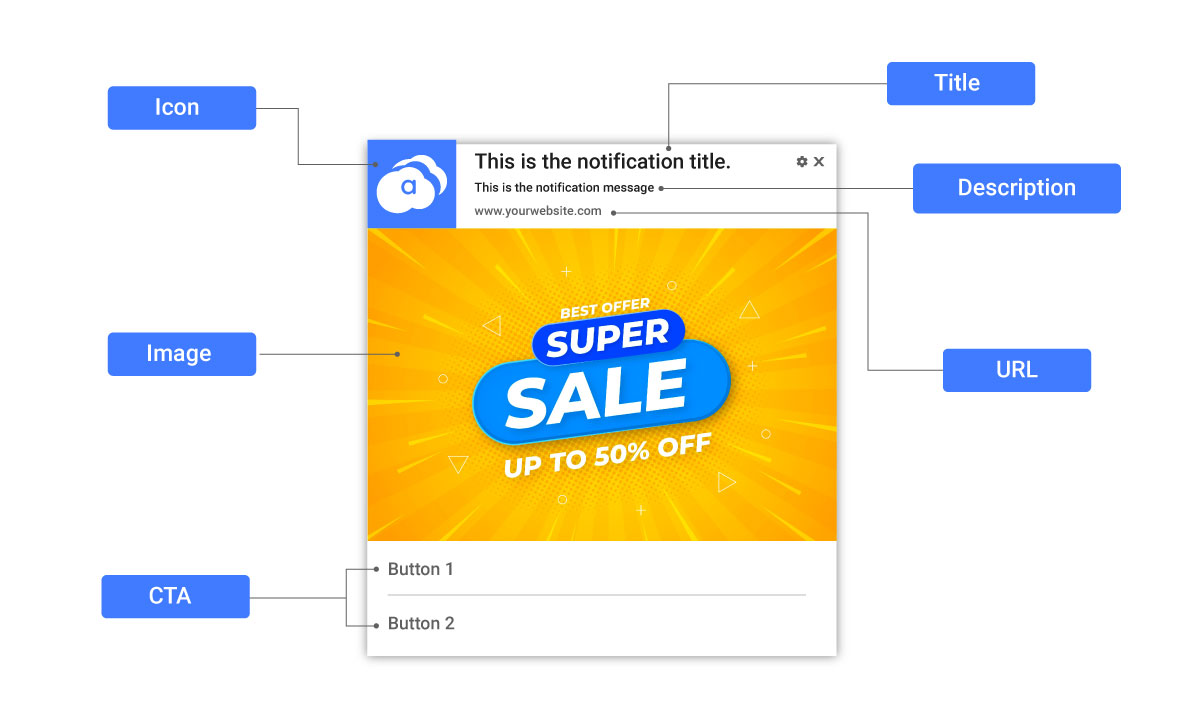
1. Icon
The icon is often the brand logo. Its position inside the push notification varies between different browsers and operating systems, but it’s always visible. The icon should be a square image, preferably at least 256 x 256px.
Tips: If you use your brand logo, you can adapt the design to match the season or a holiday!
2. Title
The title is the first text line of the push notification. It often appears in bold letters as an attempt to catch users’ attention in most browsers and operating systems. The length of the visible area typically varies between 43 and 69 characters, depending on different browsers and operating systems.
Tips: Use the most appealing words in the first 43 characters to make it visible regardless of the browser and operating system.
3. Description
This is the textual content that follows the title, and it is used to offer a more detailed explanation. Typically, the length of the visible area varies between 50 and 136 characters, depending on the browser and operating system.
Tips: Use the most appealing words in the first 50 characters to make sure it’s visible in all browsers and operating systems. Personalize your content using the dynamic parameters as well.
4. Image (optional)
An image should be descriptive, appealing, and complement the message. It is only visible on Google Chrome, Windows, and Android OS.
Tips: You can read more about the ideal size and resolution for push notifications with images right here.
5. URL
This is the domain of the website that is sending the notification. You can direct the subscriber to any destination URL, and it doesn’t necessarily have to be the same domain.
Tips: Send your subscribers to a page as close to the lower end of the shopping funnel as possible. This can increase the possibility of conversion. Remember to add UTM tags to track the traffic coming from each push notification campaign.
6. CTA
CTAs (you can have up to two) are optional buttons that tell users what you want them to do, and what action is expected from them. Its visibility varies depending on devices and operating systems. It’s possible to define a distinct URL to CTAs, other than the main URL of the push notification.
Tips: Be precise on the CTA, and tell subscribers exactly what you want them to do, such as “Finish Your Purchase,” “Order Now,” etc. Remember to add UTM tags to track the traffic coming from each push notification campaign.
Use cases of web browser push notifications across industries
Web browser push notifications have numerous use cases across industries, and they deserve a whole new post to talk about. But in this section, we’re just going to highlight some of the use cases that brands can quickly explore.
E-commerce
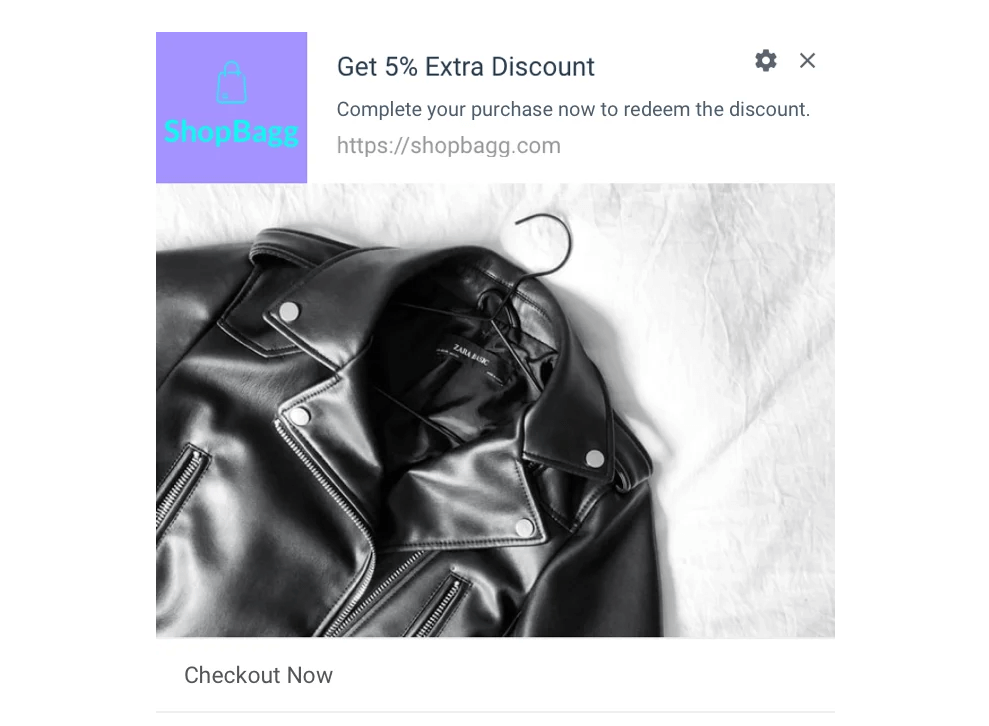
1. Cart abandonment. After someone abandons their shopping cart, you can send a push notification to nudge them to complete the purchase. You can also include an incentive to motivate them to come back.
2. Behavior-based offers. A customer who has expressed interest in a specific product (i.e., click on the product, add it to the wishlist, etc.) would be likely to click on the offer related to it.
News and media
1. Based on previous engagement. If someone has clicked on category A notifications the most, then it clearly indicates their interest in that category, and they would be more likely to entertain notifications from the same.
2. Live score of sporting events. If someone is interested in a specific sport based on your behavioral data, then you can send a push notification sharing live scores of that sport.
OTA (Online Travel Agent)
1. Flight status updates. If someone has booked a flight one week before the departure date, then it’s a good idea to send flight departure time, gate, check-in, and other important updates at regular intervals.
2. Travel booking abandonment. After someone abandons a booking due to a high price or other reasons, a push notification asking for their feedback can help you understand what made them abandon the booking.
Strategies for setting up effective web browser push notifications
In the last part, let’s see how to take full advantage of web browser push notifications and use them to run a more effective dialog with your target audience.
1. Take web push permissions the right way
As you may know, to be able to send push messages to the user’s browser, you need to gain explicit permission from the user. It is taken via a dialog box like the one below.

There are three ways users can engage with this prompt:
- Default - when the user ignores by canceling the notification or by pressing “escape”
- Granted - when the users clicks on “Allow” or “Yes”
- Denied - when the user clicks on “Block” or “No”
However, if the user denies, the browser doesn’t let you invoke the opt-in again. It is completely up to the user to reverse their decision which they can do by manually navigating a complicated UI (User Interface) and changing their site settings.
But with 60% of the users opting out of push notifications, the probability of a user going back to enable receiving notifications again is the guess of any pragmatic person. Our target is to mitigate the probability of them clicking on “block.”
To do so, iOS developers camouflage the system opt-in with a pre-permission dialog box.
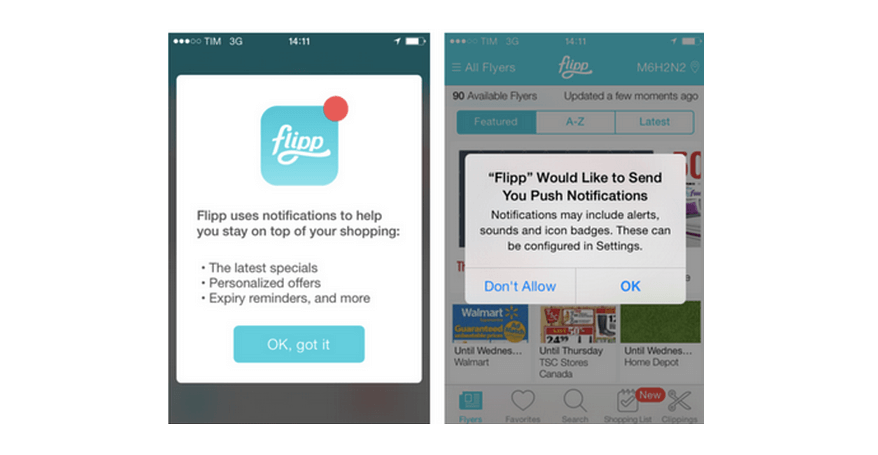
We’re going to adopt the same trick for web browser push notifications, too. Rather than directly launch the system permission dialog box, we’re going to get the user’s consent via a push notification that would motivate them to opt into the next step.
Still confused about this method? You should head to this article for more information! We explained thoroughly there.
2. Use custom segments
Before sending your web browser push campaign, you should select your audience!
While you can send a push message to your entire audience, that’s actually not a wise option. rather, you should make use of custom segments to target more specific groups of people.
While your audience shares an interest in your brand or website, they’re still a unique mixture of people. Segmenting your audience enables you to craft more personalized push campaigns that are more likely to resonate and result in a valuable click back to your website.
You should track relevant information to segment your audience. Segment according to geographic location, device type, amount of money spent, pages visited, time since the last visit, and much more.
Personalization isn’t a temporary trend in digital marketing, it’s here to stay. So, you should make use of it with your web browser push campaigns!
3. Create push notifications based on browser/device type
Ensuring that your push message looks presentable is just as vital as what your message actually says. If you are not careful, your title or body content may get cut off as a result of the browser or device your audience is using. Thankfully, this is not something that’s out of your control.
Consider segmenting your audience based on their browser or device type. Slight tweaks to your push message can ensure that it looks good across all browsers and screens. Also, we recommend placing the most crucial part towards the beginning of your message to ensure it doesn’t get cut off.
You should also send test notifications to make sure it looks exactly how you want it to.
4. Be smart with copywriting
Users don’t want to waste their precious time on vague-sounding push notifications. Below are a few things to keep in mind while you create push notifications.
-
Simple and action-oriented copy. Be assertive while creating copy for web push notifications. Use simple language to be clear with what you want to say to your audiences. Also, make sure that the copy is action-oriented and it tells users clearly to perform actions such as “Check out these items” or “Read this article.” Web browser push notifications often have a character limit of 64 characters for the title and 120 characters for the description. Nevertheless, refrain from maxing out on characters by using clever language.
-
Add “scarcity” and “urgency.” Using these could compel users to act on the push notifications. This works as “Prospect theory,” which says people make decisions based on a potential value of “losses” or “gains” they’ll get out of a given situation.
-
Use social proof. Social proof can actually compound users’ decisions to act on a push notification in your favor. Use some phrases like “100 people have already bought this product” or “1000s of readers have already signed up” and such.
5. Incorporate CTAs
One of the greatest ways to measure the performance of your web browser push notification is by viewing your click-through rate (CTR). And one way to boost your CTR is by incorporating CTA buttons.
CTAs help in just about any marketing channel, and that includes web browser push. Giving your user a specific goal to complete, together with an easy way to do it, is an excellent tactic to boost your overall web push effectiveness.
For example, if you’re running an E-commerce store, you might include a CTA button that says “Add to Cart” or “Check out Now.” If you are running a blog, a “Read More” button can motivate your subscribers to click. This gives them a clear path and can really work wonders at improving your CTR.
6. Optimize by user timezone
It may be 8 in the morning your time, but that’s likely not the case for all of your subscribers. To ensure your web browser push notifications arrive when you intend for them to, you need to optimize by user timezone.
Push messages that arrive at the wrong time not only feel out of place, but they also are incredibly annoying. People will find it irritating if they receive push notifications at an inconvenient time, such as early in the morning or late at night. They can easily unsubscribe from your notifications, and of course, you don’t want that!
You can avoid any mistakes of this nature by optimizing by user timezone. As a trustworthy push notification platform, AVADA Commerce lets you send the campaign immediately, or schedule to send later. You can select a specific date and time to send your push notification campaign, based on your user’s timezone.
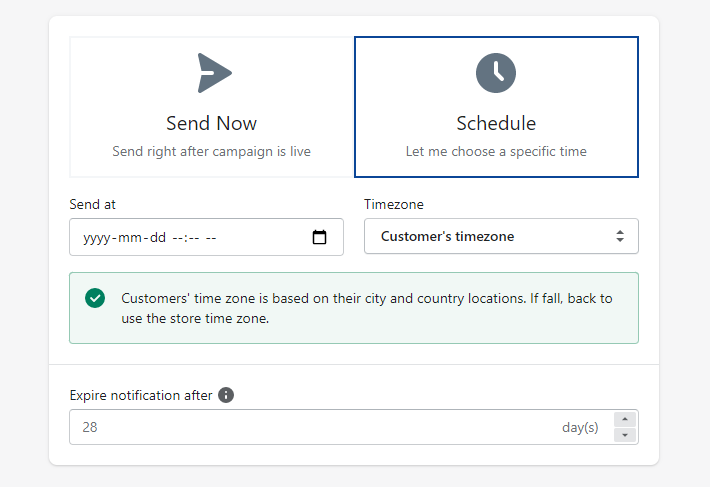
User’s timezone is based on their country and city locations. In case it falls to send, the message will be back to use the store timezone.
By doing so, you can be sure that your campaign achieves the best possible results. Want to explore more amazing features? Check out AVADA Commerce right now!
7. Make use of triggered campaigns
There are actually two main types of web browser push campaigns: manual and triggered campaigns.
You can set up a manual push campaign anytime you want. Create the campaign, choose your audience, and schedule it. However, triggered campaigns send as a result of a user’s particular action at your website.
You just need to create the push campaign and specify what the trigger will be. Once set up, it’ll trigger and automatically send whenever a subscriber completes a given action. For example, this could be opting in to your web push notifications, visiting a certain page, or abandoning their shopping cart, etc.
Triggered campaigns are highly relevant to your subscriber. Also, they couldn’t be easier to set up. Automation like this helps save you time and achieve your marketing goals.
8. A/B test your push notifications
A/B testing is one of the most effective ways to improve CTR or conversion rates. When it comes to your web push notifications, don’t rely on guesswork! You should test various titles, CTAs, body text, and more, and see what performs best!
A/B testing works best if you change only one element at a time. For example, test two unique titles but keep the rest of your push notification the same. If one push notification performs better, you can feel confident it was due to the title change. If you test various elements at once, it’s hard to identify which caused the increase in performance.
No matter how well your web browser push notifications perform, there’s always room for improvement. Consider setting up some A/B tests, and you’re sure to enhance your campaign effectiveness over time.
9. Track your metrics
Below are some metrics that you should keep an eye on to constantly improve your campaigns:
-
Opt-in rate. This is the percentage of unique users on your website clicking “Allow” and becoming your subscribers. Keeping track of this metric gives you hints on where to ask users if they want to receive your push notifications and adjust accordingly. You can place the opt-in prompt on any page, and trigger it by the user’s action. It’s unnecessary to ask permission within seconds a visitor enters the site.
-
CTR. This indicates the percentage of subscribers that click your notification over the total number of subscribers you sent it to. It’s vital to keep close track of this number, because it lets you know what type of notifications your subscribers are responding to. You should test different versions changing the title, description, image, and CTA, and analyze which ones are resulting in more clicks.
-
Opt-out rate. This shows the number of people that unsubscribed from your web push notifications. This is an essential metric to keep track of. If you discover that your opt-out rate is increasing over time, ring your alarm bells and look for the problem. In this situation, it’s often related to the low relevance of your push notifications, or maybe you are sending too many push notifications that your subscribers perceive as spam and decide to opt-out.
-
Conversion rate. This is the ultimate goal of your push campaign. It indicates the accomplishment of your goal, whether completed signup, sales, or another engagement type. You can have a significant opt-in rate or CTR, but if they are not translating into conversions, it’s time to evaluate your strategy in place, identify the problem, and resolve it.
The bottom line
In an environment where users are exposed to large amounts of content, web browser push notifications are a valuable way to get attention. They are crisp, outstanding, effective, and they can be set up in just minutes.
We hope you love this blog post and learn something useful to apply to your next push campaign. If you want more expert advice about web push notifications, we’re always here to help! Contact us now for more details!
Thanks for reading!


New Posts


How To Set Up Google Analytics 4 For Your BigCommerce Store
