
How to Set Up Newsletter Popups for Shopify Stores?

Drive 20-40% of your revenue with Avada
Building an email list is essential for any eCommerce business to succeed. Your list will be your audience to market new products, keep loyal customers, and inform subscribers about the latest offers or products. Obviously, an empty email list won’t let you do all of those, limiting your email marketing efforts with underperforming results.
Many businesses spend thousands on growing their email list, but most marketers know that excellent email opt-in popups are enough to generate more signups and expand the list. Despite many doubts, email newsletter popups are still the most effective tool to help you quickly build your email list. More than that, companies that switch from a traditional opt-in form to a kickass popup form often see a significant increase in email signups.
Whether you’re looking for newsletter popup ideas or a tool to create a fantastic popup that goes well with your Shopify store, you have landed on the right page.
This guide will show you how to set up a newsletter popup for Shopify stores in 3 easy steps, using our app AVADA Email Marketing. You will be able to design your popup, set the timing, and select the target audience in just a few clicks. Let’s get started!
What is a newsletter popup?
When we refer to newsletter popups, we are talking about lightbox popups. Typically, these popups appear on the top of any page that visitors are viewing. They often darken the page in the background and become the main focus of the page. Newsletter popups’ main goal is to make users subscribe to receive emails from the brand.
There are many ways for newsletter popups to convince visitors, such as using a coupon, addressing the benefits, or simply asking. After the user has subscribed, the brand can then send newsletter emails that contain new blog posts, latest products, special offers, promotion, etc.
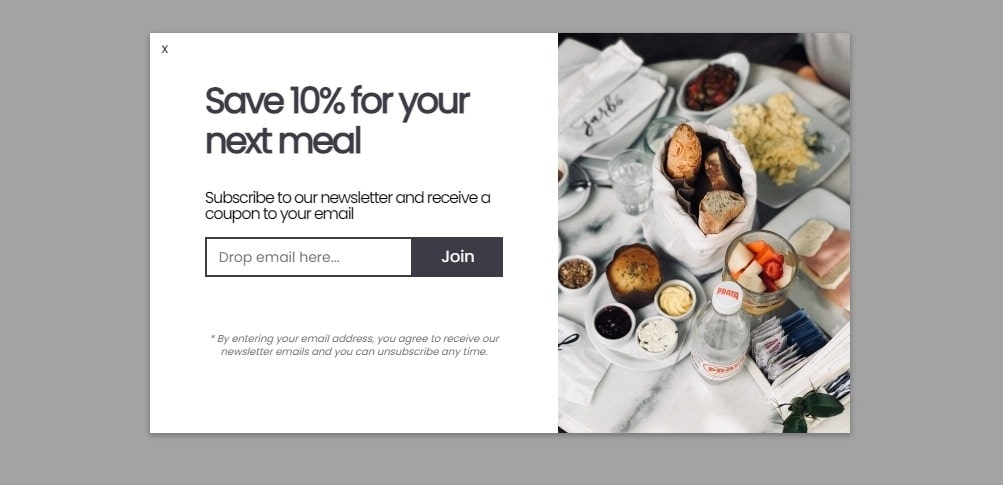
The example newsletter popup above is one of many templates that AVADA Email Marketing has. As you can see, the approach is quite simple. To earn a 10% off coupon for the next meal, all visitors need to do is enter their email address and join the list. This popup is fully customizable so you can tweak it to match your brand’s personality and eCommerce website.
Why should you use a newsletter popup?
The answer is simple – because newsletter popups offer high visibility, and can have a great return on investment rate. But, sometimes, popups can feel invasive and users may feel annoyed by poorly designed ones. But, again, you still should try using popups for the following reasons:
- Popups are effective to increase quality leads: Most users don’t scroll down the bottom of a website, making traditional signup form with a CTA at the footer impossible to get many impressions. Poups solve this problem by putting the signup form right in the center of a page, making it hard for users to miss what you have to offer.
- Popups deliver personalized and relevant content/offer to target audiences: With technology, you can push special offers and messages to the right groups, which can increase the conversion rate by getting more users to sign up. For example, if your Shopify store receives traffic from multiple countries, you can personalize your newsletter popups for each region.
- Popups help showcasing your brand image and personality: Since newsletters popups are technically not a part of your web page, you can come up with any design that supports your message well and enhances your brand’s image. Different images, colors, buttons, and layouts will give you the necessary creativity to show a dynamic brand with the personality you wish to have for different occasions (Halloween, Christmas, New Year’s Eve, etc.)
Annoying popups that try to trick visitors into scam are a thing of the past now. With Shopify, your eCommerce store has an SSL certificate for better security and no intrusion. The only popups that can get to your potential customers are YOUR popups, which can be a good or bad subscribing experience depending on your approach.
Sounds scary, but don’t worry. In the next section, I will show you how to easily set up a newsletter popup for your Shopify store in just a few steps, using a reliable tool to deliver an enjoyable experience.
How to set up newsletter popup for a Shopify store?
Now, as we have learned that newsletter popups help your brand connect with website visitors, grow the audience, and boost engagement; it is time to see how to set it up. After designing and publishing, our app AVADA Email Marketing will automatically show the popup to your connected Shopify store and start collecting email addresses.
Here are something to know before you start reading the steps:
- You will need to have a Shopify store first. If you haven’t, you can read our guide on setting up a Shopify store.
- If you haven’t installed our app, get it free at AVADA Email Marketing official site.
- Our app is updated regularly, so if you notice anything different in this guide, contact us to have support.
Now, let’s start setting up newsletter popup for your Shopify store:
Step 1: Access the popup builder and select a template
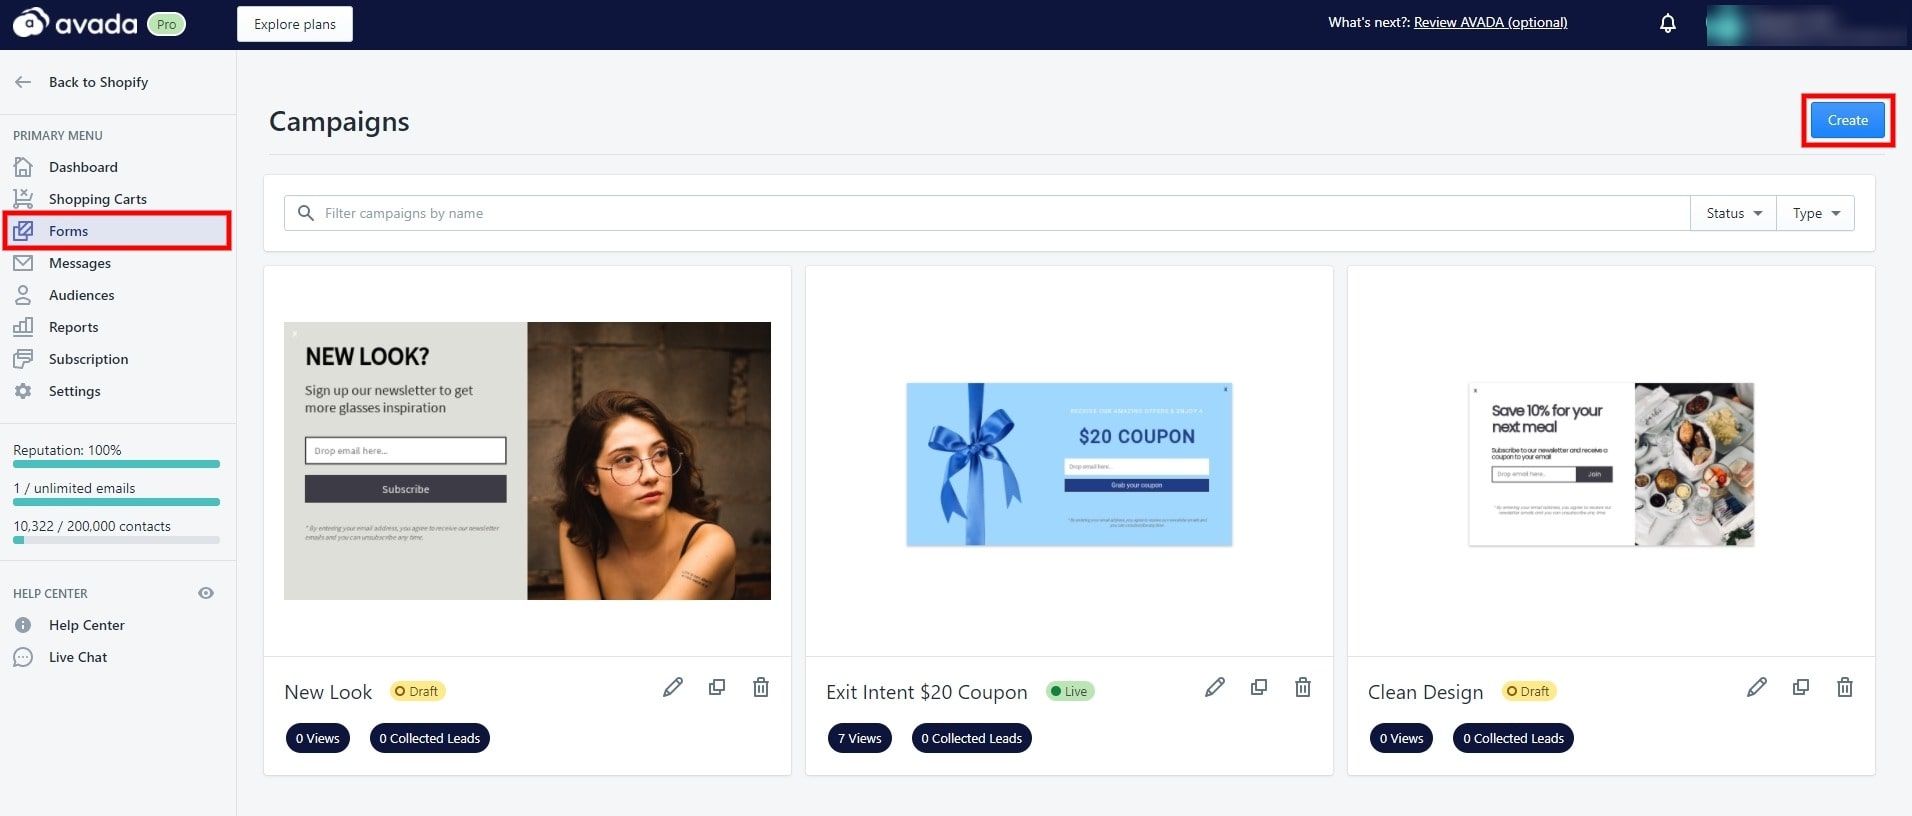
The popup form editor is where you customize your newsletter popup, duplicate existing campaigns, or delete unused popup. To access the popup forms and create a new one, from the dashboard, select ‘Forms’ -> ‘Create’ like in the image above.
As you can see, there are already some popups that I made in the ‘Forms’ section. If you click on any of them, you will be able to see the campaign’s performance and edit the popup even when the campaign is running.
For now, let’s continue creating our newsletter popup.

This is the first step of creating a newsletter popup campaign - selecting a template. There are already 10 popup templates for you to choose from. Beside them, there are also templates for spin to win popups or add to cart popup. But we will get to those exciting popups in another article. Select a newsletter popup template of your choice.
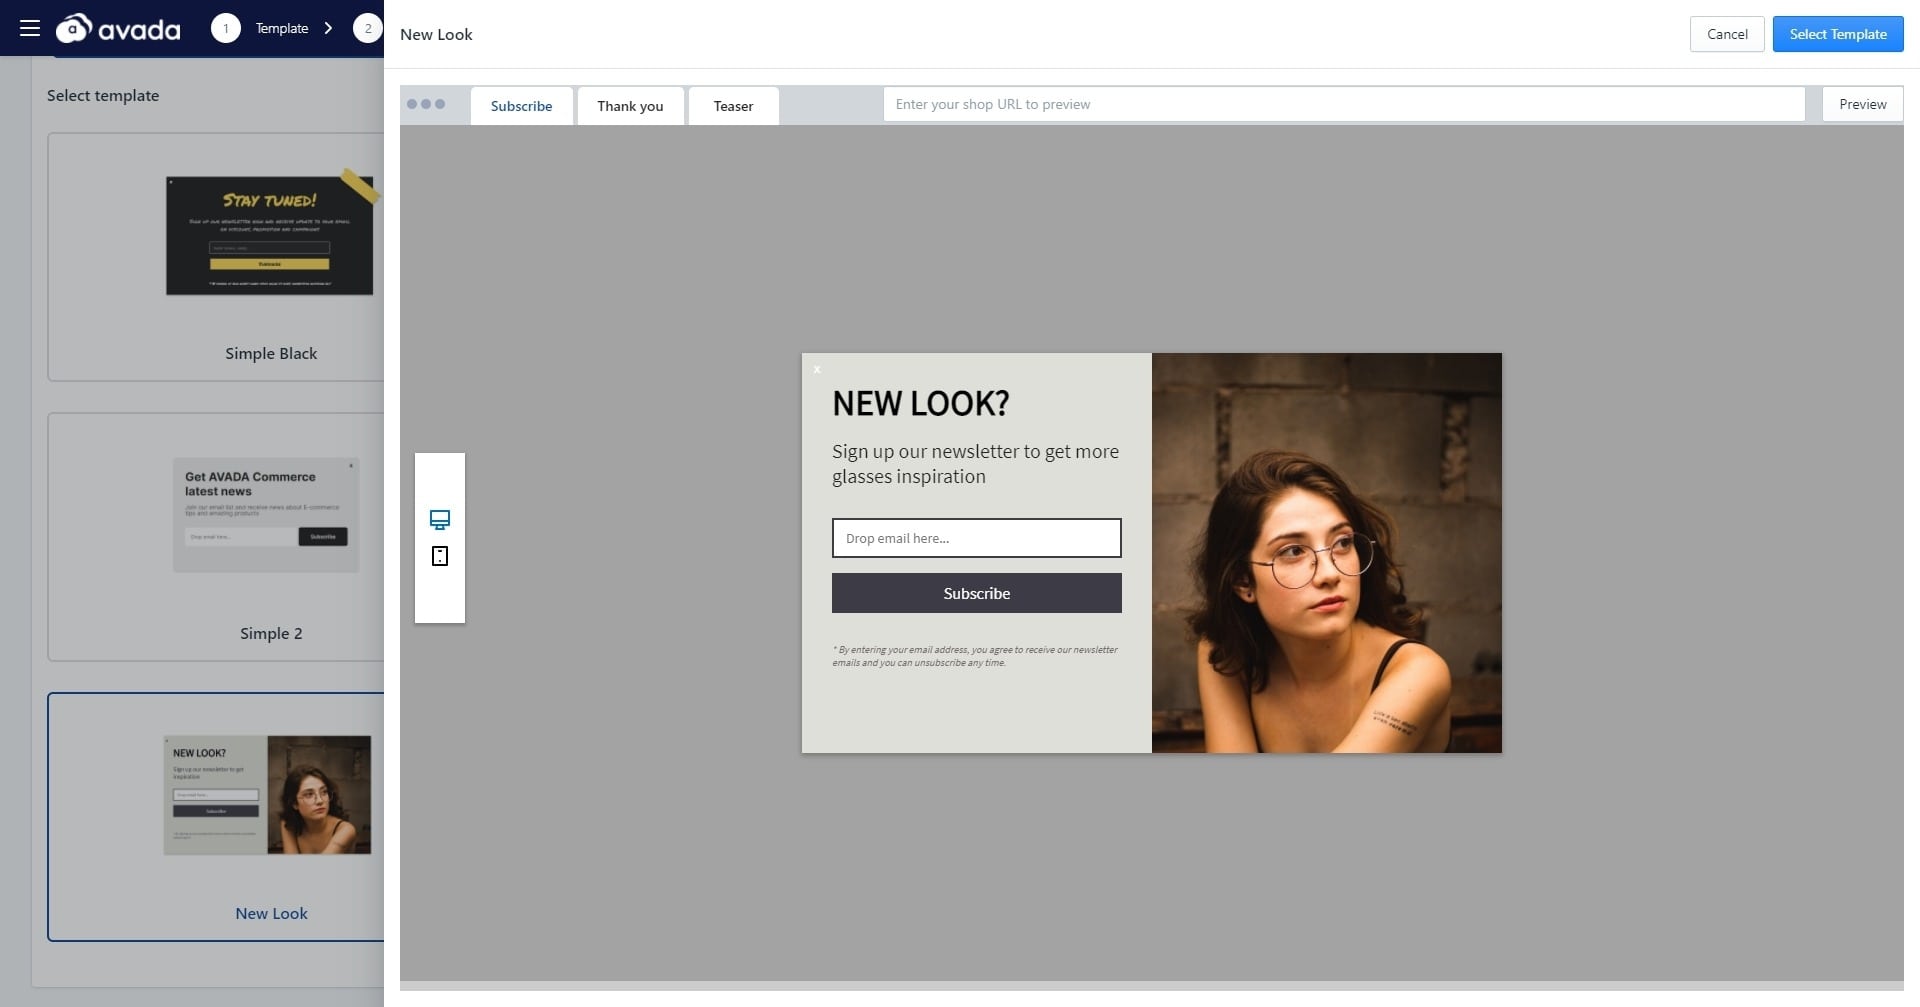
As an example, I am selecting the New Look template - which tells visitors they can get latest news and inspiration about glasses when they subscribe. You have other approaches with the popups too, like offering a coupon code, discount, or causing some FOMO in users.
In the preview pane like in the image above, you can view your popup on desktop and mobiles, as well as the ‘thank you’ version when a visitor successfully subscribed, and the teaser of the popup on your eCommerce site. When you are ready, click on ‘Select template’.
Step 2: Design your newsletter popup
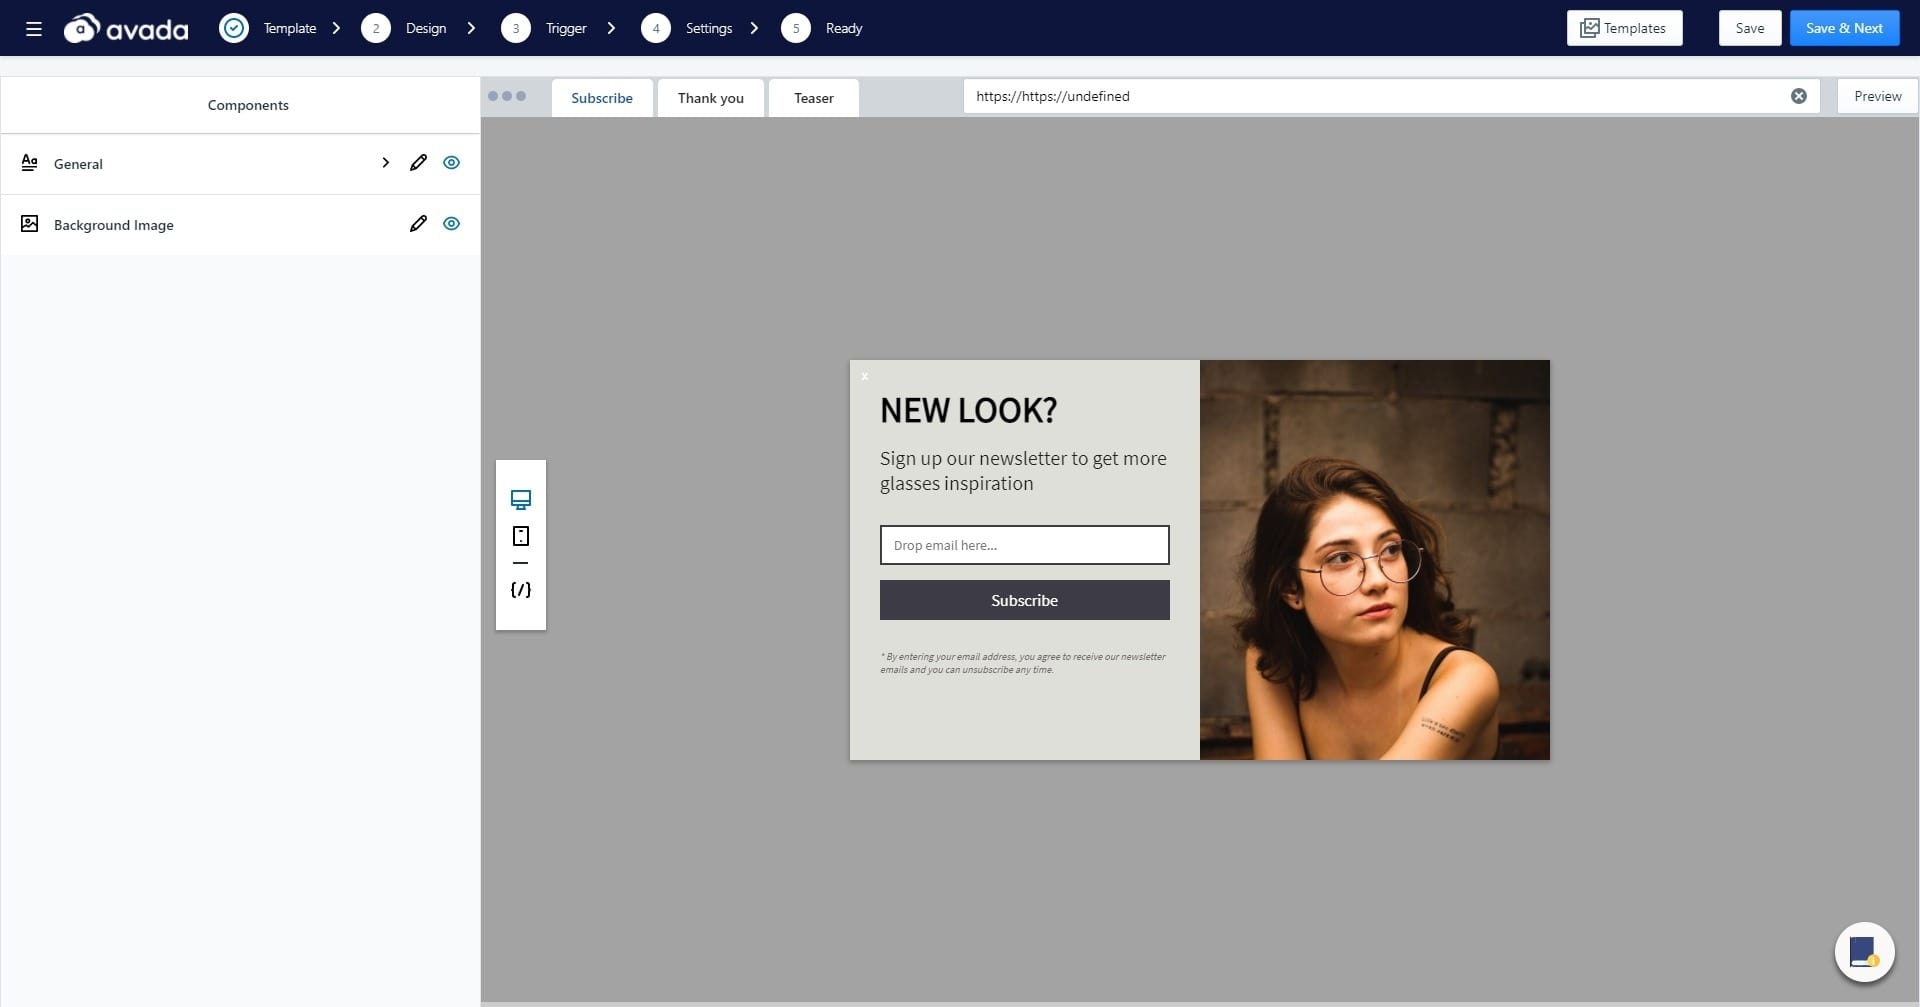
At this step, you can customize the newsletter popup to match your campaign’s message. Two main components to edit are the general copy and the background image. Your copy should be clear and encourage visitors to take action, while matching your brand’s personality.
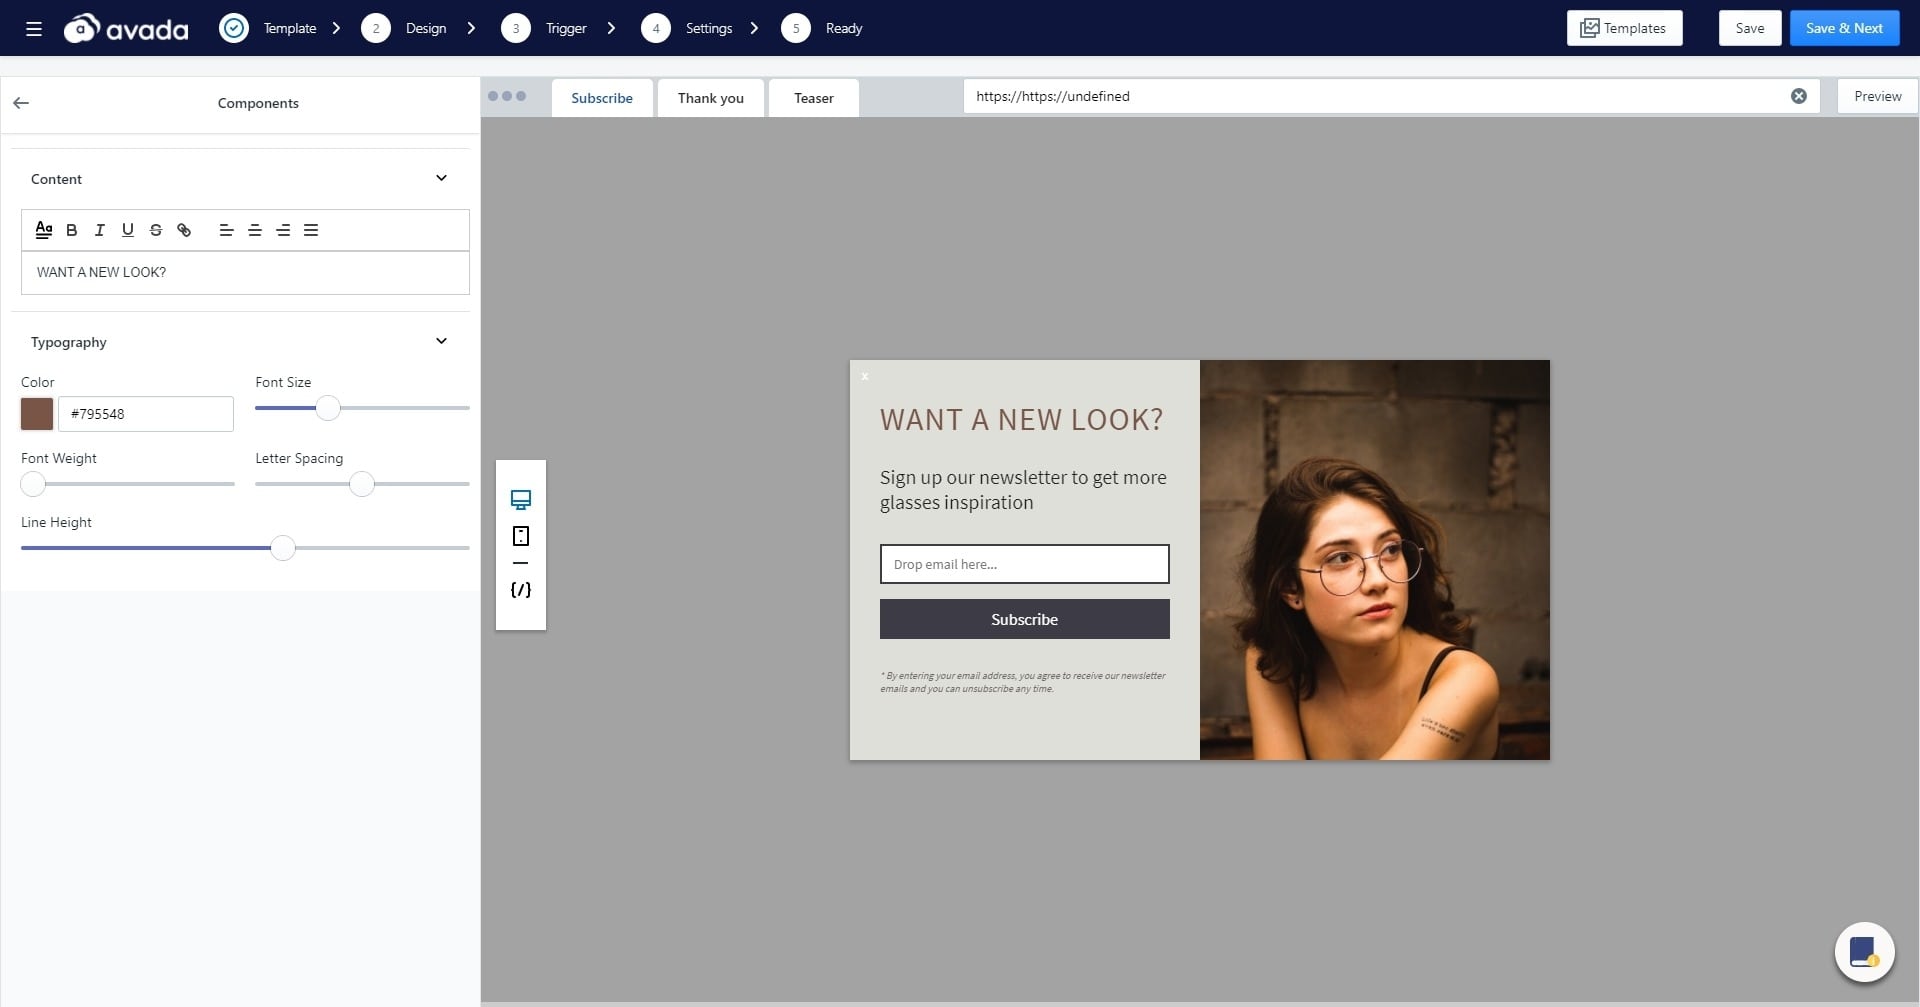
For example, I don’t really like the headline of the newsletter popup, so I clicked on ‘General’ -> ‘Heading’ and changed it into “Want a new look?”, which sounds a bit more clear. While changing the copy, I can also adjust the headline’s color, font size, font weight, letter spacing, and line height. I also changed the headline’s color so it pops out a little bit more.
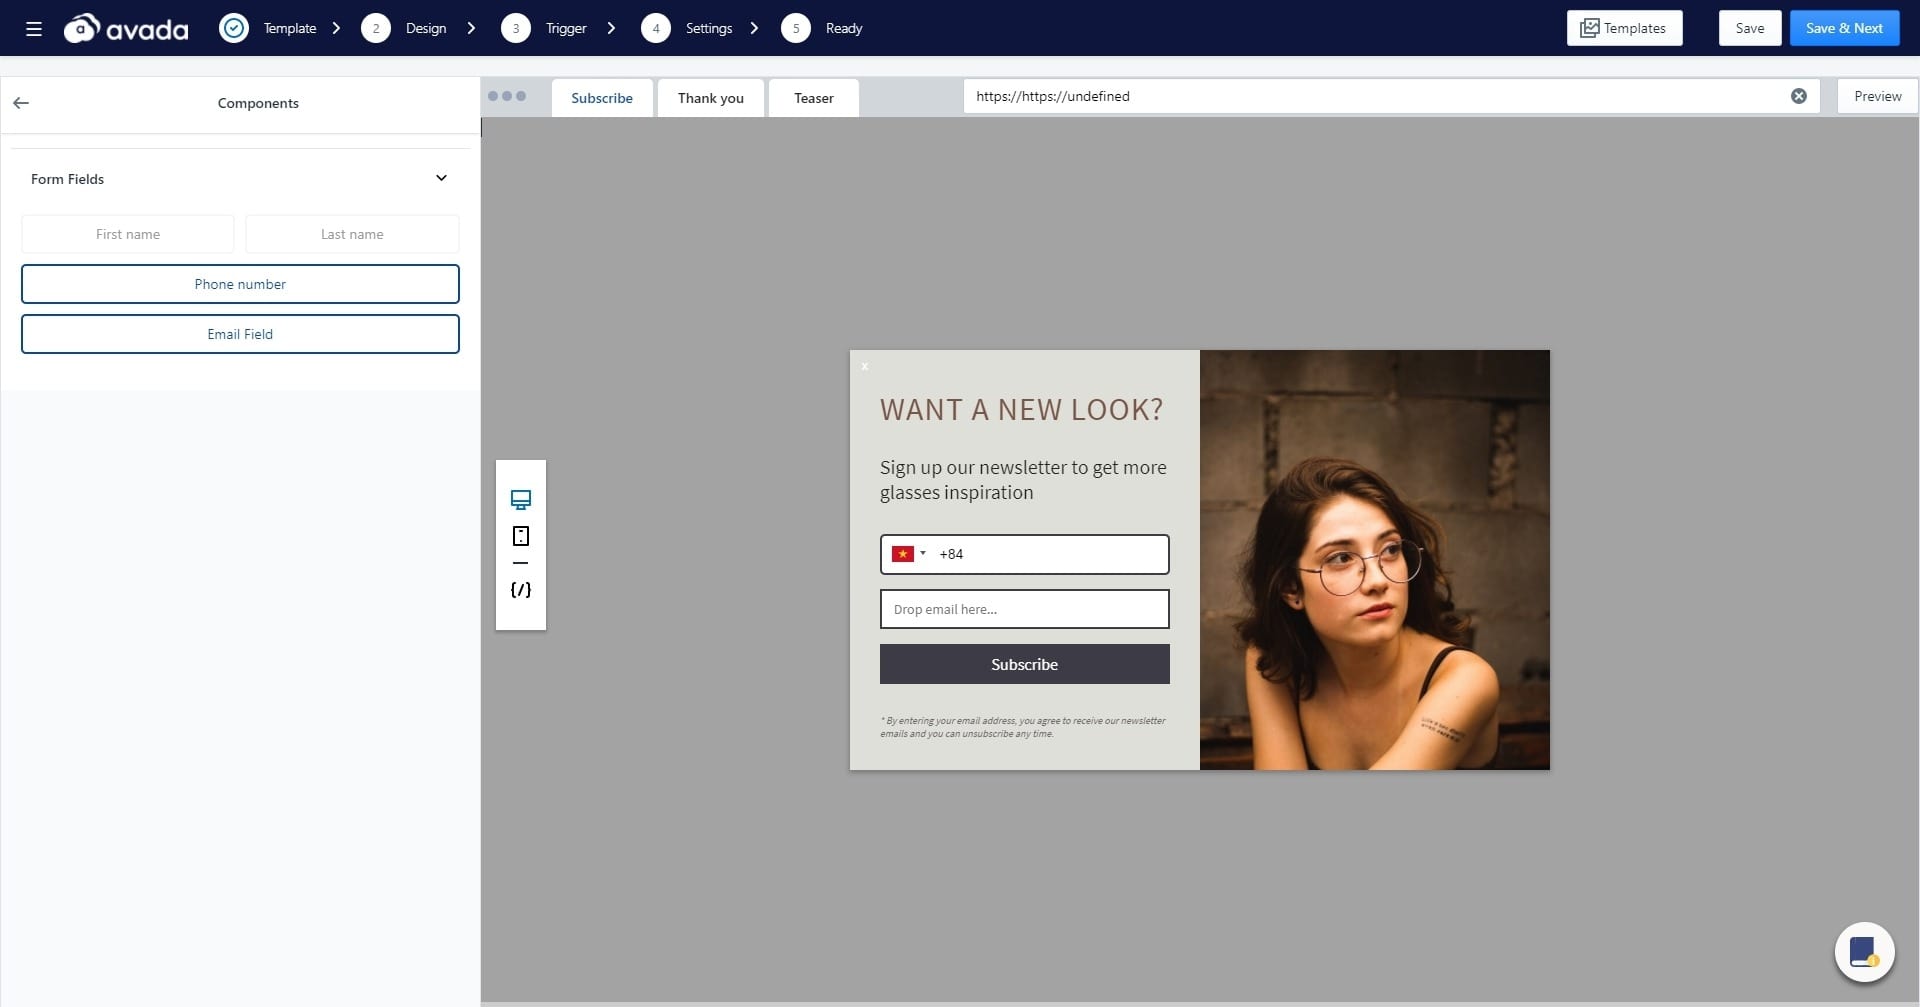
For the popup’s form fields, you can add more fields so subscribers can enter more information like first name, last name, or phone number. Having a phone number will definitely help you send SMS campaigns in the future, which is also a feature of our app. But, if this is the first popup for your visitors, keep it a low fraction by signing up with only the email address.
After you are done with editing your newsletter popup, click “Save & Next” to continue. This will take you to the next step - editing the trigger for your popup.
Step 3: Choose a trigger
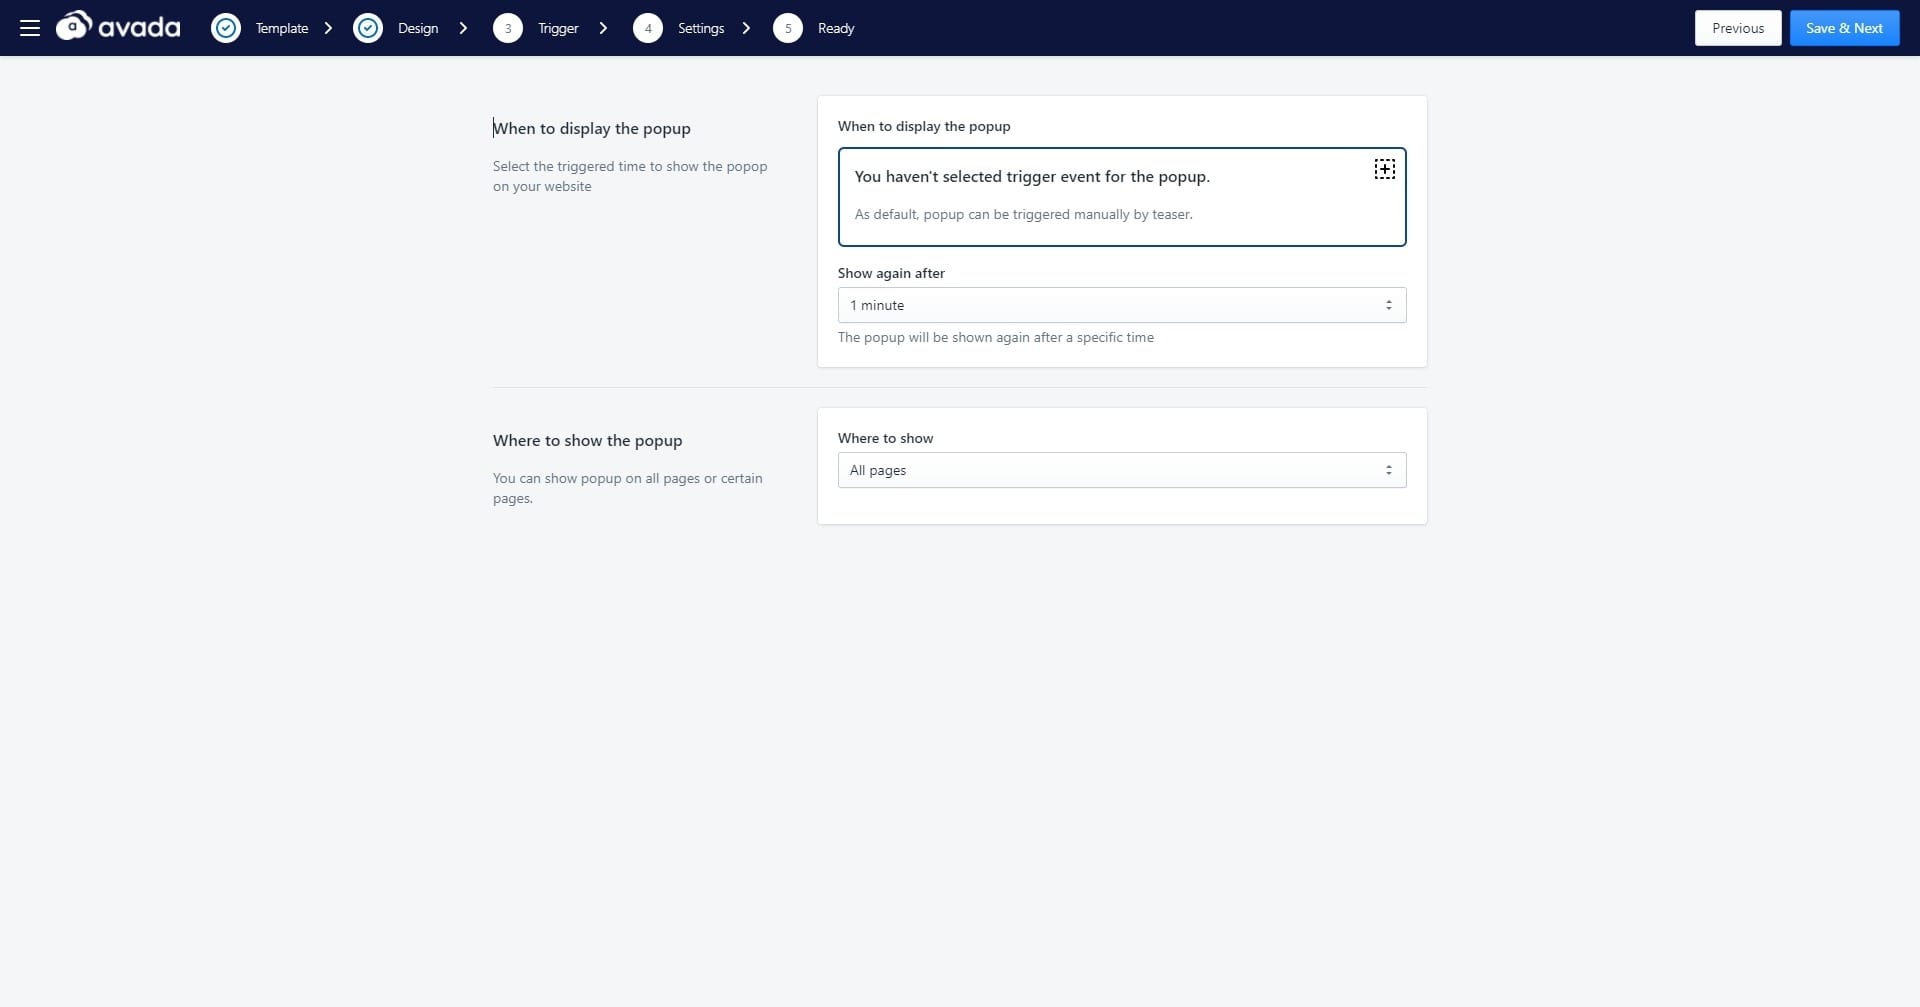
At this step, you can select when and where to display your newsletter popup. This is really important since if you show your popup at the wrong time or phase of the customer’s buying journey, it will be harder to convert the buyers.
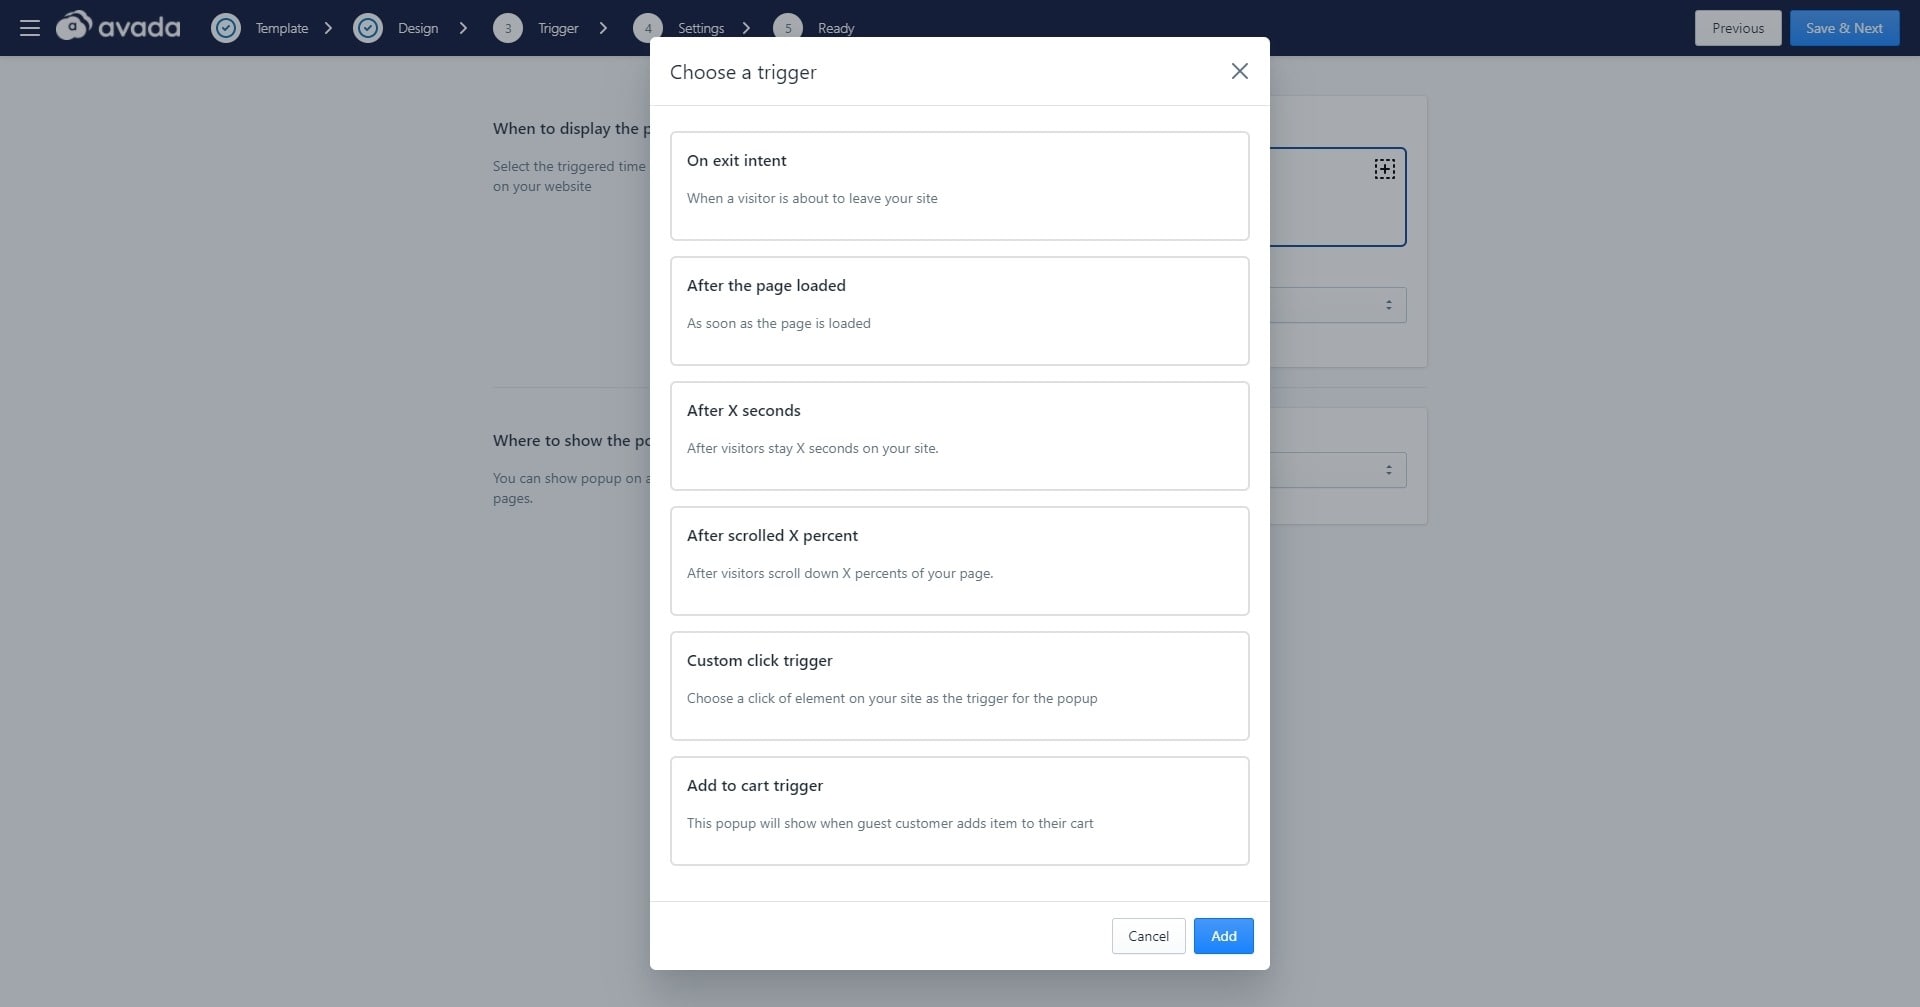
For the display trigger of the newsletter popup, you have options such as On exit intent, After the page loaded, After X seconds, After scrolled X percent, Custom click trigger, or Add to cart trigger. You can add many campaigns with different triggers to see which newsletter popup works the best.
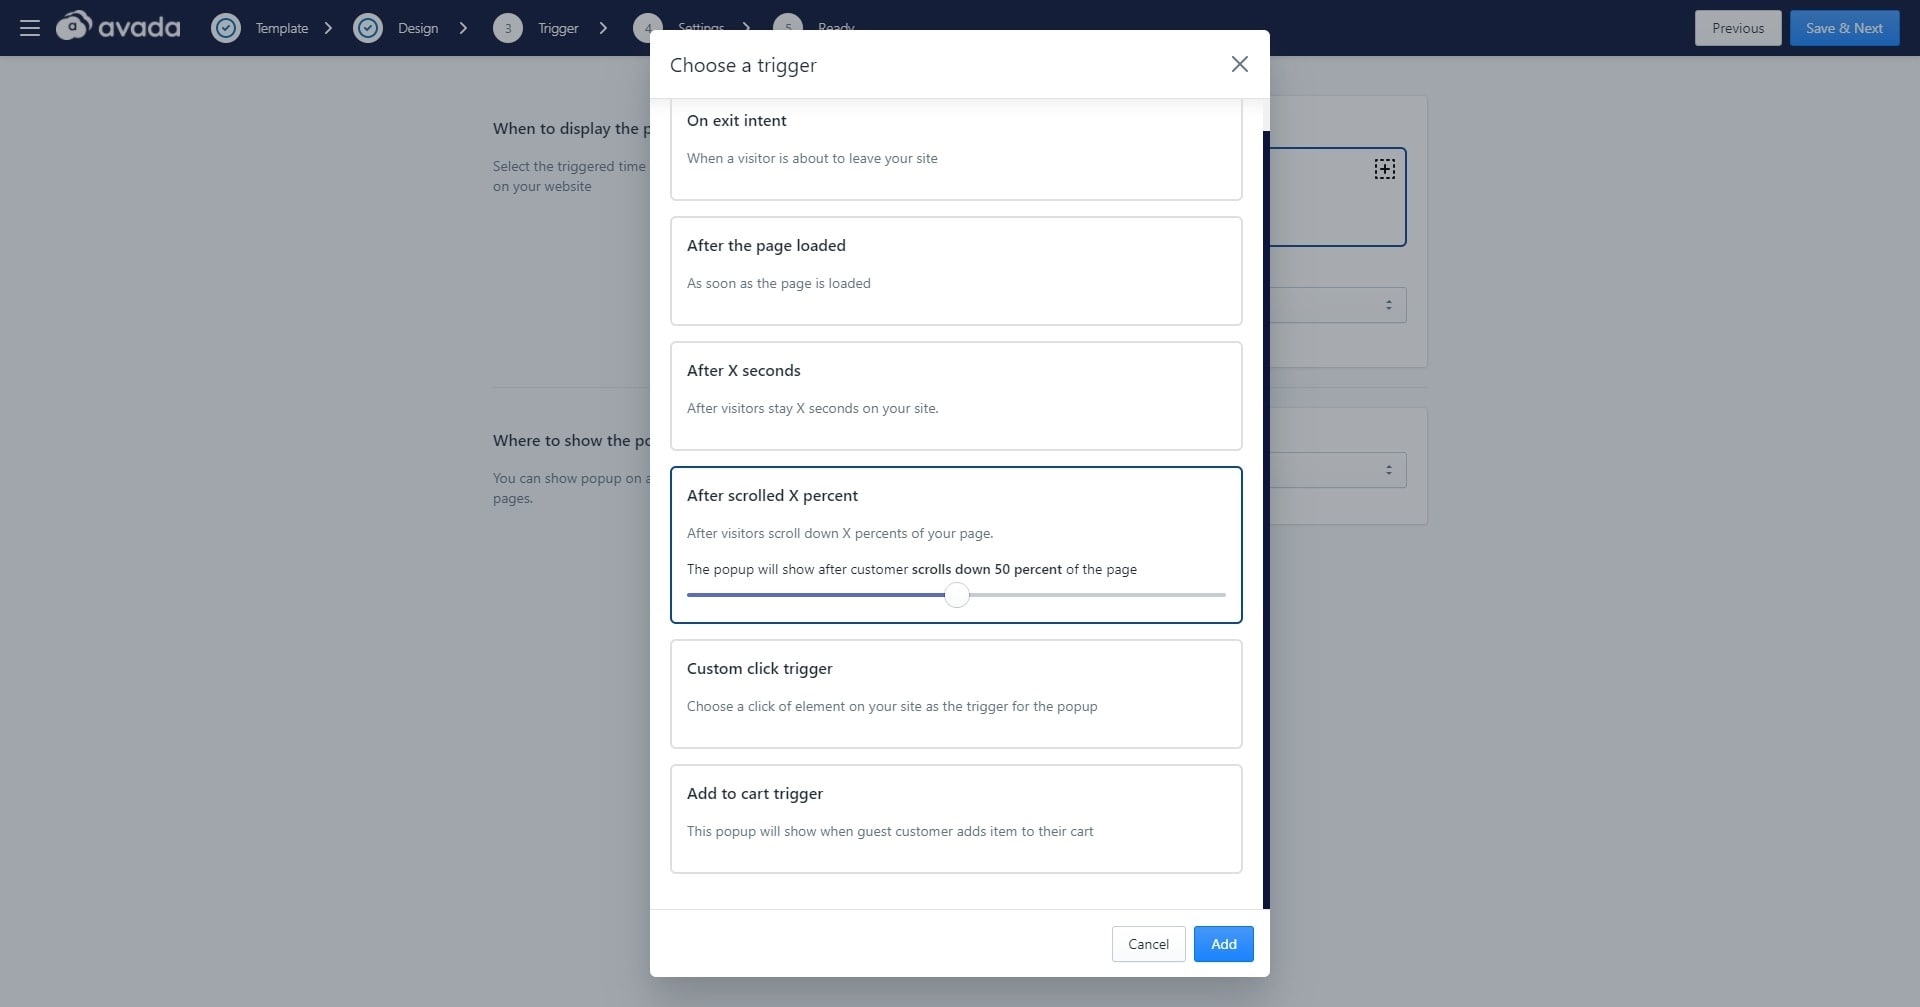
For my newsletter popup, I decided to use the After scrolled X percent trigger. This way, I know the popup only shows up if the visitor has found my store’s homepage to be somewhat interesting. So I set the popup to appear after visitors have scrolled down 50% of the page and shows again just One time.
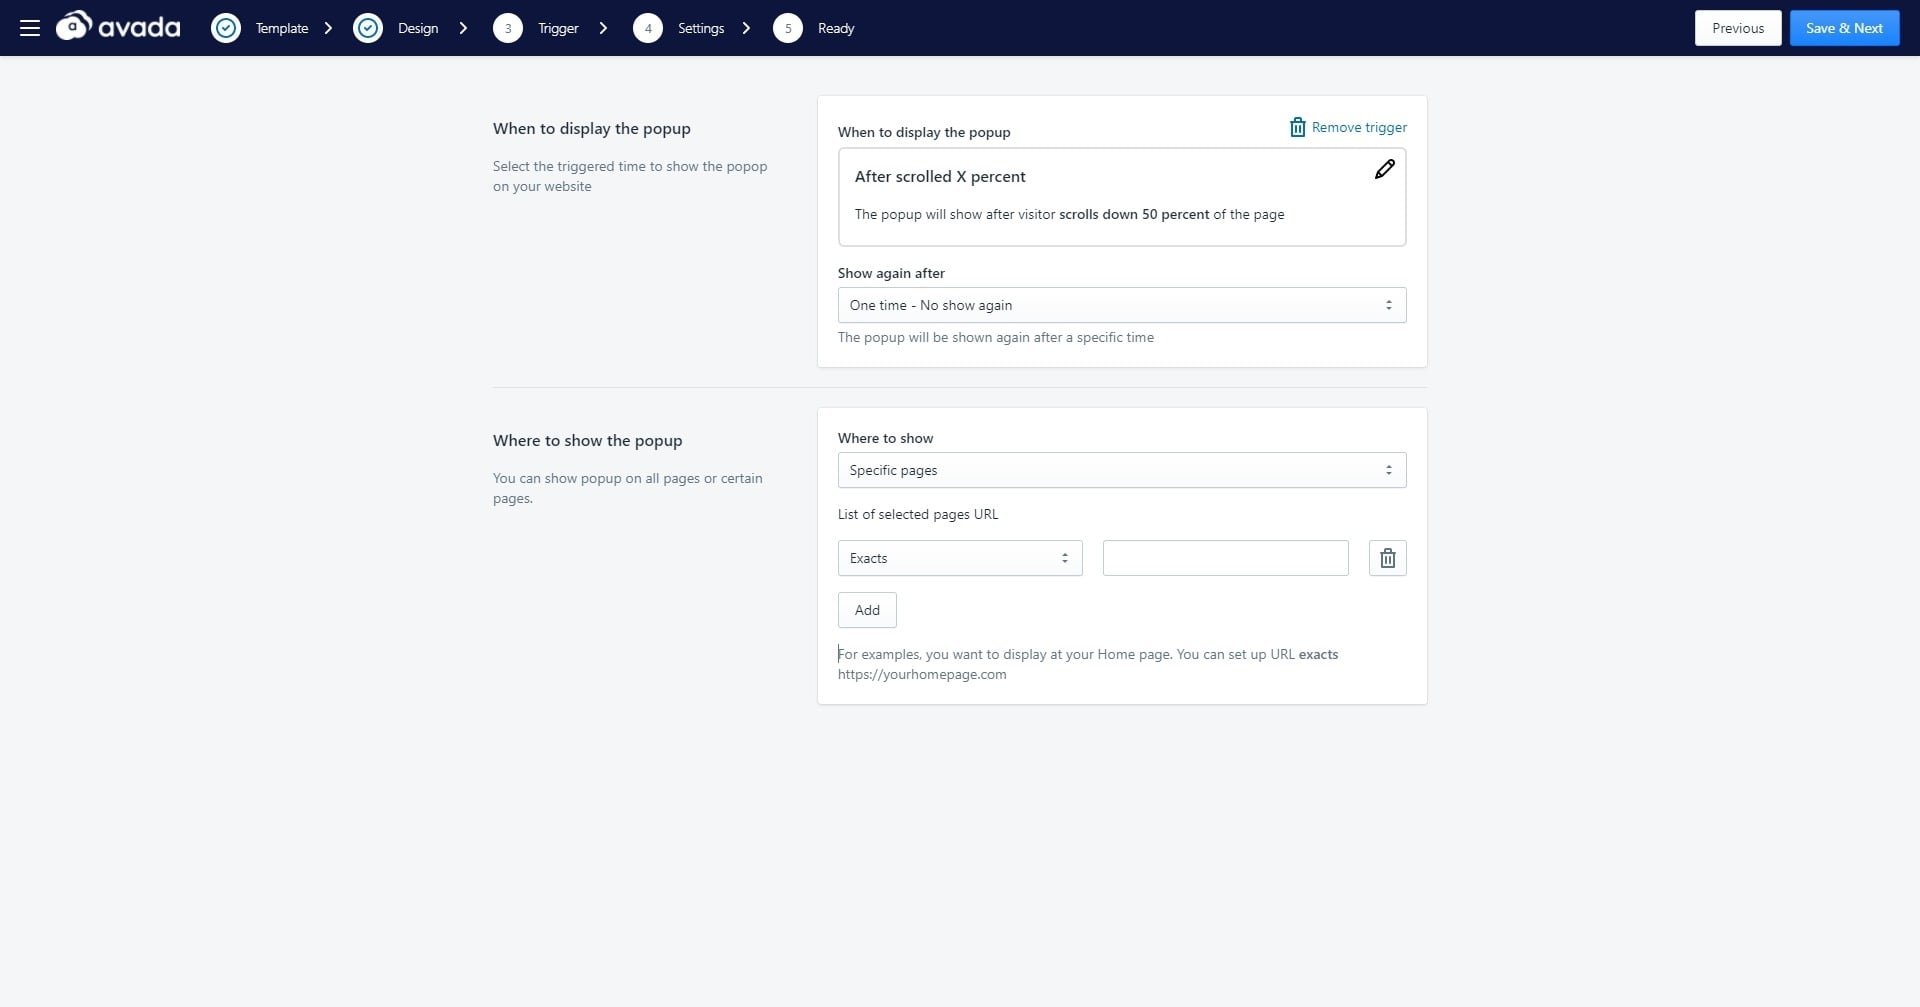
For where to show the newsletter popup, since I knew that I only wanted the popup to appear on the homepage, I selected ‘Specific pages’. This gives me the option to insert the URL of any page I have on my page and restrict the popup to only appear on those pages. Simple enough, I just need to add the URL of my store’s homepage, then click on ‘Save & Next’.
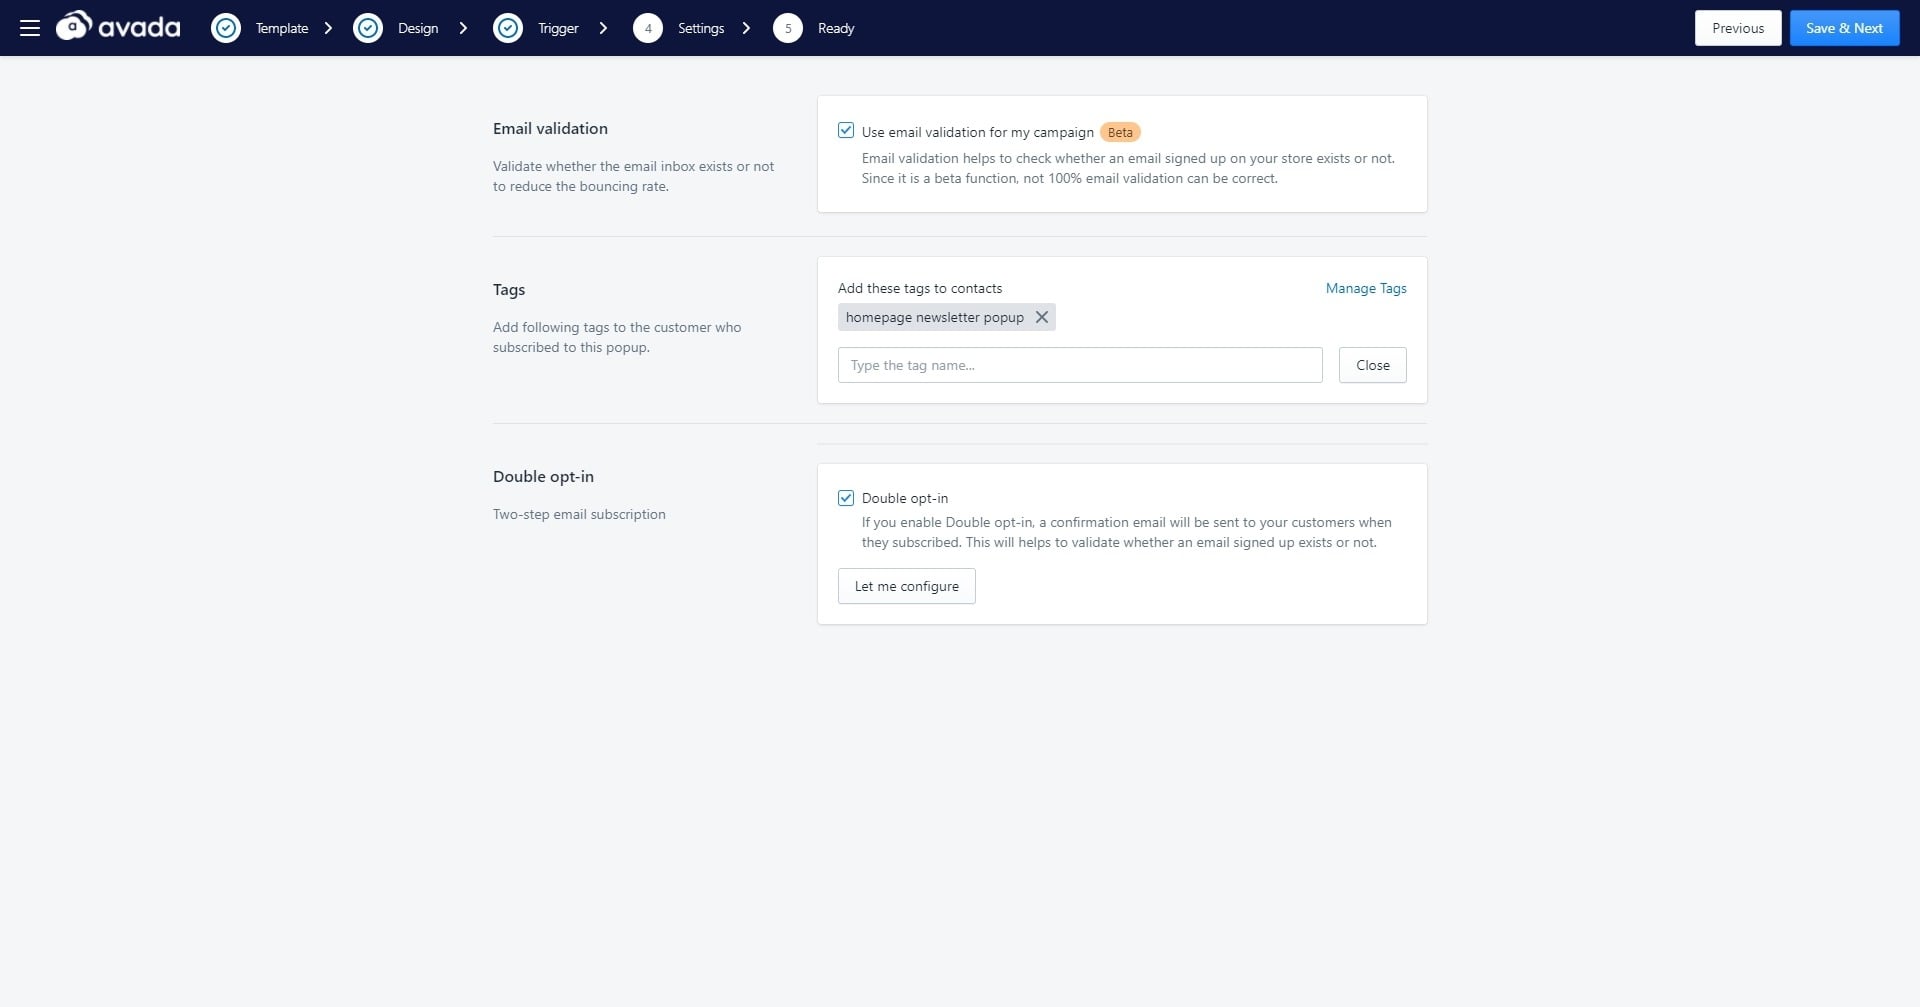
Step 4: Adjust the settings and publish the newsletter popup
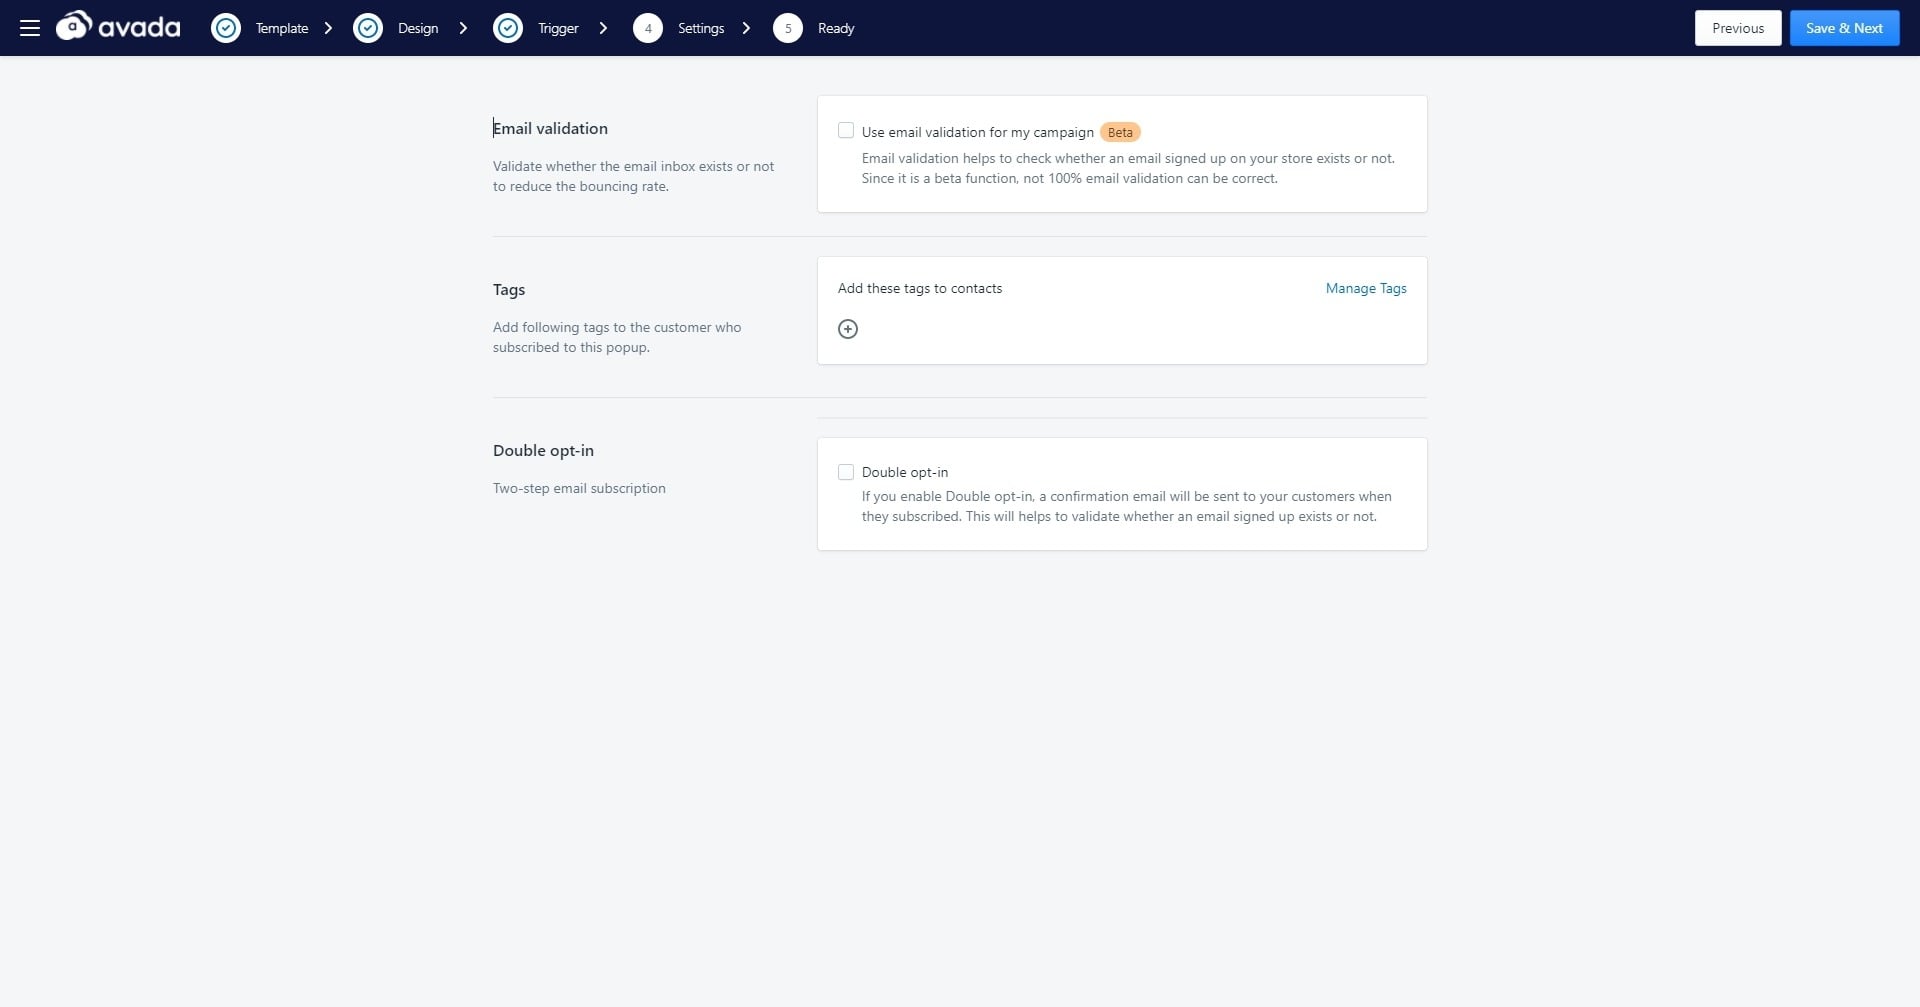
In this step, we will adjust the setting of our newsletter popup campaign a bit. There are three options to choose your own preferences:
- Email validation: This will help validate whether the signed up emails exist or not to reduce the bounce rate of your newsletter campaign. The validation feature is still in beta, but we will keep improving it to work perfectly in the future.
- Tags: You can add tags to subscribers who joined your email list through this specific popup, helping you manage and track the effectiveness of your popup campaigns.
- Double opt-in: By default, the newsletter popup is single opt-in. If you want to prevent fake signups, the double opt-in feature will send a confirmation email to your subscribers first. Only when they click on the call to action in the confirmation email can they finish the subscription. You can configure your confirmation email too.
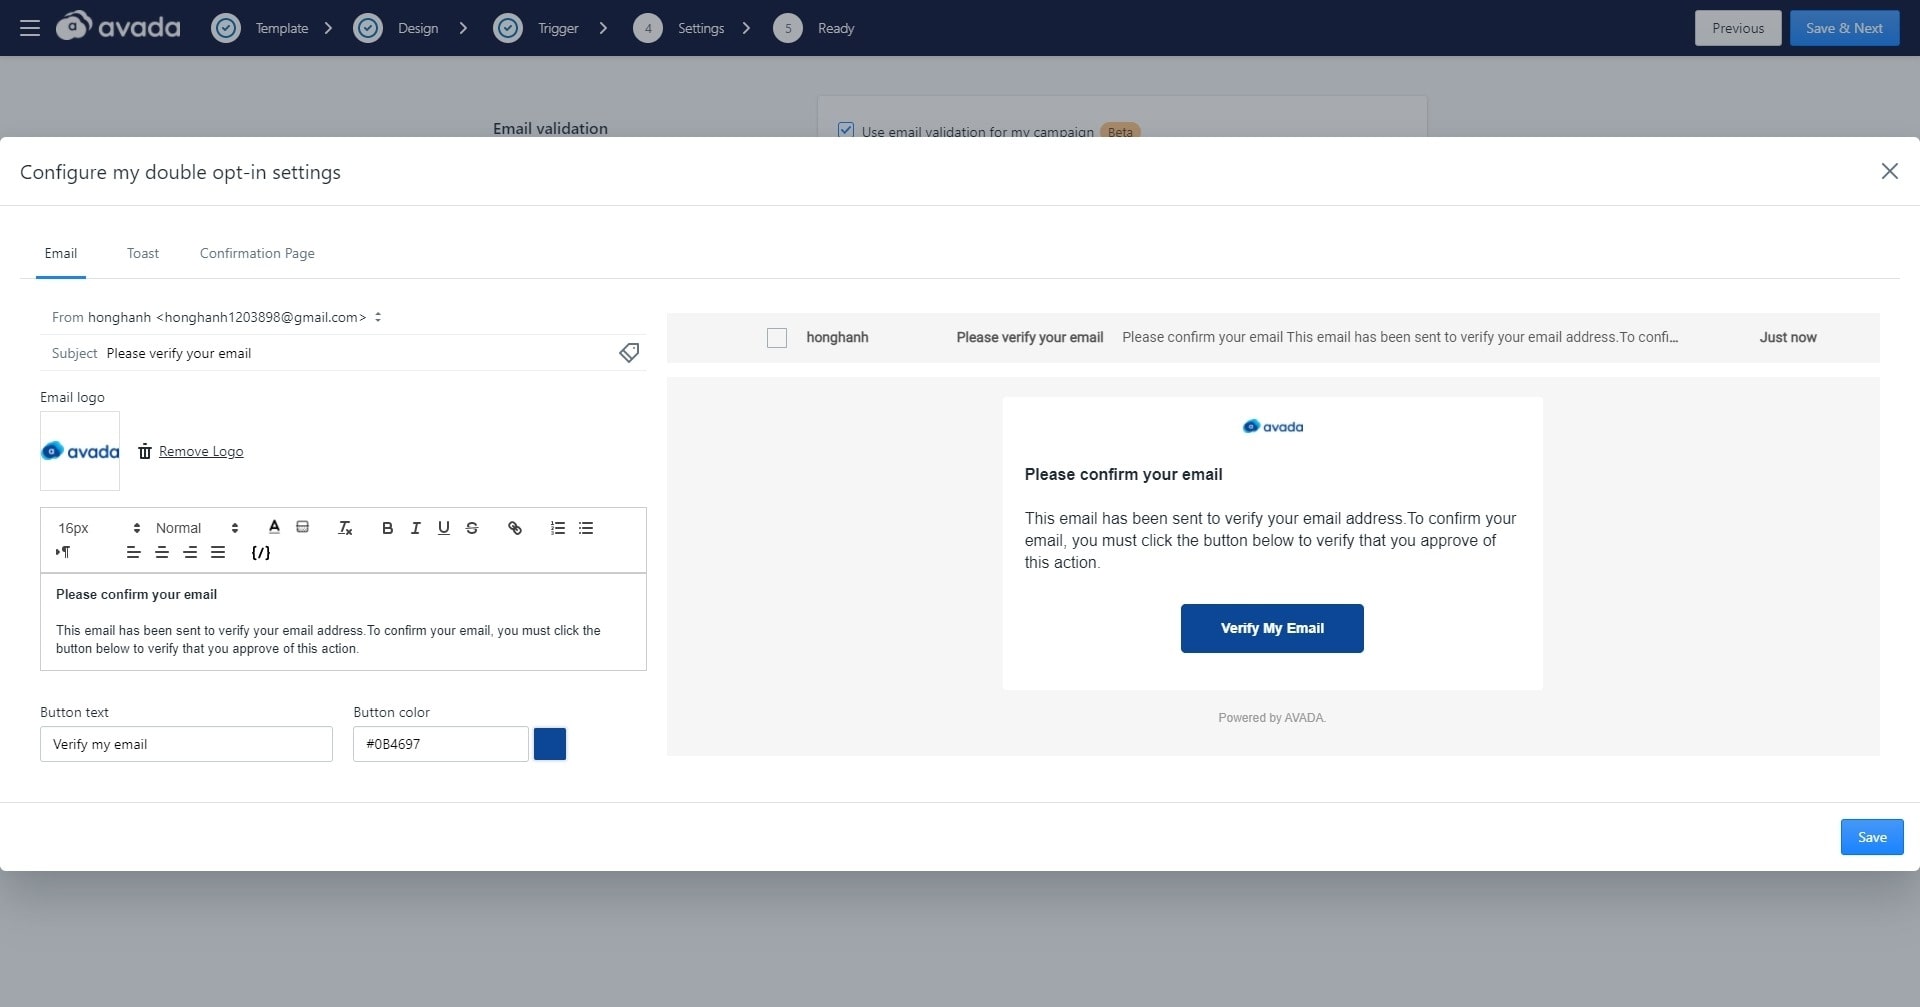
Here is the configuration for your double opt-in popup emails. You can change the copy and design of this email, maybe add a bit of personality if you wish. Besides that, you have a Toast to inform subscribers of the double-opt-in process and a Confirmation page to show customers they have successfully subscribed.
Here is how I configured my newsletter popup; you can try the settings for yourself or pick your preferences. After you have done configuring the settings or your newsletter popup, click on “Save & Next.”
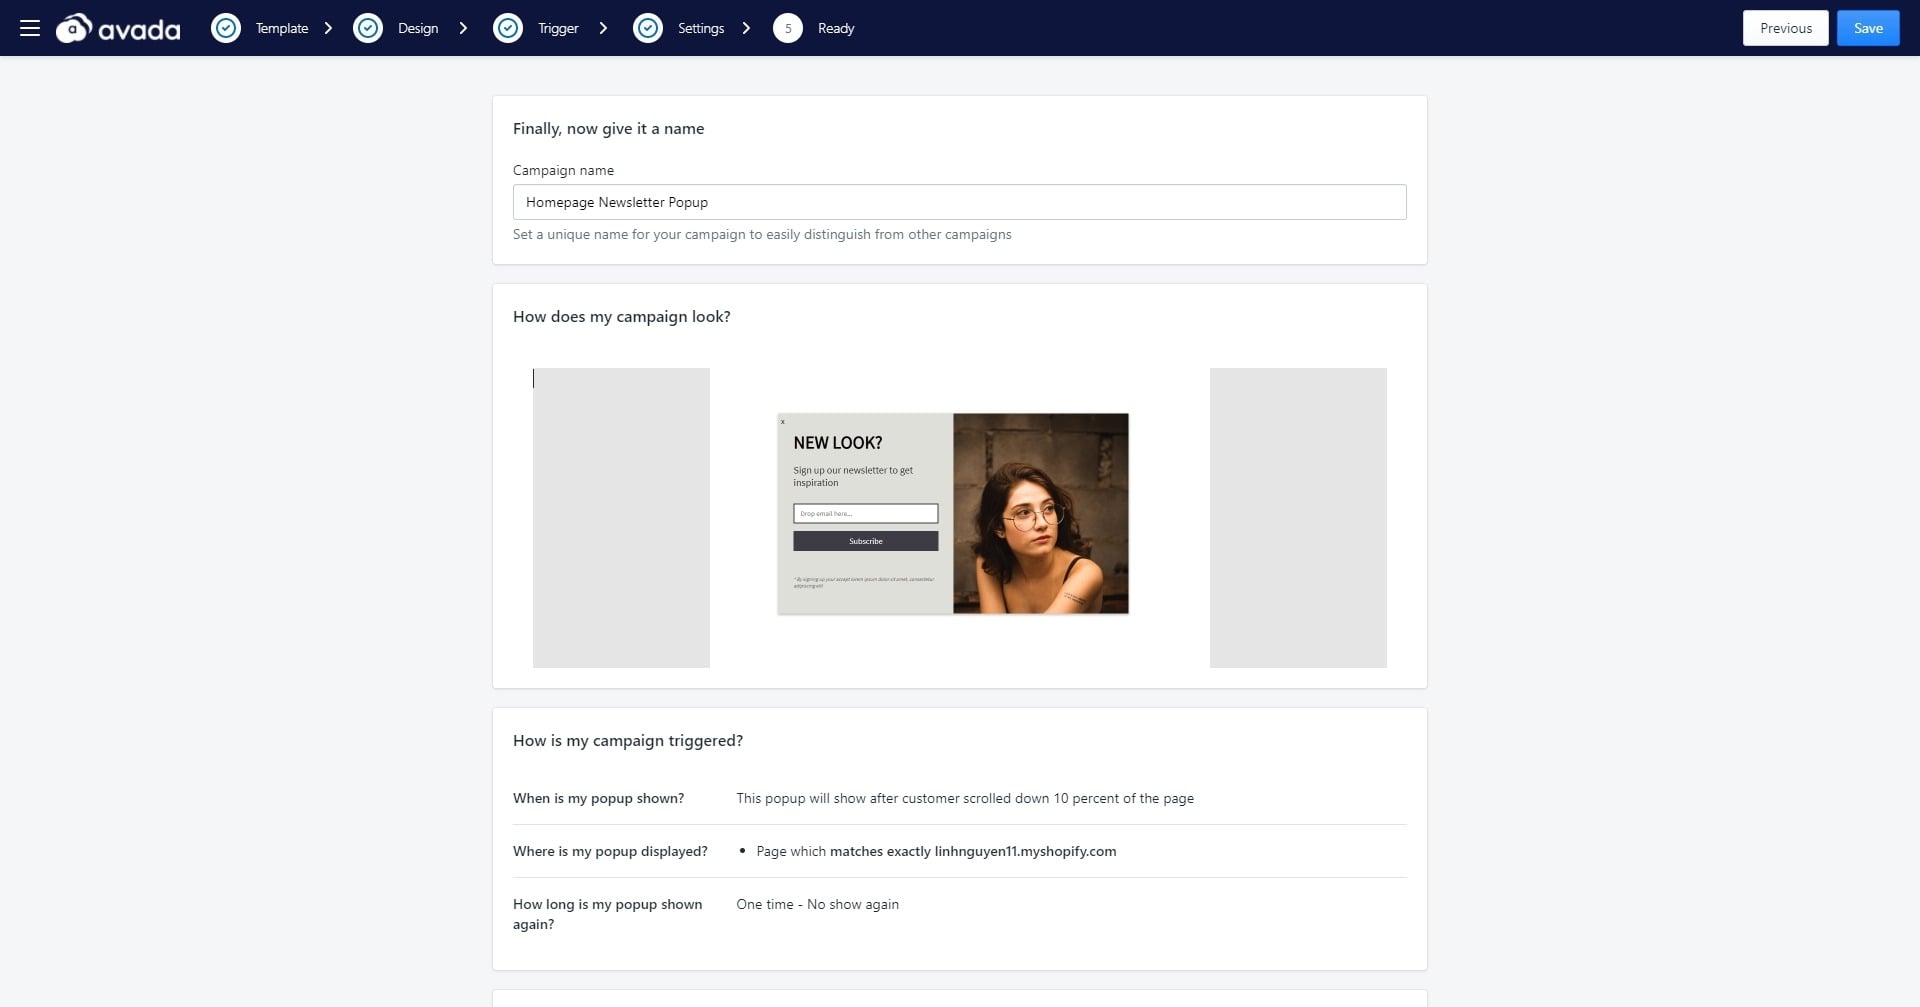
In the last step, you only need to give your popup campaign a name to finish. Type in the name, and click on ‘Save’ to publish your newsletter popup! The app will ask if you want to save the popup as a draft or go live; choose “Go live now” to finish.
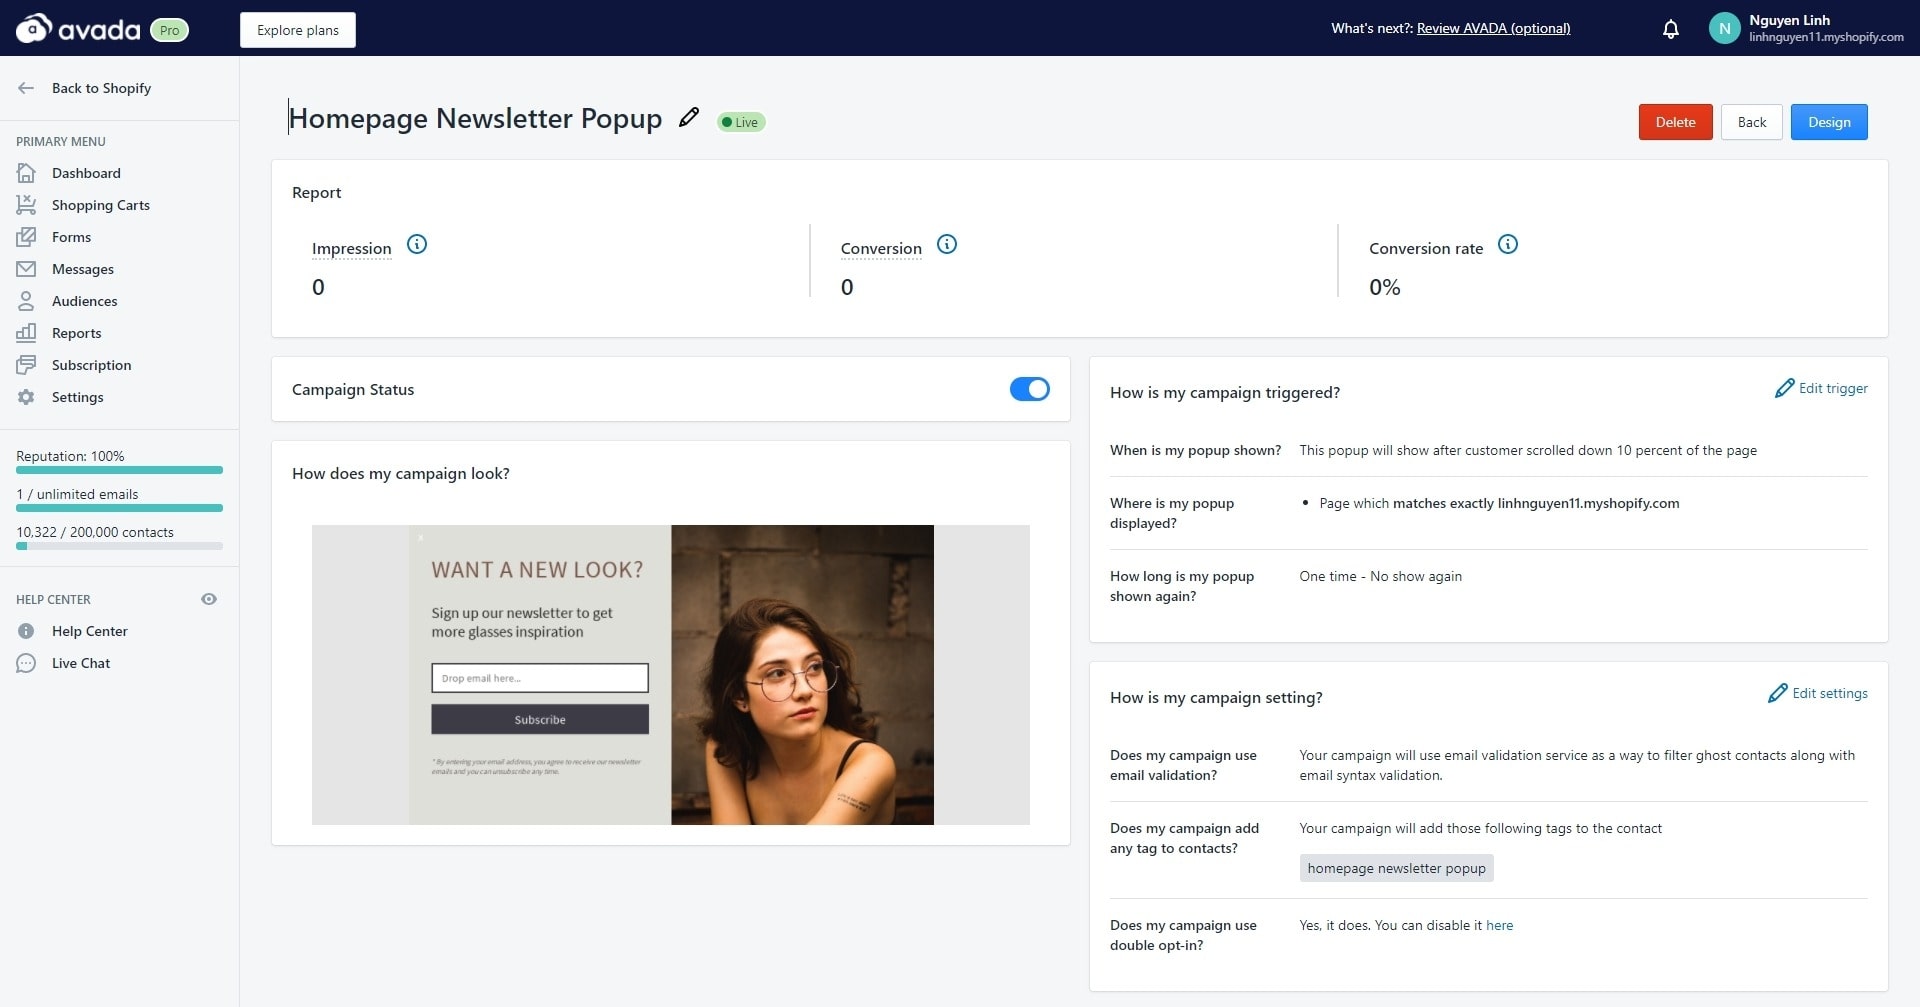
When your newsletter popup campaign is live, you can see the report on impressions, conversion, and conversion rates. Monitoring the popup’s stats will give you a clear idea of what to do next and optimize your eCommerce site’s popups.
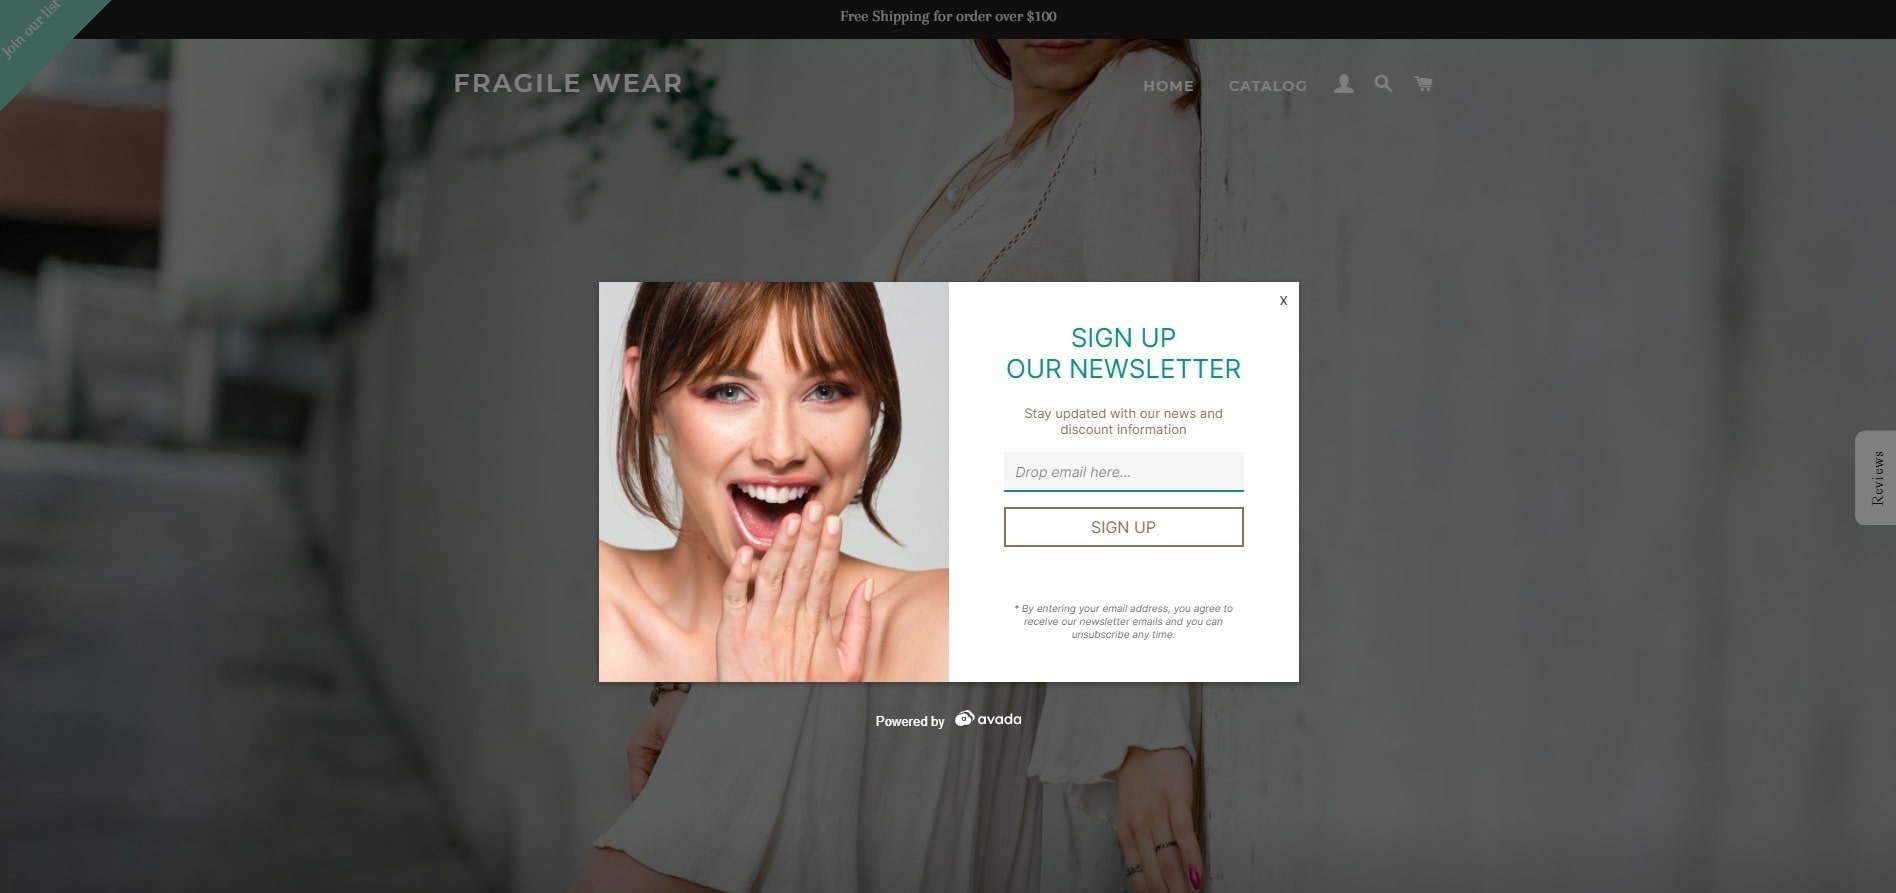
Here is the result of the newsletter popup on my Shopify store, you can see the background is darken and visitors can focus on giving information.
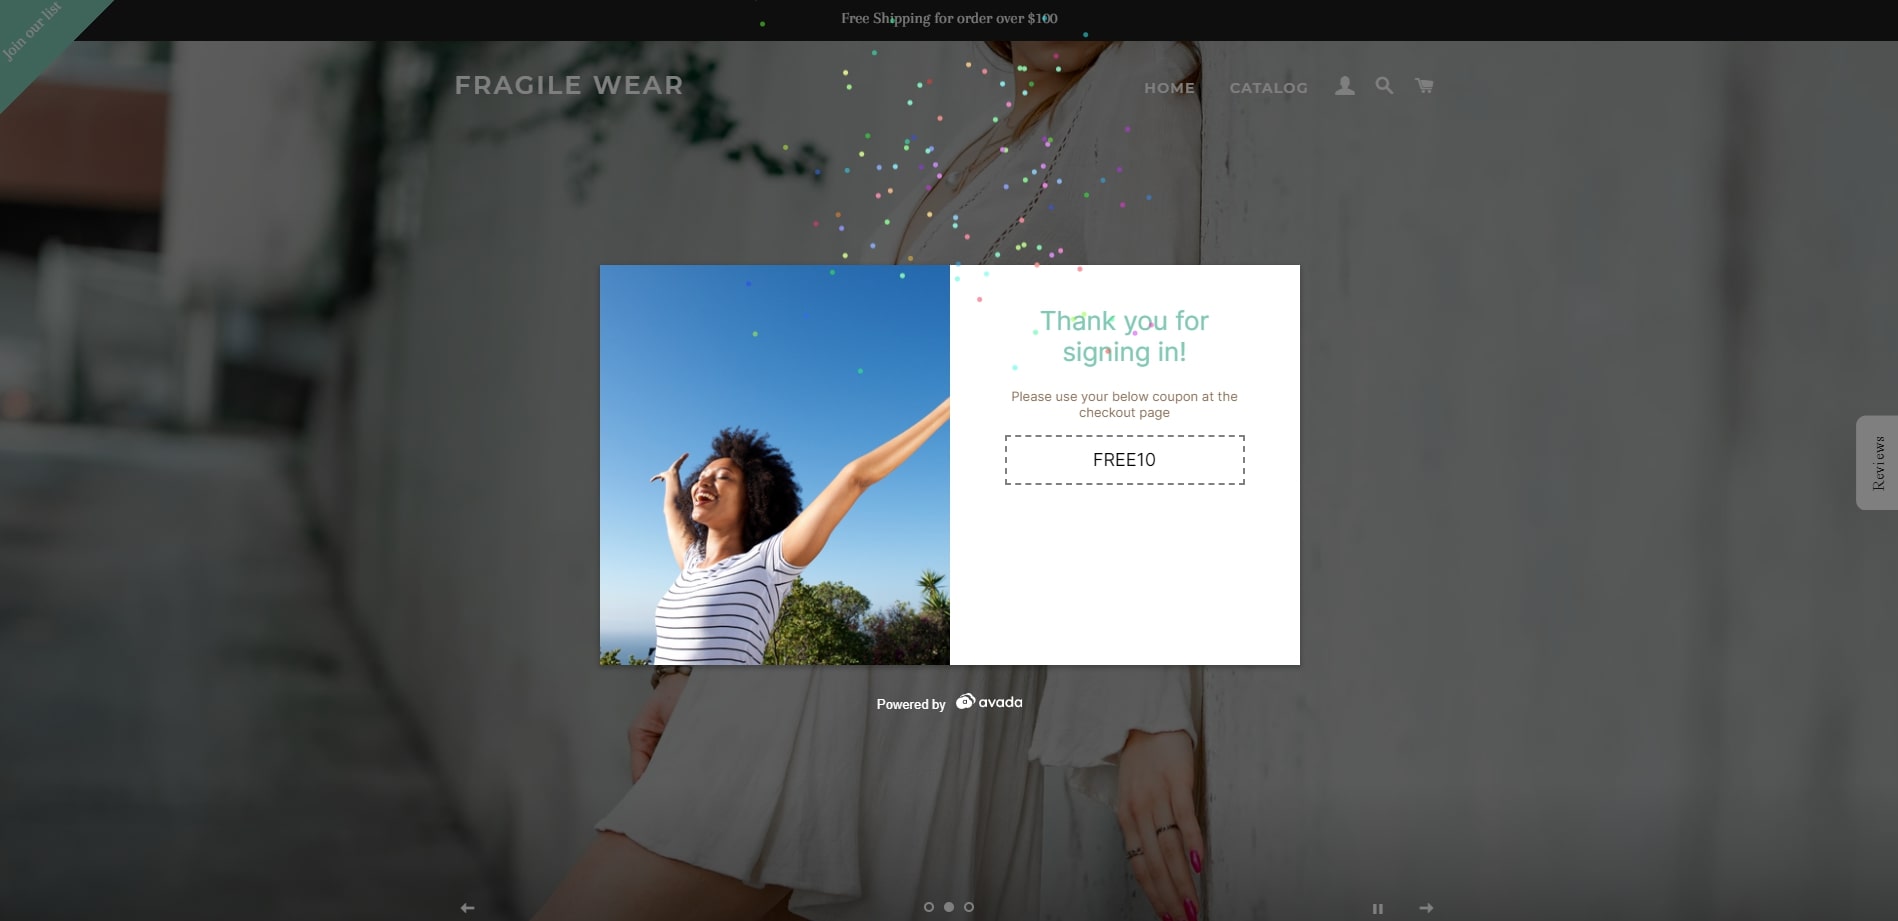
Here is the capture of when a visitor has successfully signed up for your newsletter and become a lead. With a bright image and confetti, you add a bit of excitement so the potential customer would expect your newsletter even more. The discount code is also clearly visible for users to use next time they purchase.
And that is it! Your newsletter popup campaign is good to start collecting email addresses from your visitors! In just four easy steps, you have finished setting up your newsletter popup, congratulations!
Just as a reminder, here are the key features of AVADA Email Marketing:
- Premade email templates: Beautiful emails with full customization so you can showcase your brand’s personality and connect with visitors in a personalized approach. You only need to drag and drop to edit the emails.
- Segmentation. Send emails to your target audience and divide your contact list into different groups based on criteria such as subscribe/unsubscribe, order status, product attributes, etc.
- Workflow split. Personalize the email experience by using workflow and control when, who, what to send your email series to.
- Newsletter Popup, Spin to Win. With the popup like in this article, you can collect emails easily, offer discounts and direct attention to other content.
- Reports. Keep track of your email marketing’s performance with informative reports. Many KPIs to view such as: sent, clicked, unsubscribed, opened, revenue, etc.
- Auto-sync data: Your Shopify data is synced into AVADA Email Marketing so you can have fresh and timely follow-ups to your customers.
Final words
Having read so far, now you have all the knowledge you need to set up newsletter popups for your Shopify store. It may take a while before your popup campaign starts seeing results, but you will be able to build up your email list gradually. For now, try setting up personalized newsletter popups and see their performance for your target audience.
Have you come up with an idea for your newsletter popup? Share your thoughts in the comment section, and if you need help installing AVADA Email Marketing, contact us at [email protected]. Thanks for reading!


New Posts

How To Set Up Google Analytics 4 For Your BigCommerce Store

