
How to Create a Complete Email Automation Workflow Combining Different Email Types
By Sam Nguyen

Drive 20-40% of your revenue with Avada
Are your email subscribers going with the flow and becoming new customers, or are they just simply existing there in your marketing database? If you haven’t set up any automated email workflows yet, the answer is probably the latter – which means your business’s missing out on many major opportunities to nurture and convert your existing list contacts.
For your information, according to Invespcro, marketing automation can result in an increase of 14.5% in sales productivity and a reduction of 12.2% in marketing overhead.
A welcome email campaign for new subscribers isn’t the only type of email marketing automation that you can use to make the most out of your contacts database. You can also reach out to contacts who are already your customers and even boost your communication with cart abandoners.
Email automation not only helps you convert leads into customers, but also helps you delight existing customers and result in greater product adoption, evangelism, upsells, and additional purchases. In the end, those are probably the goals of any eCommerce business.
In this article, let’s learn how to create a complete email automation workflow combining different email types so you can take the best care of your customers on auto-pilot. Of course, the email automation app you will use in this post is our advanced email marketing solution - AVADA Email Marketing.
Let’s get started!
What is email automation?
In essence,** email automation is about executing personalized, contextual email campaigns in an automatic way** rather than sending manually. In many cases, this practice involves delivering specific messages to groups of contacts that match specific criteria or user behaviors as a business plan.
Email marketing automation is necessary because it eliminates all small and time-consuming tasks for email marketers. Tasks such as sending generic messages, preparing email lists, or scheduling events manually. By using automation, marketers and companies can spend more time working on more productive projects or more significant ideas.
Email automation is most centered around generating the workflow, which is basically a blueprint of actions your automation software will take for you. The challenge here is implementing a repeatable process that can take all use cases into account.
With an app like AVADA Email Marketing, the workflow creation process is streamlined with premade templates and deep customization. We will take a look at how to do that in the next section.
How to create a complete email automation workflow?
To create your first email automation workflow, you will need to map out each step in your marketing automation platform. In this case, that is AVADA Email Marketing. Here are the steps that you need to follow in order to set up a simple email automation workflow.
Step 1: Decide on your target recipients
Personalization is crucial when it comes to email marketing, and if your automation workflow is set up effectively then you’ll easily send automated emails to the targeted segment of your customer database. It all comes down to the quality of the data you’ve collected from list contacts and their behavior with your emails or on your site.
So the first step is to know who you are sending automated emails to. An upsell campaign can be suitable for existing customers who have purchased some particular small products. For another email campaign, you may want to promote a new product to a specific type of customer who will most likely find it helpful.
Then, you want to translate the targets you identified into criteria that can work with your email marketing software. For the first example, you can set up a segment for customers with total spend being a bit low and see if your custom properties can identify that group. It can then select those who have purchased with the right amount of spending.
For the second example, you’d need to see if you have any specific criteria that can segment the group in your email list’s subscribers. It might be a property or field accounting for job title, buyer persona, or customer type. You can create criteria as specific as you wish with the data you have in the email marketing software.
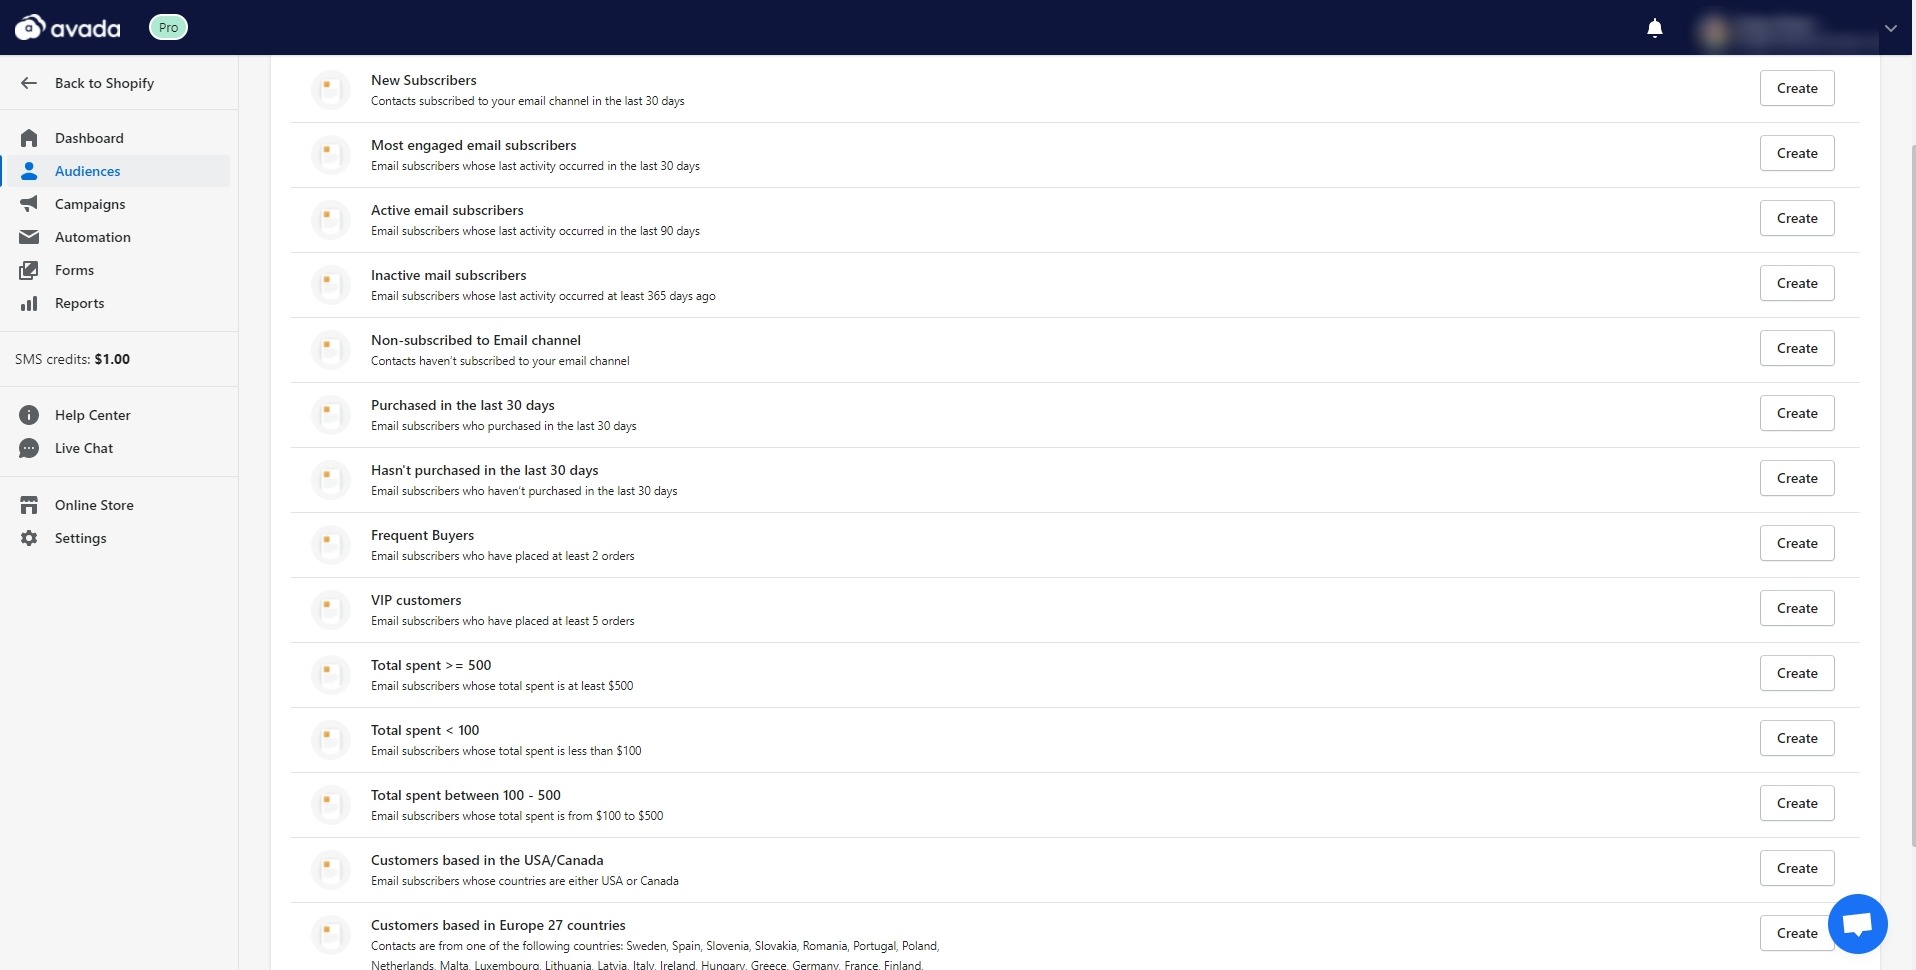
In AVADA Email Marketing, you can see that we already have many premade presets for segments. For example, there are segments for new subscribers, purchased in the last 30 days, frequent buyers, VIP customers, total spent more than $500, customers based in Europe, and more.

With the segments, you will easily create groups for your subscribers and go to the next step of creating an email automation workflow. When you select “create” on any premade presets, you will see it available in the segment tab and can immediately be used for an email campaign.
In the picture above, I created a segment for new subscribers and another segment for a new email campaign aiming to send promotions for a new shoe line.
Step 2: Determine email automation goal
Having a target recipient is only a small part of your email marketing strategy, so ensure you know why you’re sending emails to these individuals. Do you want them to purchase something? Learn something new? Or do something particular?
Once you know your automation goal, you can figure out the messages you should create to move them from where they’re at to the place you want them to be.
Not only that, you also have to plan for actions to take when your email automation succeeds.
For example, imagine you send a 3-email series to get prospective customers to purchase their abandoned carts. Prospect A converts after the first email with a coupon code. If Prospect A still receives emails telling them to buy what they’ve already purchased, they’ll get frustrated. With AVADA Email Marketing, if you define your success goal, the app will unenroll any contacts that have met the goal from the workflow.
If your email marketing software doesn’t have this feature or you do not want to use it, you will have to consider this case when building your email automation workflow’s logic.
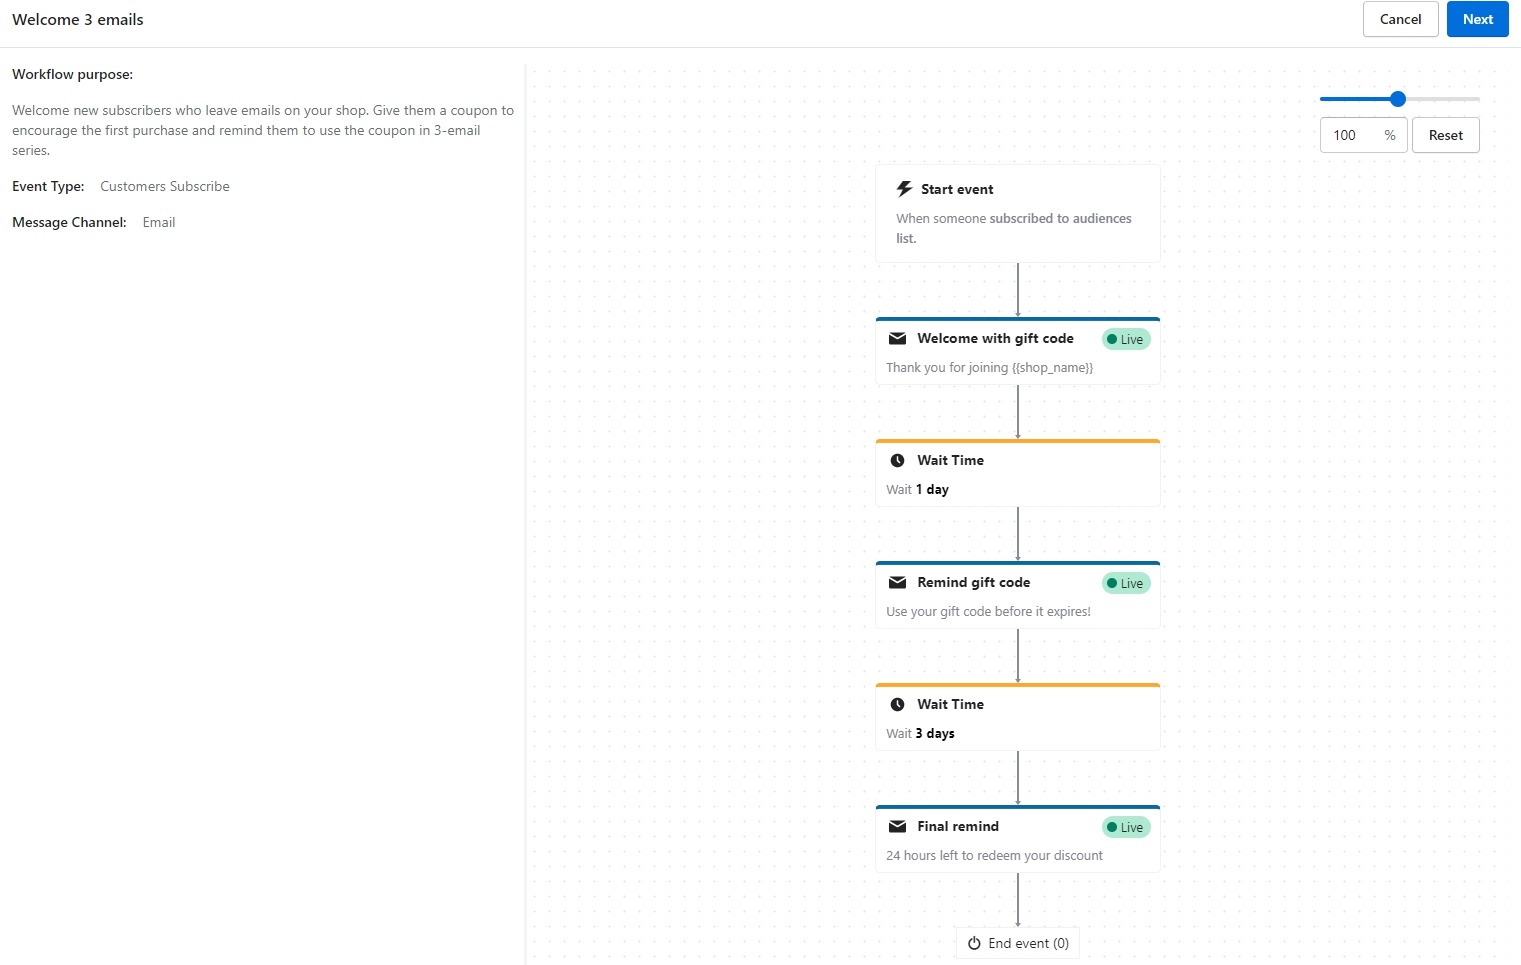
The goal of an email automation workflow should be clear, simple, and measurable. Fortunately, our app has events with specific email marketing goals in mind so you won’t have to worry too much about that. For example, an order confirmation email workflow aims to let the customer know about the details of their order and shipping status.
Step 3: Think of the touchpoints you need
If you are creating an email automation workflow from scratch, you should sketch out the touchpoints or steps of your automation workflow so you know what you are taking customers through. You should also create the necessary emails beforehand and save them so you can easily pull them to the workflow while building it.
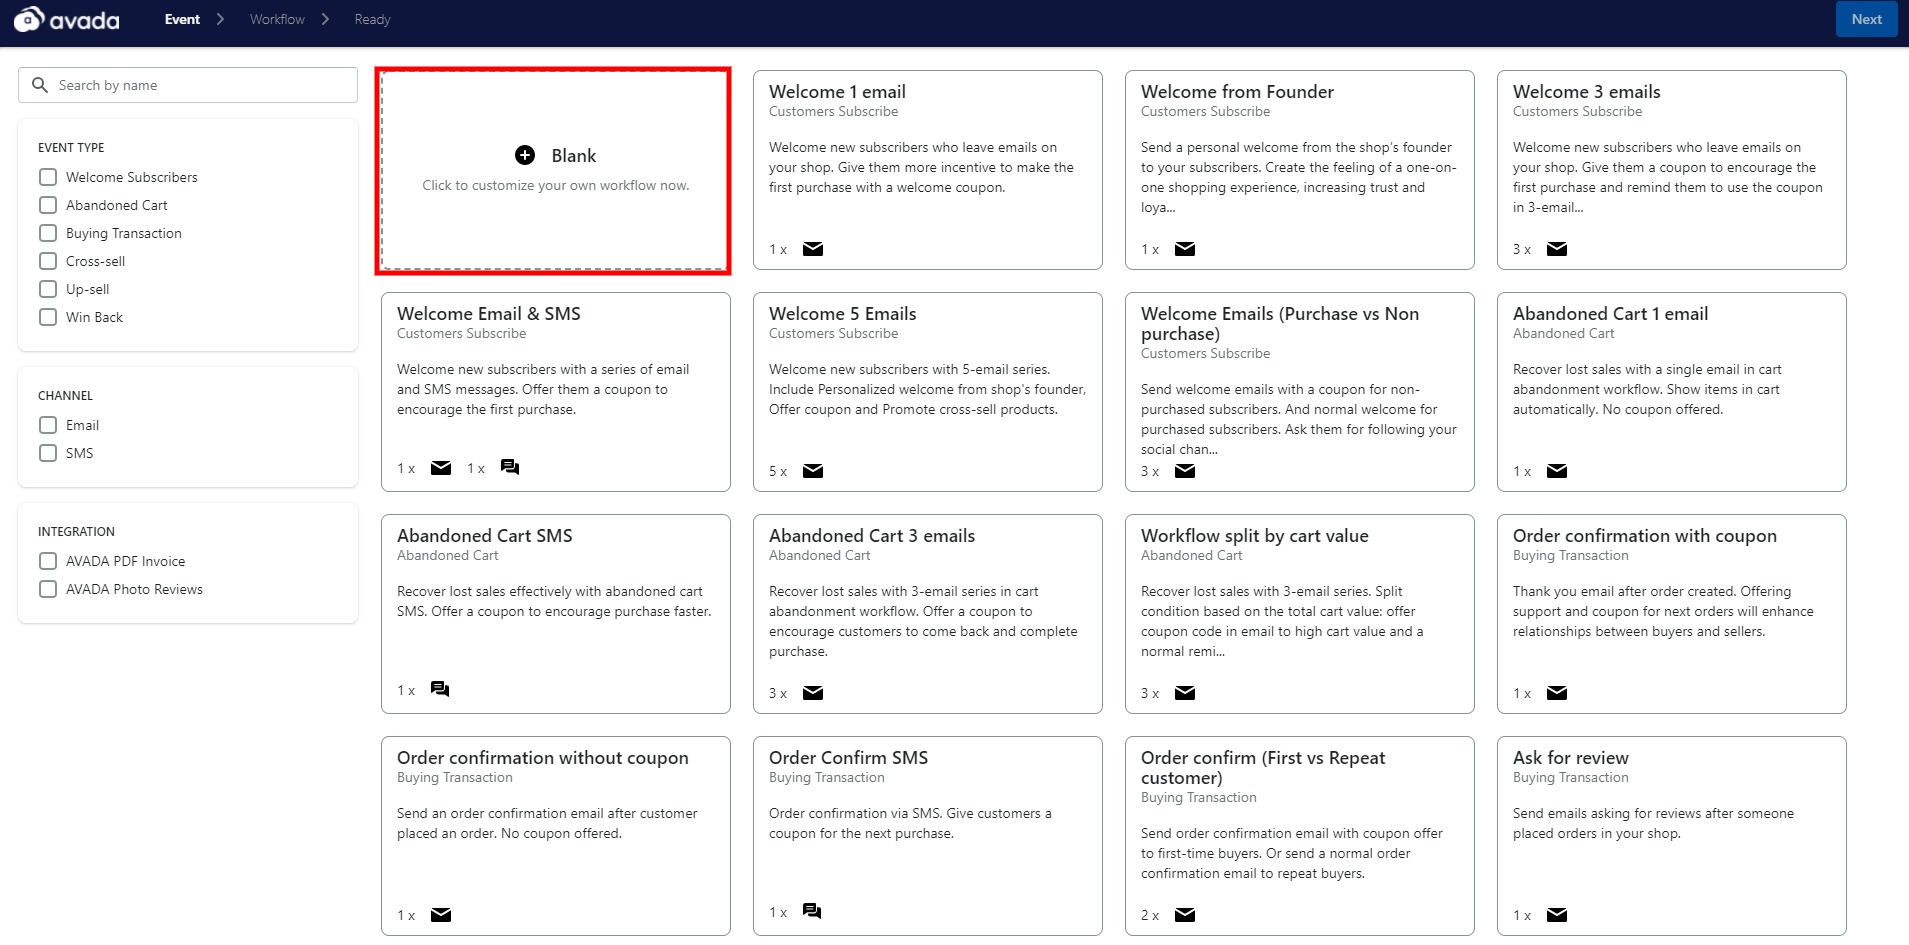
AVADA Email Marketing already has many workflows for you to explore with premade touchpoints. But if you are feeling creative, feel free to create a blank canvas and set up your touchpoints for easy viewing.
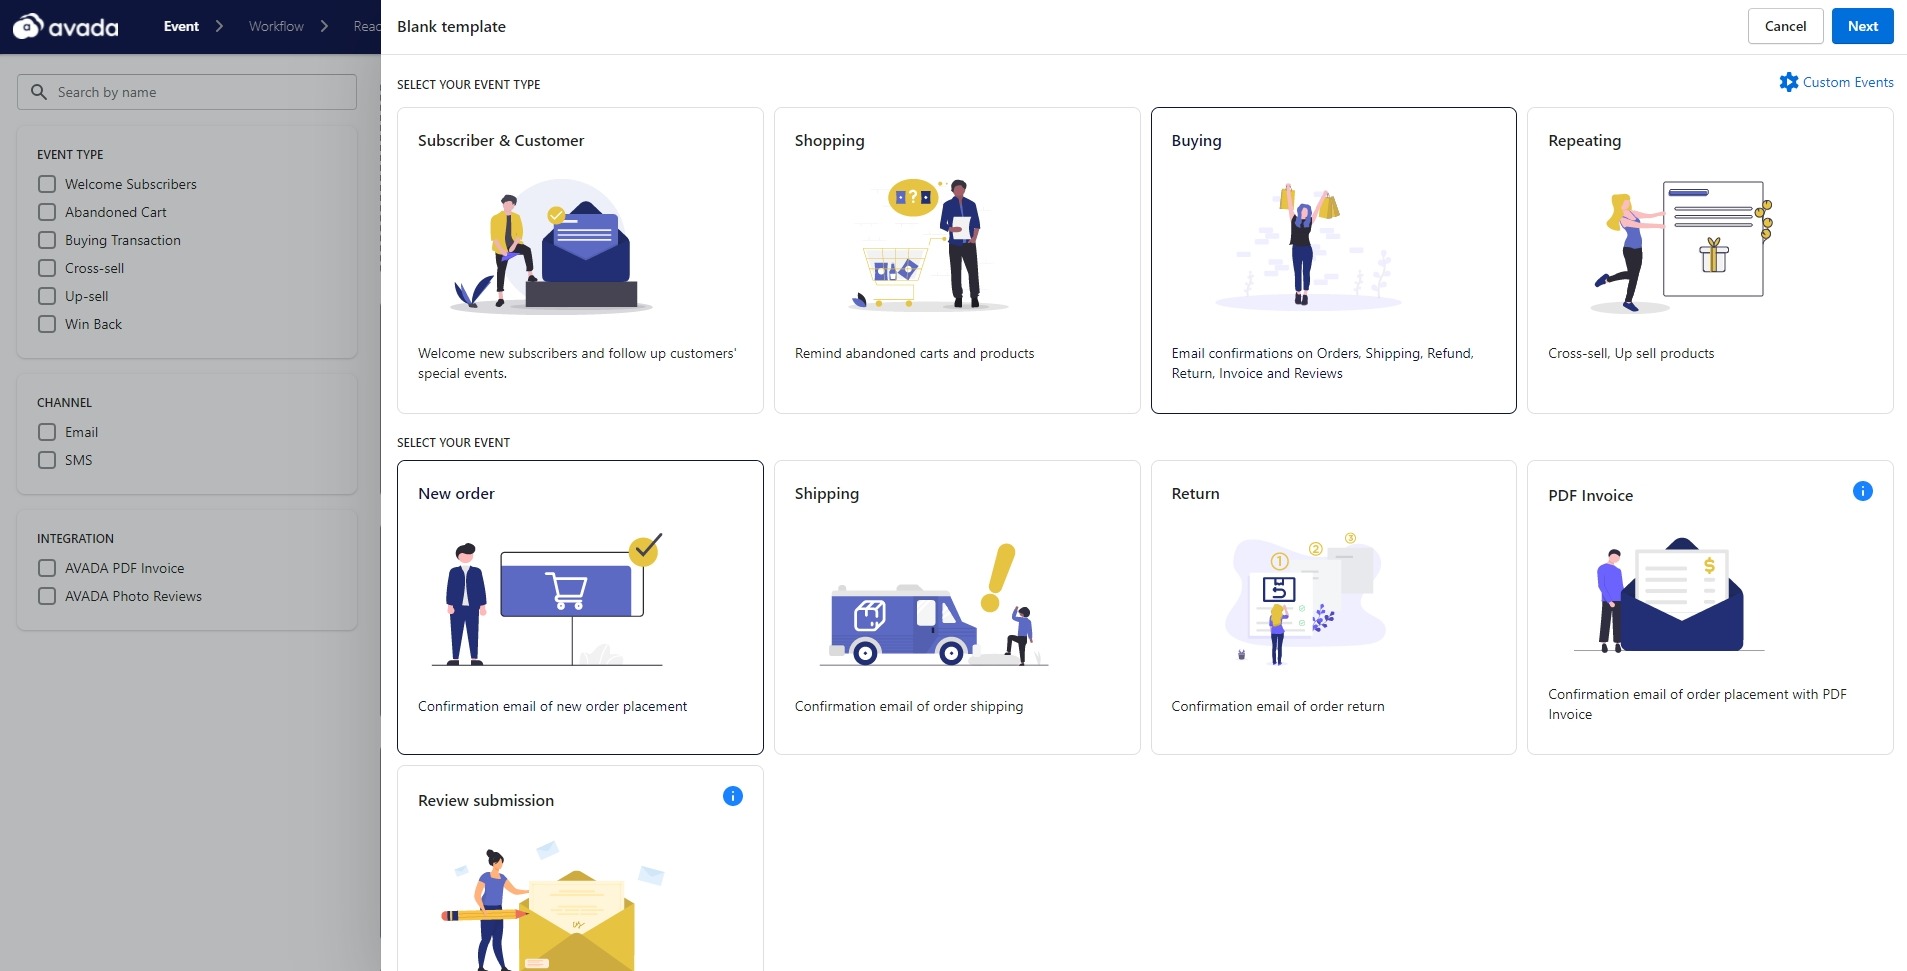
You don’t have to start creating an email automation workflow from nothing, though. When you click on creating a blank template, there are already the most common events for an eCommerce store to choose from. Then, you can start creating email workflows with a certain scenario in mind.
Step 4: Set enrollment criteria to start the event
Enrollment criteria are the qualities that must be met for a list contact to enter into the email automation workflow. You’ll need to be familiar with the types of data your email marketing software has (properties or fields) and can trust the accuracy of that data to start.
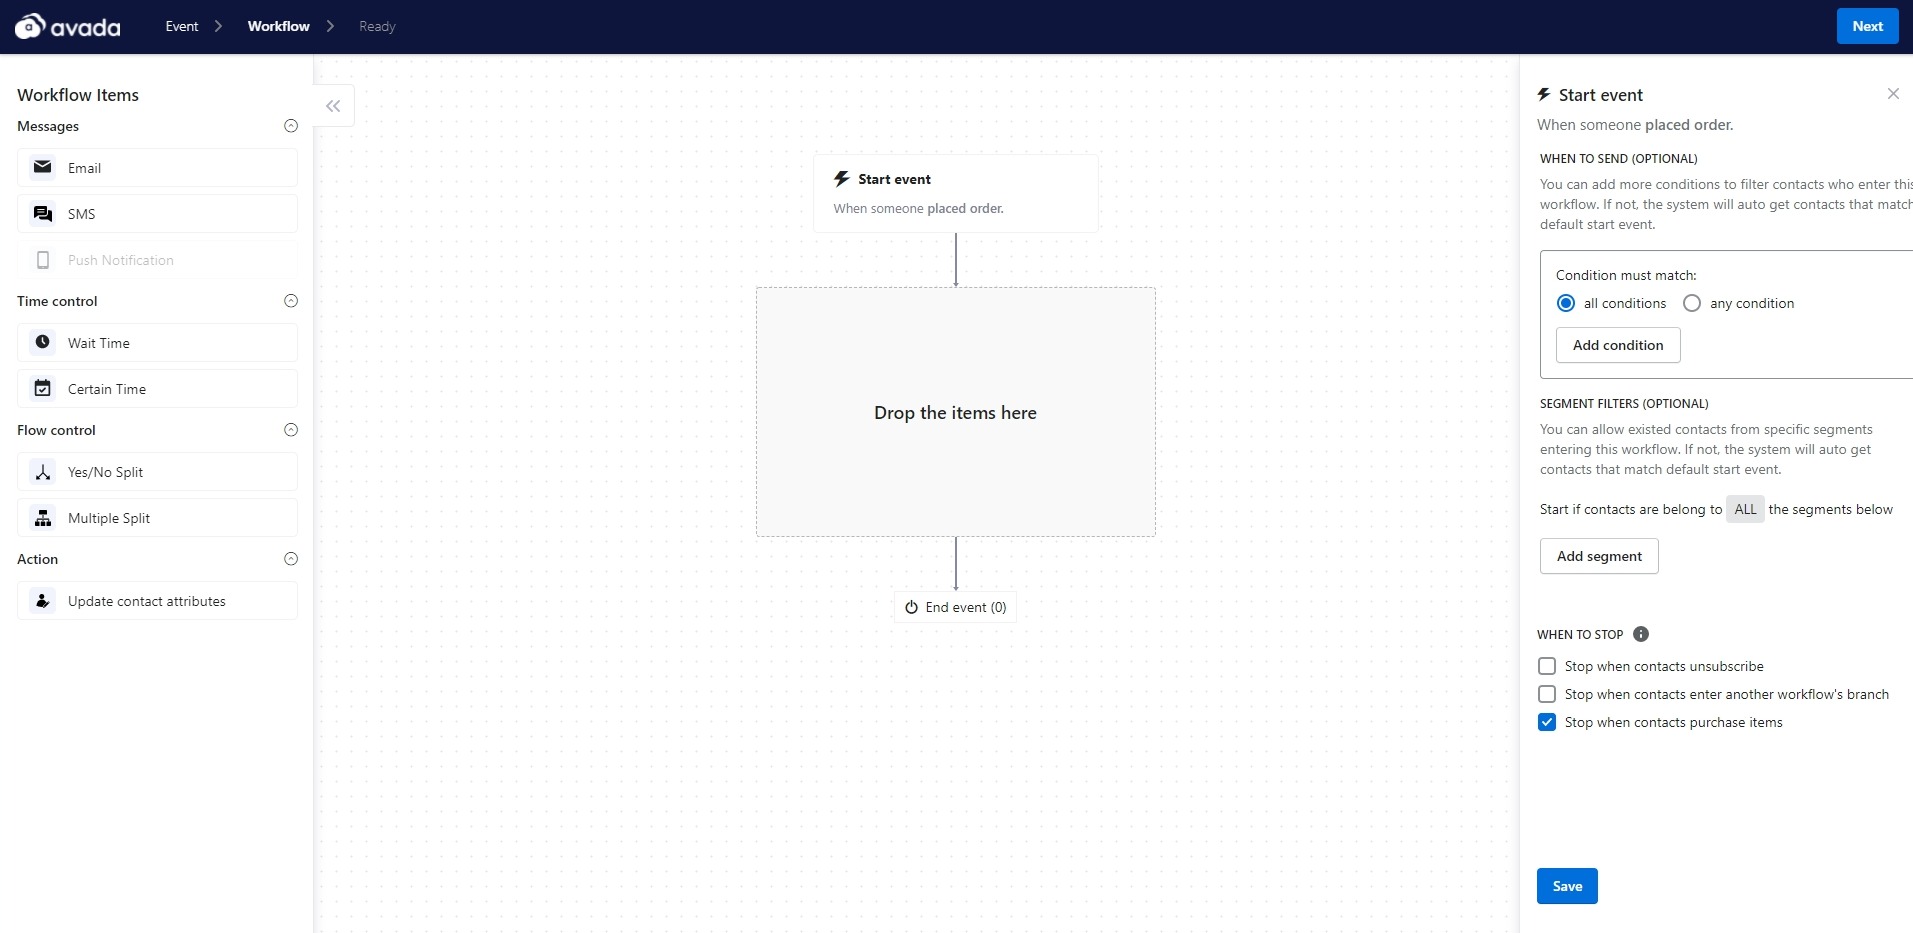
With AVADA Email Marketing, this step starts at the beginning of an event to trigger the workflow. You can add more conditions to filter list contacts who can enter the workflow. If not, the app system will automatically get contacts that match the default condition to start the event.
Also, you can allow existing contacts from specific segments to enter the automation workflow. If you have created a segment that fits this workflow, you can add it. If not, the system will automatically get contacts that match the default start event.
Step 5: Identify the actions required to take
If you were manually sending emails to these contacts, what would the strategy be? Automation actions are the examples below and more:
-
Wait time
-
Certain time
-
Email sends
-
Multiple splits
-
Yes/no splits
-
Updates on contact attributes
You’ll need to map out your email automation workflow based on the sequence of events combining “actions” that your email marketing app understands and specify when the actions should be taken.
For each required action, you would need a certain type of email to match the action. AVADA Email Marketing has multiple templates for email types that suit the most necessary needs of an eCommerce store, such as:
-
Subscriber’s welcome email
-
Abandoned cart email
-
Buying transactional emails (Order confirmation, Ask for review, Shipping, Return/Refund)
-
Up-sell
-
Cross-sell
-
Win back
-
Invoice
With these types of email, your email automation workflow can be completed quickly knowing what it needs and which type of message to send.
Step 6: Create necessary assets
By this point, you should know how many emails in the workflows you want to send and the general messages the recipients should receive. Before beginning creating the email automation workflow, you should create all assets and load them into the AVADA email marketing software.
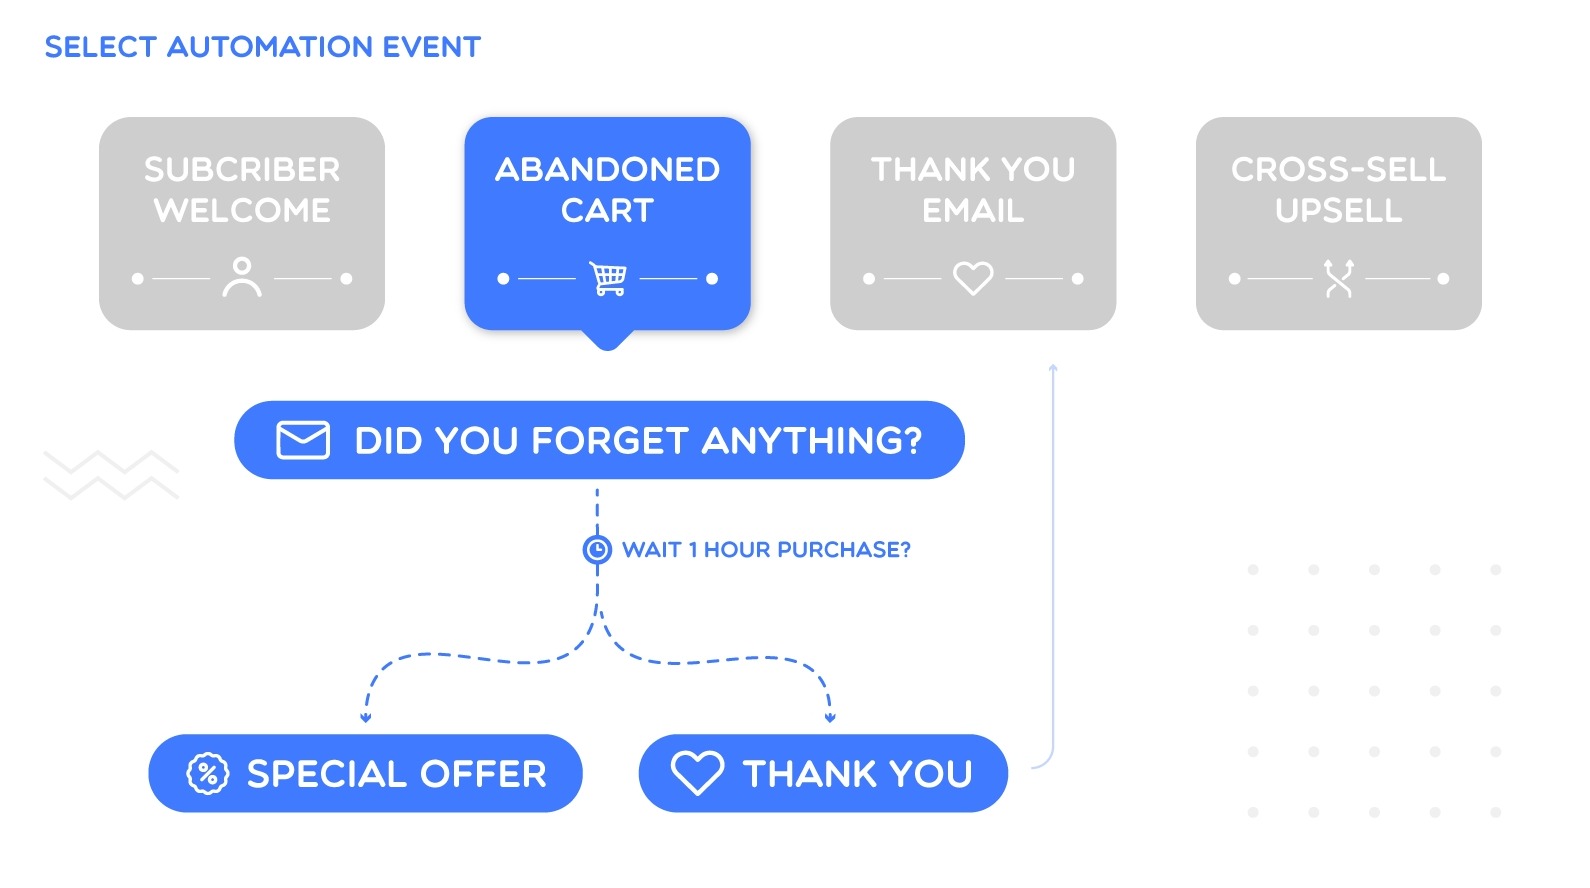
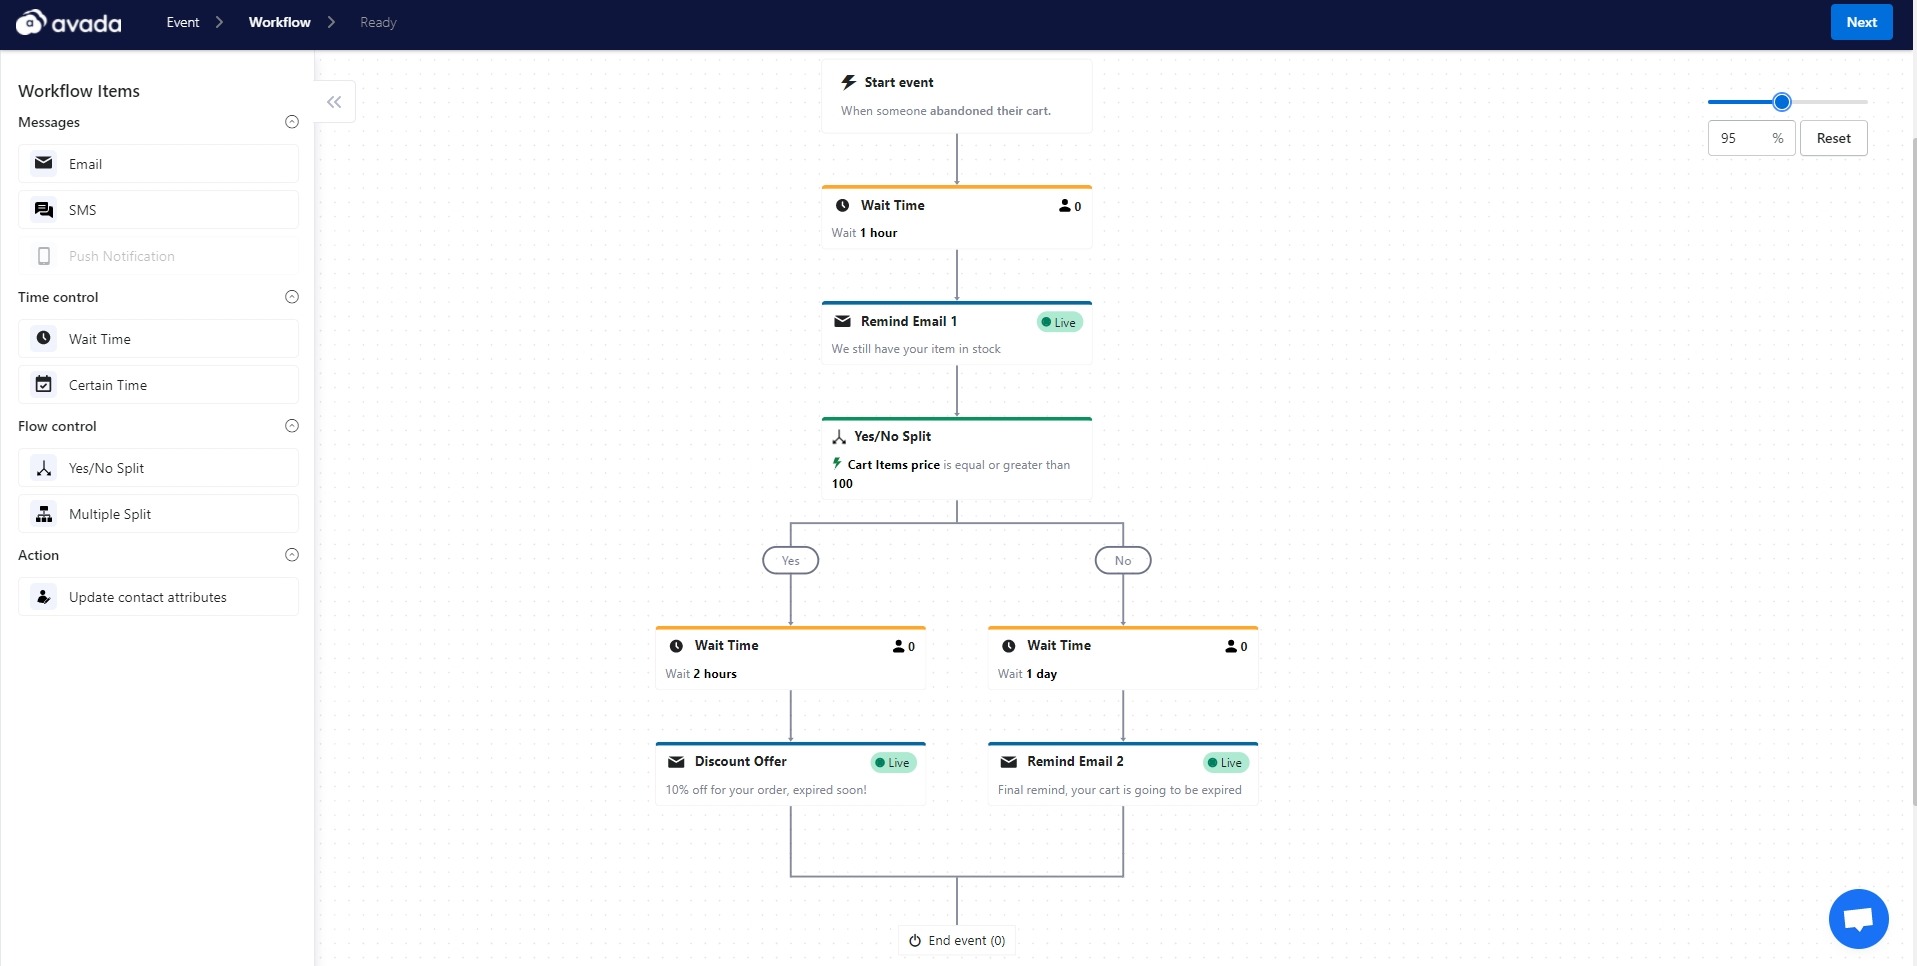
For example, let’s take a look at the email automation workflow for abandoned cart email that I created with AVADA Email Marketing.
In this automation workflow, I needed to create a reminder email, a yes/no split, then 2 versions of emails to respond to the recipient’s answers, as well as the ideal wait time between each email. Because I had two scenarios for the recipients’ answers, I needed to have the necessary logic for the following emails too.
If the customer’s cart is worth more than $100, then I will send them a 10% coupon to encourage them to purchase the cart. If their cart’s worth is less than $100, then I will just simply remind them that the cart is going to expire soon and they may lose the items they saved in the cart.
With this logic, you can easily create the necessary assets for your email automation workflow and know what messages you need to deliver and the suitable situations.
Step 7: Implement the workflow with email assets
Automation emails work in a literal way, so your email automation workflow works as a blueprint to outline each action in order, no matter how small those actions seem.
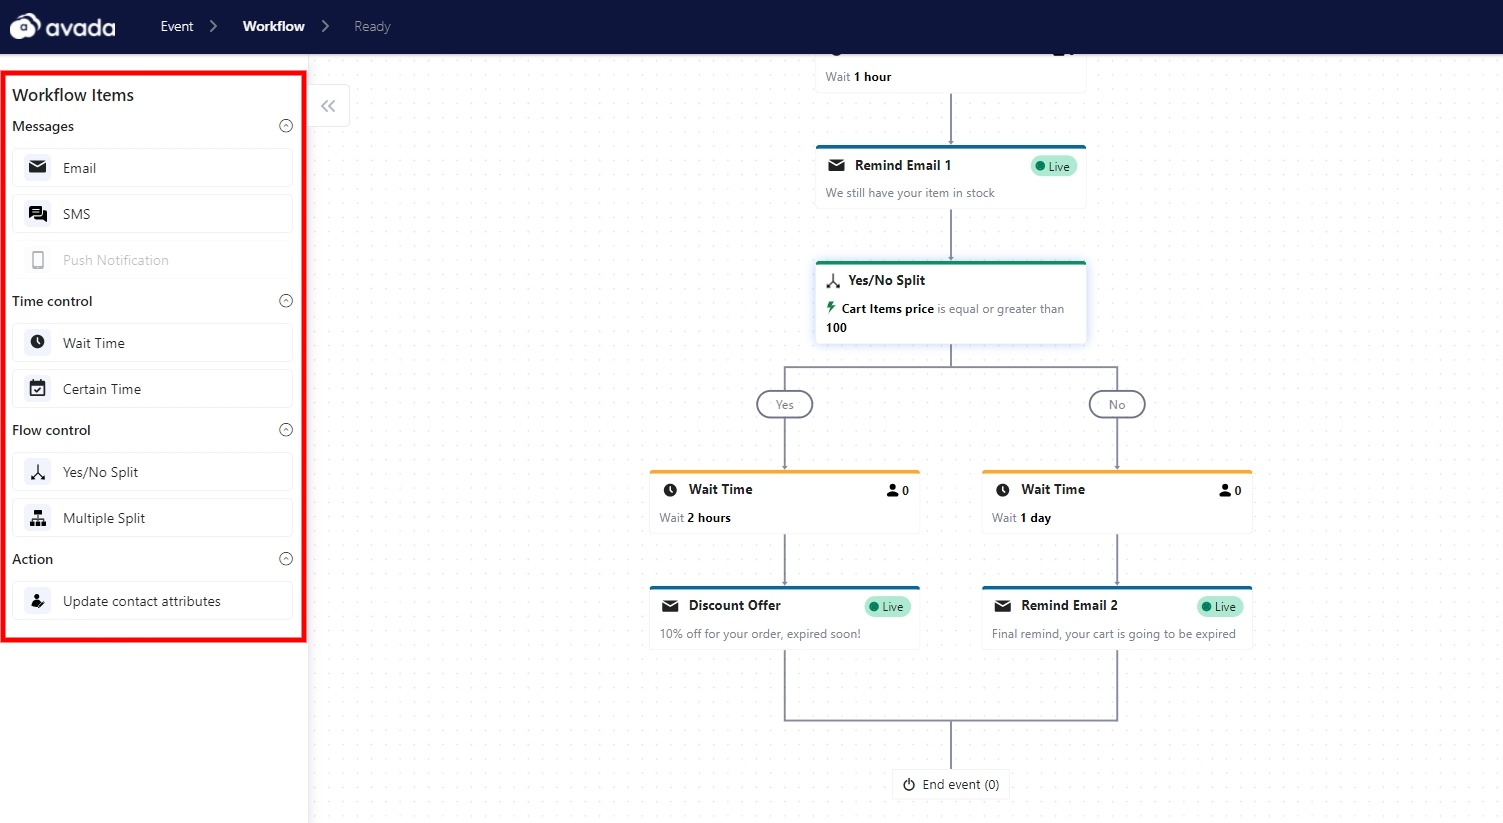
In AVADA Marketing Automation, you can specify which actions for the workflow to take using the “Workflow Items” window in the left side of the workflow tab. These items let you control how the workflow works with messages, time, flow, and action. The items that you have to implement into the email automation workflow are:
-
Email and SMSs: You can combine these two in a workflow to reach customers on two channels and optimize the message’s reach.
-
Wait time and Certain time: You can control the email’s sending time after a certain time period or at a specific timing (date and hour).
-
Yes/No Split and Multiple Split: You can choose your workflow to have two or more situations based on the recipient’s response.
-
Update contact attributes: Use this to update the assigned attribute of your contacts during or after the workflow happens.
After adding the assets and implementing the workflow items, your email automation workflow is ready to take the next step.
Step 8: Do a test of your workflow
There are some things you should consider implementing into your email automation workflow publishing process:
-
Considering the workflow chart and suitable use cases
-
Looking through the list of enrolled contacts for errors
-
Checking the send settings
-
Checking that the number of subscribers enrolled matches what you’d expect
Also, to test your email design, you can send a test email for each asset of your workflow. Your team or high-value customers are a perfect source of feedback for you to improve your design, message, and workflow in general.
Step 9: Set the email automation workflow live
Once you’re happy with the email automation workflow, ready to set it live.
Mistakes can happen, so you need to monitor the performance. Don’t be afraid to make some adjustments as necessary to resolve issues or improve the result.
And that’s just the beginning of an email automation workflow. Workflows can also help you automate many other actions besides email, such as updating a contact’s lifecycle stage, setting or deleting a contact property value, adding/removing a contact from a specific list, and other administrative tasks that can result in a more targeted, effective marketing strategy to your customers and coworkers.
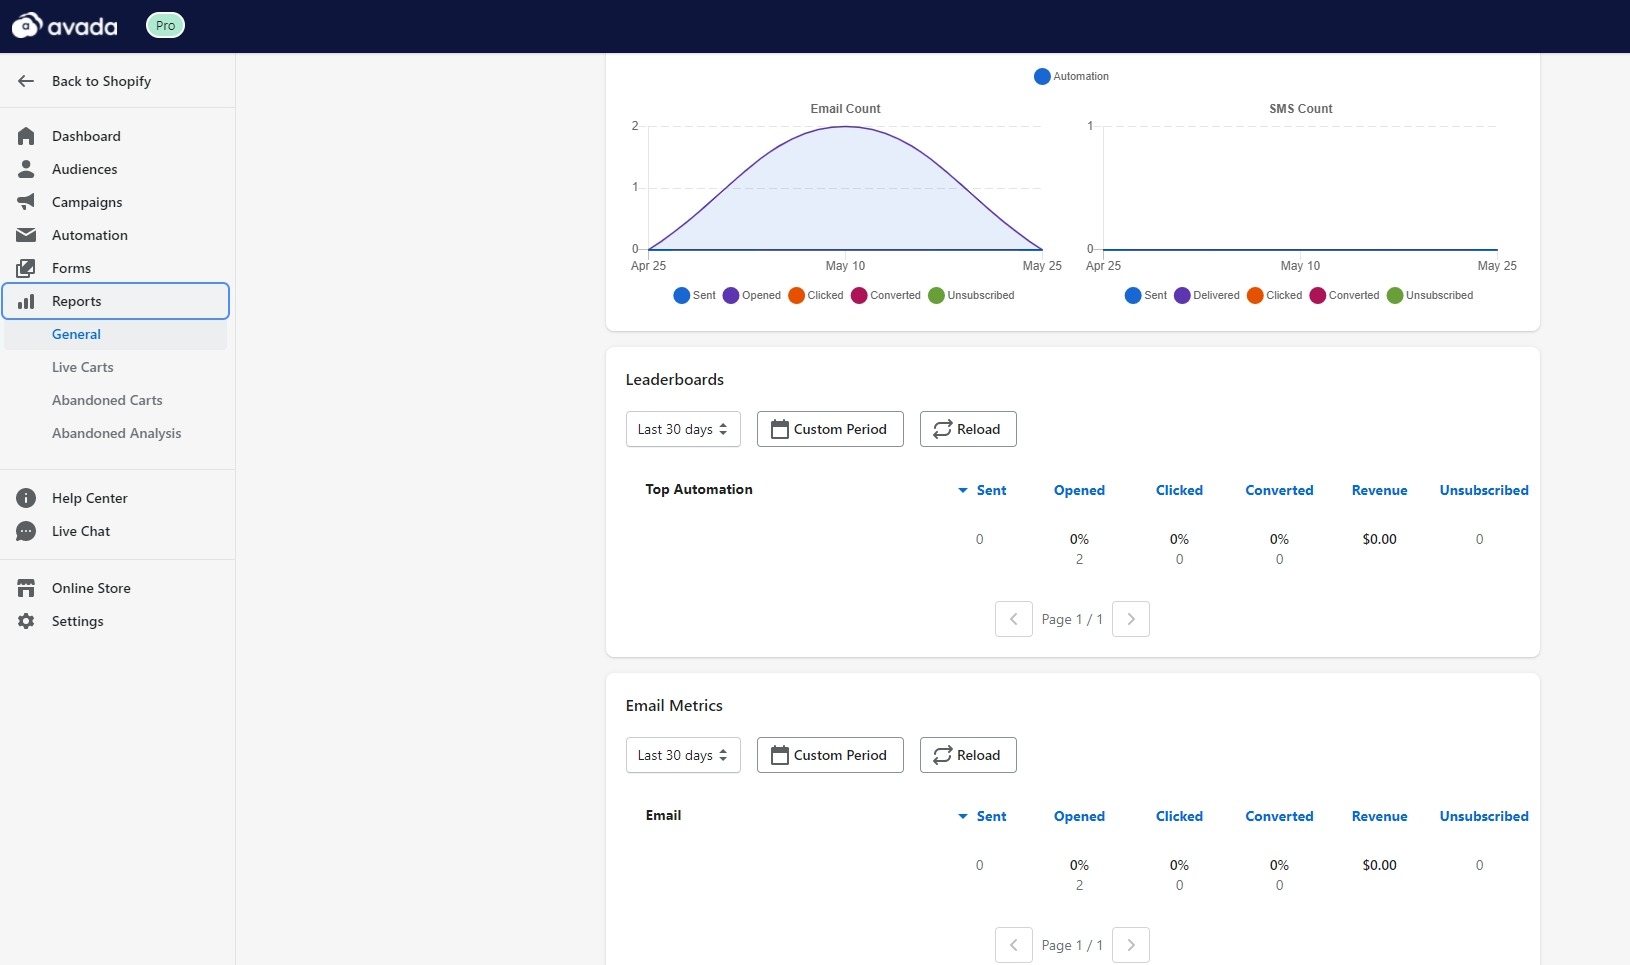
In AVADA Email Marketing, you can see the performance of your email campaigns and workflows in a clear way, presented by the reports. Not only that, you can also compare the results of all automation workflows and quickly view the most important metrics to act on the result.
Final words
With ideal email automation workflows, you can trigger emails on the go and connect with customers right at the time they need. Using an email marketing system like AVADA Marketing Automation, you can easily set the automation workflows to send campaigns, update subscribers’ statuses, and review performance in one place.
If you still don’t have many ideas for an email automation workflow, check out our article on 10 Proven Email Automation Workflows That Highly Convert. But, better yet, take a try at the app today since it is free to start using. Our support team is always ready to help, so feel free to give AVADA Email Marketing a go!


New Posts


